Cirkit Designer Logo
Cirkit Designer
Your all-in-one circuit design IDE
Home / 
Component Documentation

How to Use MEAN WELL HDR-60-5: Examples, Pinouts, and Specs

Image of MEAN WELL HDR-60-5
Cirkit Designer LogoDesign with MEAN WELL HDR-60-5 in Cirkit Designer

Introduction

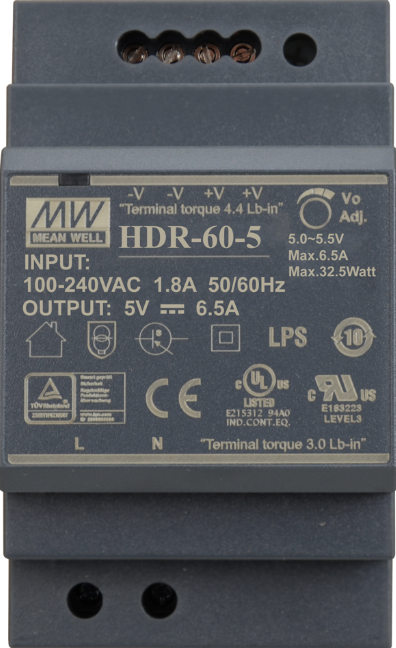
The MEAN WELL HDR-60-5 is a 60W, 5V DC-DC power supply designed for a wide range of applications. Its compact and efficient design makes it ideal for use in industrial automation, LED lighting systems, and other low-voltage DC applications. The HDR-60-5 is part of MEAN WELL's HDR series, which is known for its reliability, high efficiency, and compliance with international safety standards.

Explore Projects Built with MEAN WELL HDR-60-5

Use Cirkit Designer to design, explore, and prototype these projects online. Some projects support real-time simulation. Click "Open Project" to start designing instantly!
Multi-Channel Load Cell Measurement System with JYS60 Amplifiers and DAQ Integration
Image of Load Cell Circuit: A project utilizing MEAN WELL HDR-60-5 in a practical application
This is a multi-channel load cell measurement system with several JYS60 amplifiers connected to load cells for weight or force sensing. The amplified signals are directed to a DAQ system for data capture, and power is supplied through a barrel jack. Grounding is achieved via an AdaGator Side Black component.
Cirkit Designer LogoOpen Project in Cirkit Designer
ESP32C3 Supermini-Based Smart Environment Monitor and Lighting Control System
Image of Bedside RGB and Lamp: A project utilizing MEAN WELL HDR-60-5 in a practical application
This is a smart control system featuring an ESP32C3 Supermini microcontroller for interfacing with various sensors and actuators. It includes temperature and humidity sensing, RGB LED strip control, user input via a pushbutton and rotary encoder, and AC power control through a two-channel relay. The system is powered by an AC source converted to DC by the HLK-PM12 module.
Cirkit Designer LogoOpen Project in Cirkit Designer
USB-Powered DC Gear Motor with LED Indicator
Image of Hand Crank mobile charger : A project utilizing MEAN WELL HDR-60-5 in a practical application
This circuit appears to be a power supply unit with a bridge rectifier connected to a DC gear motor, indicating it is designed to convert AC to DC power for the motor. An electrolytic capacitor is used for smoothing the DC output, and a 7805 voltage regulator is included to provide a stable 5V output. Additionally, there is an LED with a series resistor, likely serving as a power indicator light.
Cirkit Designer LogoOpen Project in Cirkit Designer
Arduino Mega 2560-Based Smart Water Quality Monitoring System with Wi-Fi Connectivity
Image of A: A project utilizing MEAN WELL HDR-60-5 in a practical application
This circuit is a water quality monitoring system that uses an Arduino Mega 2560 to interface with various sensors including a pH meter, temperature sensor, TDS sensor, turbidity sensor, and water flow meter. It also includes a WiFi module for connectivity, an LCD for display, and a solenoid valve and water pump for controlling water flow, with a UV-C tube for sterilization.
Cirkit Designer LogoOpen Project in Cirkit Designer

Explore Projects Built with MEAN WELL HDR-60-5

Use Cirkit Designer to design, explore, and prototype these projects online. Some projects support real-time simulation. Click "Open Project" to start designing instantly!
Image of Load Cell Circuit: A project utilizing MEAN WELL HDR-60-5 in a practical application
Multi-Channel Load Cell Measurement System with JYS60 Amplifiers and DAQ Integration
This is a multi-channel load cell measurement system with several JYS60 amplifiers connected to load cells for weight or force sensing. The amplified signals are directed to a DAQ system for data capture, and power is supplied through a barrel jack. Grounding is achieved via an AdaGator Side Black component.
Cirkit Designer LogoOpen Project in Cirkit Designer
Image of Bedside RGB and Lamp: A project utilizing MEAN WELL HDR-60-5 in a practical application
ESP32C3 Supermini-Based Smart Environment Monitor and Lighting Control System
This is a smart control system featuring an ESP32C3 Supermini microcontroller for interfacing with various sensors and actuators. It includes temperature and humidity sensing, RGB LED strip control, user input via a pushbutton and rotary encoder, and AC power control through a two-channel relay. The system is powered by an AC source converted to DC by the HLK-PM12 module.
Cirkit Designer LogoOpen Project in Cirkit Designer
Image of Hand Crank mobile charger : A project utilizing MEAN WELL HDR-60-5 in a practical application
USB-Powered DC Gear Motor with LED Indicator
This circuit appears to be a power supply unit with a bridge rectifier connected to a DC gear motor, indicating it is designed to convert AC to DC power for the motor. An electrolytic capacitor is used for smoothing the DC output, and a 7805 voltage regulator is included to provide a stable 5V output. Additionally, there is an LED with a series resistor, likely serving as a power indicator light.
Cirkit Designer LogoOpen Project in Cirkit Designer
Image of A: A project utilizing MEAN WELL HDR-60-5 in a practical application
Arduino Mega 2560-Based Smart Water Quality Monitoring System with Wi-Fi Connectivity
This circuit is a water quality monitoring system that uses an Arduino Mega 2560 to interface with various sensors including a pH meter, temperature sensor, TDS sensor, turbidity sensor, and water flow meter. It also includes a WiFi module for connectivity, an LCD for display, and a solenoid valve and water pump for controlling water flow, with a UV-C tube for sterilization.
Cirkit Designer LogoOpen Project in Cirkit Designer

Common Applications

  • LED lighting systems
  • Industrial automation equipment
  • Home automation and smart devices
  • Security systems
  • Communication devices
  • General-purpose low-voltage DC power supply

Technical Specifications

The following table outlines the key technical specifications of the MEAN WELL HDR-60-5:

Parameter Value
Input Voltage Range 85-264 VAC / 120-370 VDC
Output Voltage 5V DC
Output Current 10A
Output Power 60W
Efficiency Up to 87%
Ripple and Noise ≤ 80mVp-p
Operating Temperature -30°C to +70°C
Dimensions 35mm (W) x 90mm (H) x 54.5mm (D)
Weight 0.2 kg
Safety Standards UL62368-1, EN62368-1, IEC62368-1
Protection Features Overload, Overvoltage, Short Circuit

Pin Configuration and Descriptions

The HDR-60-5 features a screw terminal block for easy wiring. The pin configuration is as follows:

Pin Label Description
1 L AC Line Input
2 N AC Neutral Input
3 -V DC Output Negative (-)
4 +V DC Output Positive (+)
5 Ground Earth Ground (optional connection)

Usage Instructions

How to Use the Component in a Circuit

  1. Input Connection: Connect the AC input terminals (L and N) to the mains power supply. Ensure the input voltage is within the specified range (85-264 VAC).
  2. Output Connection: Connect the DC output terminals (+V and -V) to the load. Ensure the load does not exceed the maximum output current of 10A.
  3. Grounding: For safety, connect the Earth Ground terminal to a proper grounding point.
  4. Mounting: The HDR-60-5 is designed for DIN rail mounting. Secure it onto a standard DIN rail for proper installation.

Important Considerations and Best Practices

  • Load Requirements: Ensure the connected load does not exceed the rated output power (60W) or current (10A).
  • Ventilation: Install the power supply in a well-ventilated area to prevent overheating. Avoid enclosing it in tight spaces without airflow.
  • Wiring: Use appropriately rated wires for both input and output connections. Double-check all connections before powering on.
  • Safety: Always disconnect the power supply from the mains before making any wiring changes.
  • Voltage Adjustment: The HDR-60-5 includes a small potentiometer for fine-tuning the output voltage. Use this feature if precise voltage adjustment is required.

Example: Using HDR-60-5 with an Arduino UNO

The HDR-60-5 can be used to power an Arduino UNO and other peripherals. Below is an example wiring setup and Arduino code:

Wiring

  1. Connect the +V terminal of the HDR-60-5 to the Arduino's 5V pin.
  2. Connect the -V terminal of the HDR-60-5 to the Arduino's GND pin.
  3. Ensure the HDR-60-5 is properly connected to the mains power supply.

Arduino Code

// Example code to blink an LED connected to pin 13 of the Arduino UNO
// Ensure the HDR-60-5 is providing a stable 5V to the Arduino

void setup() {
  pinMode(13, OUTPUT); // Set pin 13 as an output pin
}

void loop() {
  digitalWrite(13, HIGH); // Turn the LED on
  delay(1000);            // Wait for 1 second
  digitalWrite(13, LOW);  // Turn the LED off
  delay(1000);            // Wait for 1 second
}

Troubleshooting and FAQs

Common Issues and Solutions

  1. No Output Voltage

    • Cause: Incorrect wiring or no AC input.
    • Solution: Verify the AC input connections (L and N) and ensure the mains power is on.
  2. Overheating

    • Cause: Insufficient ventilation or excessive load.
    • Solution: Ensure proper airflow around the power supply and reduce the load if it exceeds 60W.
  3. Output Voltage Fluctuations

    • Cause: Unstable input voltage or overloaded output.
    • Solution: Check the input voltage stability and ensure the load is within the rated limits.
  4. Short Circuit Protection Triggered

    • Cause: A short circuit in the connected load.
    • Solution: Disconnect the load, identify the short circuit, and resolve it before reconnecting.

FAQs

Q1: Can the HDR-60-5 be used outdoors?
A1: No, the HDR-60-5 is not designed for outdoor use. It must be installed in a dry, indoor environment.

Q2: Is the output voltage adjustable?
A2: Yes, the output voltage can be fine-tuned using the built-in potentiometer.

Q3: What happens if the load exceeds 60W?
A3: The HDR-60-5 includes overload protection. If the load exceeds the rated power, the power supply will shut down to prevent damage.

Q4: Can I use the HDR-60-5 to power multiple devices?
A4: Yes, as long as the total current draw does not exceed 10A and the devices are compatible with a 5V DC supply.

Q5: Does the HDR-60-5 require a fuse?
A5: The HDR-60-5 has built-in protection features, but it is recommended to use an external fuse on the AC input for additional safety.