Cirkit Designer Logo
Cirkit Designer
Your all-in-one circuit design IDE
Home / 
Component Documentation

How to Use DFROBOT 3,5"480x320 TFT LCD: Examples, Pinouts, and Specs

Image of DFROBOT 3,5"480x320 TFT LCD
Cirkit Designer LogoDesign with DFROBOT 3,5"480x320 TFT LCD in Cirkit Designer

Introduction

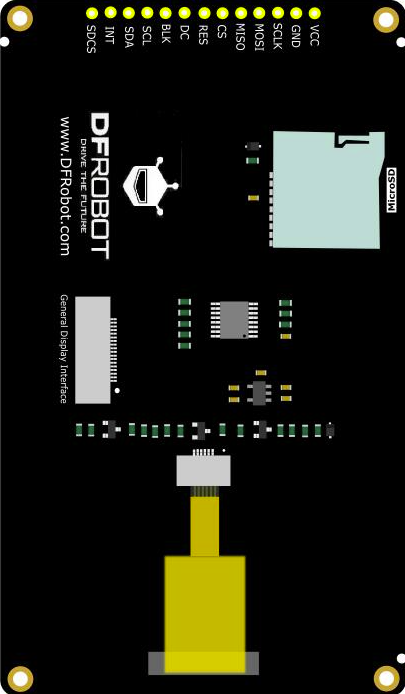
The DFROBOT 3.5" TFT LCD Display Module (DFR0669) is a high-quality display designed for use in embedded systems and microcontroller projects. With a resolution of 480x320 pixels, this display provides clear and vibrant visual output, making it ideal for a wide range of applications, including:

  • User interfaces for embedded systems
  • Displaying sensor data
  • Visual feedback for control systems
  • Educational projects and prototypes

Explore Projects Built with DFROBOT 3,5"480x320 TFT LCD

Use Cirkit Designer to design, explore, and prototype these projects online. Some projects support real-time simulation. Click "Open Project" to start designing instantly!
Arduino Mega 2560 Controlled TFT Touchscreen Interface
Image of Tablero Moto: A project utilizing DFROBOT 3,5"480x320 TFT LCD in a practical application
This circuit connects an Arduino Mega 2560 microcontroller to a 3.5-inch 480x320 TFT LCD display. The Arduino provides power, ground, and digital signals to control the display, including data lines for pixel information and control lines for reset, write, and command/data selection. The embedded code initializes the display and configures the Arduino's pins for communication, likely to create a user interface or visual output for a project.
Cirkit Designer LogoOpen Project in Cirkit Designer
Arduino Nano and 3.5 TFT LCD Shield Display Interface
Image of BAROMETR BMP280 TFT 9488: A project utilizing DFROBOT 3,5"480x320 TFT LCD in a practical application
This circuit interfaces an Arduino Nano with a 3.5-inch TFT LCD Shield, allowing the Arduino to control the display and read/write data to it. The connections include data lines, control signals, and power, enabling the Arduino to drive the LCD for various display applications.
Cirkit Designer LogoOpen Project in Cirkit Designer
RTL8720DN-Based Interactive Button-Controlled TFT Display
Image of coba-coba: A project utilizing DFROBOT 3,5"480x320 TFT LCD in a practical application
This circuit features an RTL8720DN microcontroller interfaced with a China ST7735S 160x128 TFT LCD display and four pushbuttons. The microcontroller reads the states of the pushbuttons and displays their statuses on the TFT LCD, providing a visual feedback system for button presses.
Cirkit Designer LogoOpen Project in Cirkit Designer
Arduino UNO and HC-05 Bluetooth Controlled TFT LCD Display
Image of TFT LCD based interactive notice board: A project utilizing DFROBOT 3,5"480x320 TFT LCD in a practical application
This circuit integrates an Arduino UNO with an HC-05 Bluetooth module and a 3.5 TFT LCD Shield. The Arduino UNO serves as the central controller, receiving data via Bluetooth from the HC-05 module and displaying information on the TFT LCD screen.
Cirkit Designer LogoOpen Project in Cirkit Designer

Explore Projects Built with DFROBOT 3,5"480x320 TFT LCD

Use Cirkit Designer to design, explore, and prototype these projects online. Some projects support real-time simulation. Click "Open Project" to start designing instantly!
Image of Tablero Moto: A project utilizing DFROBOT 3,5"480x320 TFT LCD in a practical application
Arduino Mega 2560 Controlled TFT Touchscreen Interface
This circuit connects an Arduino Mega 2560 microcontroller to a 3.5-inch 480x320 TFT LCD display. The Arduino provides power, ground, and digital signals to control the display, including data lines for pixel information and control lines for reset, write, and command/data selection. The embedded code initializes the display and configures the Arduino's pins for communication, likely to create a user interface or visual output for a project.
Cirkit Designer LogoOpen Project in Cirkit Designer
Image of BAROMETR BMP280 TFT 9488: A project utilizing DFROBOT 3,5"480x320 TFT LCD in a practical application
Arduino Nano and 3.5 TFT LCD Shield Display Interface
This circuit interfaces an Arduino Nano with a 3.5-inch TFT LCD Shield, allowing the Arduino to control the display and read/write data to it. The connections include data lines, control signals, and power, enabling the Arduino to drive the LCD for various display applications.
Cirkit Designer LogoOpen Project in Cirkit Designer
Image of coba-coba: A project utilizing DFROBOT 3,5"480x320 TFT LCD in a practical application
RTL8720DN-Based Interactive Button-Controlled TFT Display
This circuit features an RTL8720DN microcontroller interfaced with a China ST7735S 160x128 TFT LCD display and four pushbuttons. The microcontroller reads the states of the pushbuttons and displays their statuses on the TFT LCD, providing a visual feedback system for button presses.
Cirkit Designer LogoOpen Project in Cirkit Designer
Image of TFT LCD based interactive notice board: A project utilizing DFROBOT 3,5"480x320 TFT LCD in a practical application
Arduino UNO and HC-05 Bluetooth Controlled TFT LCD Display
This circuit integrates an Arduino UNO with an HC-05 Bluetooth module and a 3.5 TFT LCD Shield. The Arduino UNO serves as the central controller, receiving data via Bluetooth from the HC-05 module and displaying information on the TFT LCD screen.
Cirkit Designer LogoOpen Project in Cirkit Designer

Technical Specifications

Key Technical Details

Specification Value
Display Size 3.5 inches
Resolution 480x320 pixels
Interface SPI
Operating Voltage 3.3V/5V
Backlight Current 120mA
Viewing Angle 60°/70°/70°/70° (L/R/U/D)
Operating Temperature -20°C to 70°C
Storage Temperature -30°C to 80°C

Pin Configuration and Descriptions

Pin Number Pin Name Description
1 VCC Power supply (3.3V/5V)
2 GND Ground
3 CS Chip Select
4 RESET Reset
5 DC Data/Command
6 SDI(MOSI) Serial Data Input (Master Out Slave In)
7 SCK Serial Clock
8 LED Backlight control

Usage Instructions

Connecting to an Arduino UNO

To use the DFROBOT 3.5" TFT LCD Display Module with an Arduino UNO, follow these steps:

  1. Wiring:

    • Connect the VCC pin of the display to the 5V pin on the Arduino.
    • Connect the GND pin of the display to the GND pin on the Arduino.
    • Connect the CS pin of the display to the digital pin 10 on the Arduino.
    • Connect the RESET pin of the display to the digital pin 9 on the Arduino.
    • Connect the DC pin of the display to the digital pin 8 on the Arduino.
    • Connect the SDI(MOSI) pin of the display to the digital pin 11 on the Arduino.
    • Connect the SCK pin of the display to the digital pin 13 on the Arduino.
    • Connect the LED pin of the display to the 3.3V pin on the Arduino.
  2. Library Installation:

    • Install the Adafruit GFX and Adafruit ILI9486 libraries from the Arduino Library Manager.
  3. Sample Code:

#include <Adafruit_GFX.h>    // Core graphics library
#include <Adafruit_ILI9486.h> // Hardware-specific library for ILI9486

#define TFT_CS     10
#define TFT_RST    9
#define TFT_DC     8

// Initialize the display
Adafruit_ILI9486 tft = Adafruit_ILI9486(TFT_CS, TFT_DC, TFT_RST);

void setup() {
  tft.begin();
  tft.setRotation(1); // Set the display orientation
  tft.fillScreen(ILI9486_BLACK); // Clear the screen with black color
  tft.setTextColor(ILI9486_WHITE); // Set text color to white
  tft.setTextSize(2); // Set text size
  tft.setCursor(10, 10); // Set cursor position
  tft.println("Hello, World!"); // Print text to the display
}

void loop() {
  // Add your code here
}

Important Considerations and Best Practices

  • Power Supply: Ensure that the display is powered with the correct voltage (3.3V or 5V) to avoid damage.
  • Backlight Control: The backlight can be controlled via the LED pin. Connect it to a PWM-capable pin on the Arduino for brightness control.
  • Initialization: Always initialize the display in the setup() function to ensure proper operation.
  • Library Compatibility: Use the recommended libraries (Adafruit GFX and Adafruit ILI9486) for best compatibility and performance.

Troubleshooting and FAQs

Common Issues

  1. Display Not Turning On:

    • Solution: Check the power connections and ensure the display is receiving the correct voltage.
  2. No Display Output:

    • Solution: Verify the wiring connections, especially the SPI pins (CS, RESET, DC, SDI, SCK). Ensure the correct pins are defined in the code.
  3. Garbled or Incorrect Display:

    • Solution: Check the initialization code and ensure the correct display driver (ILI9486) is being used. Verify the display orientation settings.

FAQs

Q1: Can I use this display with other microcontrollers?

  • A1: Yes, the display can be used with other microcontrollers that support SPI communication. Ensure the correct pin connections and library support.

Q2: How can I control the backlight brightness?

  • A2: Connect the LED pin to a PWM-capable pin on the microcontroller and use analogWrite() to control the brightness.

Q3: What is the maximum resolution supported by this display?

  • A3: The maximum resolution supported by this display is 480x320 pixels.

Q4: Can I use this display in outdoor environments?

  • A4: The display has an operating temperature range of -20°C to 70°C, but it is not specifically designed for outdoor use. Consider environmental protection measures if using outdoors.

By following this documentation, users can effectively integrate and utilize the DFROBOT 3.5" TFT LCD Display Module (DFR0669) in their projects, ensuring optimal performance and reliability.