How to Use Analog Cam RunCam Racer Nano 3: Examples, Pinouts, and Specs
Introduction
The RunCam Racer Nano 3 is a compact analog camera specifically designed for FPV (First Person View) racing drones. It offers high-resolution video output and ultra-low latency, making it an ideal choice for real-time video transmission during high-speed drone racing. Its lightweight design ensures minimal impact on drone performance, while its robust build quality ensures durability in demanding environments.
Explore Projects Built with Analog Cam RunCam Racer Nano 3

Explore Projects Built with Analog Cam RunCam Racer Nano 3
Common Applications and Use Cases
- FPV racing drones for competitive events
- Freestyle FPV drones for acrobatic flying
- Small-scale UAVs requiring lightweight, high-performance cameras
- Hobbyist drone projects needing real-time video feedback
Technical Specifications
The following table outlines the key technical details of the RunCam Racer Nano 3:
| Specification | Details |
|---|---|
| Image Sensor | 1/3" CMOS |
| Resolution | 1000 TVL |
| Lens | 2.1mm (M8) |
| Field of View (FOV) | 160° (Diagonal) |
| Video System | PAL/NTSC (Switchable) |
| Input Voltage | 5V - 36V |
| Signal-to-Noise Ratio | >50dB |
| Latency | <6ms |
| Dimensions | 14mm × 14mm × 16mm |
| Weight | 3.5g |
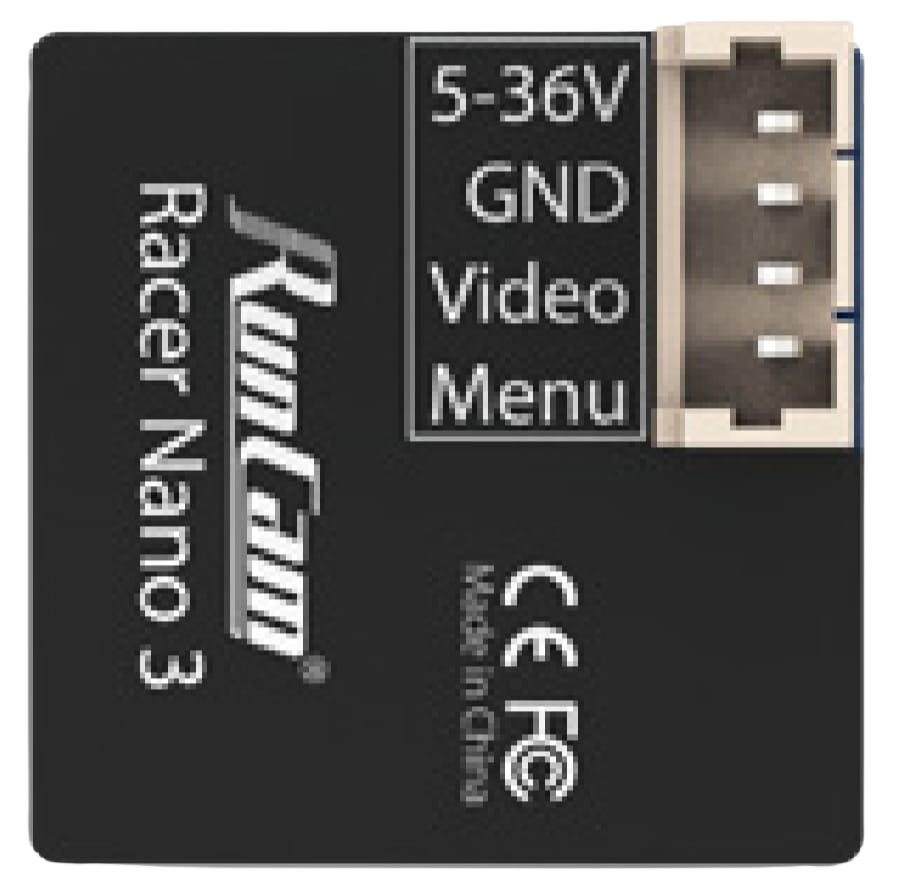
Pin Configuration and Descriptions
The RunCam Racer Nano 3 features a 4-pin connector for power, video output, and control. The pin configuration is as follows:
| Pin | Name | Description |
|---|---|---|
| 1 | GND | Ground connection |
| 2 | VCC | Power input (5V - 36V) |
| 3 | VIDEO | Analog video output signal |
| 4 | OSD | On-Screen Display control (UART interface) |
Usage Instructions
How to Use the Component in a Circuit
- Power Connection: Connect the VCC pin to a power source within the range of 5V to 36V. Ensure the GND pin is connected to the ground of the power source.
- Video Output: Connect the VIDEO pin to the video input of your FPV transmitter or display device.
- OSD Control: Use the OSD pin to configure camera settings via a UART interface. This requires a compatible flight controller or OSD module.
Important Considerations and Best Practices
- Voltage Range: Ensure the input voltage is within the specified range (5V - 36V) to avoid damaging the camera.
- Mounting: Use the included mounting hardware to securely attach the camera to your drone. Avoid excessive vibrations, as they may affect video quality.
- Lens Protection: Keep the lens clean and free from scratches for optimal image quality. Use a lens cap when the camera is not in use.
- Video System: Set the video system (PAL/NTSC) to match your FPV transmitter and display device for proper video synchronization.
- Heat Management: Although the camera is designed for high-performance use, ensure adequate airflow around the camera to prevent overheating during extended operation.
Arduino UNO Example Code
While the RunCam Racer Nano 3 is not directly compatible with Arduino for video processing, you can use the UART interface to configure camera settings. Below is an example of how to send UART commands to the camera using an Arduino UNO:
#include <SoftwareSerial.h>

// Define RX and TX pins for UART communication
SoftwareSerial cameraSerial(10, 11); // RX = Pin 10, TX = Pin 11

void setup() {
  // Initialize serial communication with the camera
  cameraSerial.begin(9600); // Default baud rate for the camera
  Serial.begin(9600);       // For debugging via Serial Monitor

  // Example: Send a command to switch to NTSC video system
  sendCameraCommand(0x01, 0x00); // Command ID: 0x01, Parameter: 0x00 (NTSC)
}

void loop() {
  // Continuously check for responses from the camera
  if (cameraSerial.available()) {
    char response = cameraSerial.read();
    Serial.print("Camera Response: ");
    Serial.println(response, HEX);
  }
}

// Function to send a command to the camera
void sendCameraCommand(byte commandID, byte parameter) {
  byte command[3];
  command[0] = 0xAA;         // Start byte
  command[1] = commandID;    // Command ID
  command[2] = parameter;    // Parameter

  // Send the command over UART
  for (int i = 0; i < 3; i++) {
    cameraSerial.write(command[i]);
  }
}
Notes:
- Replace the
commandIDandparametervalues with the appropriate values for your desired camera settings. - Ensure the UART pins on the Arduino are connected to the OSD pin and GND pin of the camera.
Troubleshooting and FAQs
Common Issues and Solutions
No Video Output:
- Cause: Incorrect wiring or mismatched video system (PAL/NTSC).
- Solution: Verify the wiring connections and ensure the video system matches your FPV transmitter and display.
Blurry or Distorted Image:
- Cause: Dirty or damaged lens.
- Solution: Clean the lens with a microfiber cloth. Replace the lens if it is scratched or damaged.
Camera Overheating:
- Cause: Prolonged use without adequate airflow.
- Solution: Ensure proper ventilation around the camera. Avoid using the camera in high-temperature environments.
UART Communication Issues:
- Cause: Incorrect baud rate or wiring.
- Solution: Verify the baud rate (default: 9600) and ensure the RX/TX pins are correctly connected.
FAQs
Q: Can I use this camera with a 3.3V power source?
A: No, the minimum input voltage is 5V. Using a lower voltage may damage the camera or result in malfunction.Q: How do I switch between PAL and NTSC?
A: Use the OSD control via UART to send the appropriate command to the camera. Refer to the example code above.Q: Is the camera waterproof?
A: No, the camera is not waterproof. Avoid exposing it to water or moisture.Q: Can I use this camera with a digital FPV system?
A: No, the RunCam Racer Nano 3 is an analog camera and is not compatible with digital FPV systems.