How to Use VTX RUSH Tank Solo: Examples, Pinouts, and Specs
Introduction
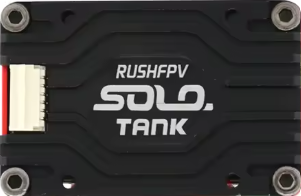
The VTX RUSH Tank Solo is a compact and lightweight video transmitter (VTX) designed specifically for FPV (First Person View) drone racing and freestyle applications. It delivers high-quality video transmission with adjustable power output settings, ensuring optimal performance in various environments. With support for multiple frequency channels, the RUSH Tank Solo minimizes interference, making it an excellent choice for competitive drone pilots and hobbyists alike.
Explore Projects Built with VTX RUSH Tank Solo

Explore Projects Built with VTX RUSH Tank Solo
Common Applications and Use Cases
- FPV drone racing and freestyle flying
- Aerial videography and photography
- Long-range FPV flights
- Multi-drone environments requiring interference-free communication
- Custom FPV builds for hobbyists and professionals
Technical Specifications
The VTX RUSH Tank Solo is engineered for reliability and performance. Below are its key technical specifications:
| Parameter | Specification |
|---|---|
| Input Voltage | 7V - 36V (2S - 8S LiPo compatible) |
| Power Output Levels | 25mW, 200mW, 500mW, 800mW, 1.6W (1600mW) |
| Frequency Range | 5.8GHz (48 channels, including Raceband) |
| Video Format | NTSC/PAL (auto-detect) |
| Antenna Connector | MMCX (detachable) |
| Dimensions | 36mm x 36mm x 4.5mm |
| Weight | 7.8g (without antenna) |
| Operating Temperature | -10°C to 60°C |
| Mounting Hole Spacing | 30.5mm x 30.5mm (standard stack size) |
Pin Configuration and Descriptions
The VTX RUSH Tank Solo features a straightforward pinout for easy integration into FPV systems. Below is the pin configuration:
| Pin | Label | Description |
|---|---|---|
| 1 | GND | Ground connection |
| 2 | +V IN | Power input (7V - 36V) |
| 3 | VIDEO IN | Video signal input from the camera |
| 4 | TX | SmartAudio control (UART TX for VTX settings) |
| 5 | GND | Ground connection |
Usage Instructions
How to Use the VTX RUSH Tank Solo in a Circuit
- Power Connection: Connect the
+V INpin to a power source within the range of 7V to 36V (e.g., a 2S to 8S LiPo battery). Ensure theGNDpin is connected to the ground of the power source. - Video Input: Connect the
VIDEO INpin to the video output of your FPV camera. - SmartAudio Control: If using a flight controller with SmartAudio support, connect the
TXpin to a UART TX pin on the flight controller. This allows you to adjust VTX settings (e.g., power level, channel) via Betaflight or similar software. - Antenna: Attach an MMCX-compatible antenna to the VTX. Ensure the antenna is securely connected before powering on the device to avoid damage.
Important Considerations and Best Practices
- Antenna Connection: Always connect an antenna before powering on the VTX to prevent damage to the transmitter.
- Heat Management: The VTX can become hot during operation, especially at higher power levels. Ensure adequate airflow or consider adding a heatsink if necessary.
- Frequency Selection: Use a frequency channel that minimizes interference with other devices in the area. Refer to your local regulations for legal frequency and power settings.
- SmartAudio Configuration: If using SmartAudio, configure the correct UART port in your flight controller software (e.g., Betaflight). Below is an example configuration for an Arduino-based flight controller.
Example SmartAudio Configuration Code
// Example: Configuring SmartAudio on an Arduino-based flight controller
// Ensure the UART TX pin is connected to the VTX TX pin

#include <SoftwareSerial.h>

// Define the UART pins for SmartAudio communication
#define SMARTAUDIO_TX_PIN 10  // TX pin connected to VTX TX
#define SMARTAUDIO_BAUD 4800  // SmartAudio uses 4800 baud rate

SoftwareSerial smartAudio(SMARTAUDIO_TX_PIN, -1); // RX pin not used

void setup() {
  // Initialize SmartAudio communication
  smartAudio.begin(SMARTAUDIO_BAUD);
  Serial.begin(9600); // For debugging

  Serial.println("SmartAudio initialized. Ready to send commands.");
}

void loop() {
  // Example: Send a command to set VTX power level
  // Command format depends on SmartAudio protocol version
  byte setPowerCommand[] = {0xAA, 0x55, 0x03, 0x01, 0x02, 0x00}; // Example command
  smartAudio.write(setPowerCommand, sizeof(setPowerCommand));

  Serial.println("Power level command sent.");
  delay(1000); // Wait before sending the next command
}
Adjusting VTX Settings
- Use the onboard button to manually change channels, bands, and power levels. Refer to the user manual for the button operation sequence.
- Alternatively, configure settings via SmartAudio using your flight controller's OSD (On-Screen Display) or Betaflight Configurator.
Troubleshooting and FAQs
Common Issues and Solutions
No Video Signal
- Ensure the
VIDEO INpin is properly connected to the FPV camera. - Verify that the camera is powered and functioning correctly.
- Check the antenna connection and ensure it is securely attached.
- Ensure the
Overheating
- Operate the VTX in a well-ventilated area to prevent overheating.
- Reduce the power output level if high temperatures persist.
Interference or Poor Signal Quality
- Select a different frequency channel to avoid interference.
- Ensure the antenna is in good condition and properly oriented.
- Check for nearby devices operating on the same frequency band.
SmartAudio Not Working
- Verify the
TXpin is connected to the correct UART TX pin on the flight controller. - Ensure the correct UART port is enabled in the flight controller software.
- Confirm that the SmartAudio protocol version is compatible with your VTX.
- Verify the
FAQs
Q: Can I use the VTX RUSH Tank Solo without SmartAudio?
A: Yes, you can manually adjust settings using the onboard button.Q: What is the maximum range of the VTX?
A: The range depends on the power output level, antenna type, and environmental conditions. At 1.6W, it can achieve several kilometers in open areas.Q: Is the VTX waterproof?
A: No, the VTX is not waterproof. Avoid exposure to water or moisture.Q: Can I use this VTX with any FPV camera?
A: Yes, the VTX is compatible with most FPV cameras that output NTSC or PAL video signals.
By following this documentation, you can effectively integrate and operate the VTX RUSH Tank Solo in your FPV drone setup.