Cirkit Designer Logo
Cirkit Designer
Your all-in-one circuit design IDE
Home / 
Component Documentation

How to Use Adafruit FeatherWing Proto: Examples, Pinouts, and Specs

Image of Adafruit FeatherWing Proto
Cirkit Designer LogoDesign with Adafruit FeatherWing Proto in Cirkit Designer

Introduction

The Adafruit FeatherWing Proto is a versatile prototyping expansion board designed to complement the Adafruit Feather ecosystem. It offers a convenient way to build custom circuits and interfaces that can be easily integrated with Feather development boards. This board is ideal for hobbyists, educators, and professionals who require a quick and reliable prototyping solution for their projects.

Explore Projects Built with Adafruit FeatherWing Proto

Use Cirkit Designer to design, explore, and prototype these projects online. Some projects support real-time simulation. Click "Open Project" to start designing instantly!
Arduino-Based Temperature Monitoring System with RGB LED Feedback and I2C LCD Display
Image of wemos custom shield: A project utilizing Adafruit FeatherWing Proto in a practical application
This circuit features an Adafruit Proto Shield R3 configured with a DS18B20 temperature sensor, a WS2812 RGB LED matrix, and an LCD I2C display. The microcontroller on the Proto Shield reads the temperature from the DS18B20 sensor and displays it on the LCD. It also controls the LED matrix to show random colors and indicates temperature status with onboard LEDs.
Cirkit Designer LogoOpen Project in Cirkit Designer
Touch-Sensitive Interface with Adafruit MPR121 and Feather 32u4 Bluefruit
Image of MPR121: A project utilizing Adafruit FeatherWing Proto in a practical application
This circuit integrates an Adafruit MPR121 capacitive touch sensor with an Adafruit Feather 32u4 Bluefruit microcontroller. The MPR121 is powered by the Feather and communicates via I2C (SCL and SDA) to detect touch inputs, which can be processed or transmitted wirelessly by the Feather.
Cirkit Designer LogoOpen Project in Cirkit Designer
ESP32-Based Vibration Feedback System with Quad Alphanumeric Display and ADXL343 Accelerometer
Image of EC444 - Quest 3: A project utilizing Adafruit FeatherWing Proto in a practical application
This circuit features an Adafruit HUZZAH32 ESP32 Feather board as the central microcontroller, which is connected to an Adafruit Quad AlphaNumeric Featherwing display and an Adafruit ADXL343 accelerometer via I2C communication (SCL and SDA lines). The ESP32 controls a vibration motor connected to one of its GPIO pins (A5_IO4) and shares a common power supply (3.3V) and ground (GND) with the other components. The purpose of this circuit is likely to read acceleration data, display information on the alphanumeric display, and provide haptic feedback through the vibration motor.
Cirkit Designer LogoOpen Project in Cirkit Designer
Arduino UNO and OLED FeatherWing Display: Battery-Powered Hello World Project
Image of ARDUINO_SSD1306: A project utilizing Adafruit FeatherWing Proto in a practical application
This circuit consists of an Arduino UNO connected to an Adafruit OLED FeatherWing display via I2C communication (SDA and SCL lines). The Arduino is powered through a Vcc source and provides 3.3V and GND connections to the OLED display. The Arduino runs a program to display 'Hello, World!' on the OLED screen.
Cirkit Designer LogoOpen Project in Cirkit Designer

Explore Projects Built with Adafruit FeatherWing Proto

Use Cirkit Designer to design, explore, and prototype these projects online. Some projects support real-time simulation. Click "Open Project" to start designing instantly!
Image of wemos custom shield: A project utilizing Adafruit FeatherWing Proto in a practical application
Arduino-Based Temperature Monitoring System with RGB LED Feedback and I2C LCD Display
This circuit features an Adafruit Proto Shield R3 configured with a DS18B20 temperature sensor, a WS2812 RGB LED matrix, and an LCD I2C display. The microcontroller on the Proto Shield reads the temperature from the DS18B20 sensor and displays it on the LCD. It also controls the LED matrix to show random colors and indicates temperature status with onboard LEDs.
Cirkit Designer LogoOpen Project in Cirkit Designer
Image of MPR121: A project utilizing Adafruit FeatherWing Proto in a practical application
Touch-Sensitive Interface with Adafruit MPR121 and Feather 32u4 Bluefruit
This circuit integrates an Adafruit MPR121 capacitive touch sensor with an Adafruit Feather 32u4 Bluefruit microcontroller. The MPR121 is powered by the Feather and communicates via I2C (SCL and SDA) to detect touch inputs, which can be processed or transmitted wirelessly by the Feather.
Cirkit Designer LogoOpen Project in Cirkit Designer
Image of EC444 - Quest 3: A project utilizing Adafruit FeatherWing Proto in a practical application
ESP32-Based Vibration Feedback System with Quad Alphanumeric Display and ADXL343 Accelerometer
This circuit features an Adafruit HUZZAH32 ESP32 Feather board as the central microcontroller, which is connected to an Adafruit Quad AlphaNumeric Featherwing display and an Adafruit ADXL343 accelerometer via I2C communication (SCL and SDA lines). The ESP32 controls a vibration motor connected to one of its GPIO pins (A5_IO4) and shares a common power supply (3.3V) and ground (GND) with the other components. The purpose of this circuit is likely to read acceleration data, display information on the alphanumeric display, and provide haptic feedback through the vibration motor.
Cirkit Designer LogoOpen Project in Cirkit Designer
Image of ARDUINO_SSD1306: A project utilizing Adafruit FeatherWing Proto in a practical application
Arduino UNO and OLED FeatherWing Display: Battery-Powered Hello World Project
This circuit consists of an Arduino UNO connected to an Adafruit OLED FeatherWing display via I2C communication (SDA and SCL lines). The Arduino is powered through a Vcc source and provides 3.3V and GND connections to the OLED display. The Arduino runs a program to display 'Hello, World!' on the OLED screen.
Cirkit Designer LogoOpen Project in Cirkit Designer

Common Applications and Use Cases

  • Rapid prototyping of custom circuits
  • Educational projects and learning electronics
  • Development of custom interfaces for sensors and actuators
  • Building compact and stackable designs with multiple FeatherWing boards

Technical Specifications

Key Technical Details

  • Compatibility: Designed to work with all Adafruit Feather boards
  • Dimensions: 50.8mm x 22.9mm x 1.6mm / 2.0" x 0.9" x 0.06"
  • Weight: 4.7 grams

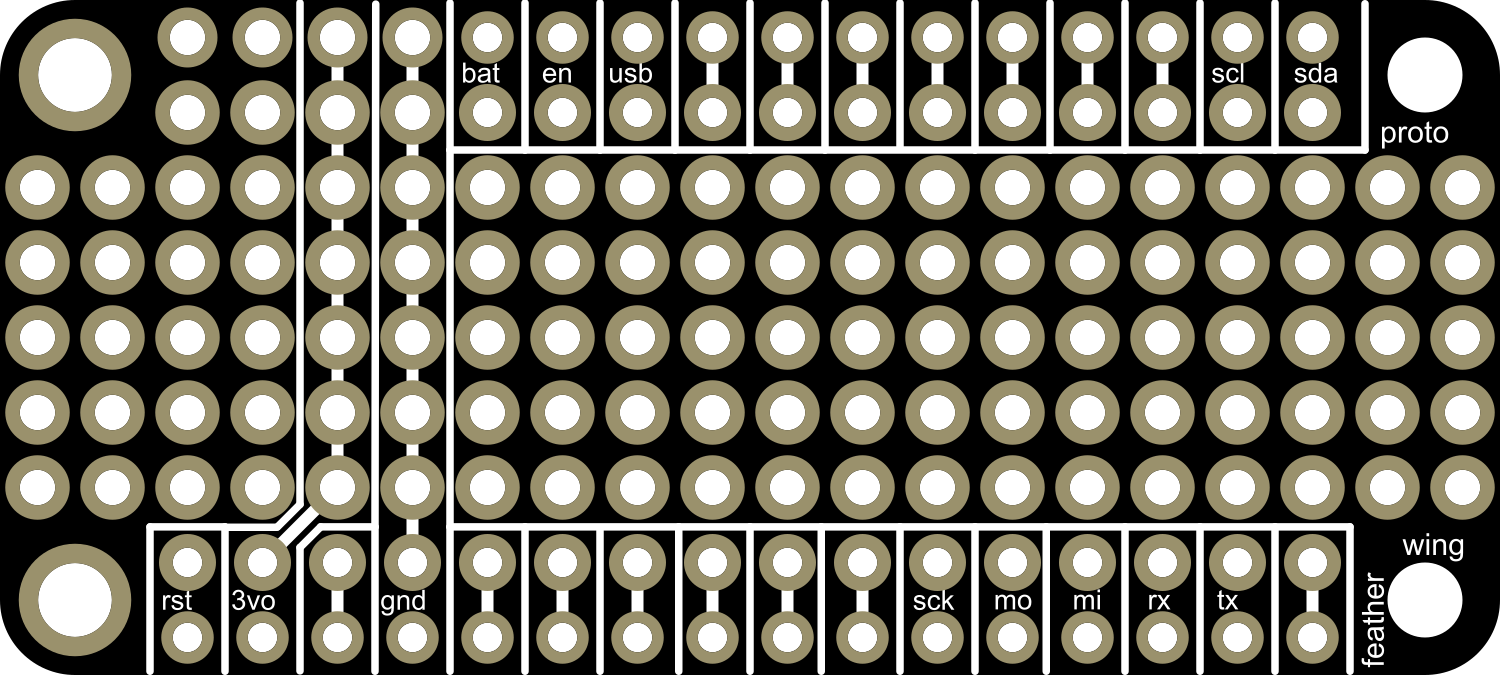
Pin Configuration and Descriptions

Pin Number Description
GND Ground connection
3V 3.3V power supply from the Feather
A0-A5 Analog pins, also usable as digital
D0-D13 Digital pins, some with PWM capability
SCK Serial Clock for SPI communication
MISO Master In Slave Out for SPI
MOSI Master Out Slave In for SPI
RX Receive pin for serial communication
TX Transmit pin for serial communication
SDA Serial Data for I2C communication
SCL Serial Clock for I2C communication
RST Reset pin
BAT Battery voltage (if available)
USB USB power (if available)

Usage Instructions

How to Use the Component in a Circuit

  1. Stacking with Feather Board:

    • Align the female headers of the FeatherWing Proto with the male headers on the Feather board.
    • Gently press down to mate the two boards together.
  2. Soldering Components:

    • Identify the locations on the prototyping area where you want to place your components.
    • Solder the components onto the board, ensuring good solder joints and no shorts.
  3. Connecting Wires:

    • Use the through-holes to solder wires for connections between components or external devices.
  4. Testing the Circuit:

    • Before powering up, double-check all connections for correctness and ensure there are no shorts.
    • Connect the Feather board to a power source or USB to test the circuit.

Important Considerations and Best Practices

  • Power Ratings: Ensure that the power requirements of your custom circuit do not exceed the power capabilities of the Feather board.
  • Stacking: When stacking multiple FeatherWing boards, verify that pin functions do not conflict with each other.
  • Isolation: Keep high-frequency or noisy components away from sensitive analog parts to prevent interference.
  • Inspection: Regularly inspect solder joints and connections for signs of wear or damage.

Troubleshooting and FAQs

Common Issues Users Might Face

  • Poor Solder Joints: If components are not working as expected, check for cold solder joints or bridges between pads.
  • Short Circuits: Use a multimeter to check for shorts, especially if the Feather board becomes hot or unresponsive.
  • Stacking Issues: If using multiple FeatherWing boards, ensure they are properly aligned and no pins are bent during stacking.

Solutions and Tips for Troubleshooting

  • Reflow Solder: If a solder joint looks suspicious, reflow the solder with a soldering iron and add more if necessary.
  • Continuity Testing: Use a multimeter to test continuity between points in your circuit to ensure connections are solid.
  • Isolate Problems: Disconnect parts of the circuit to isolate where the issue might be occurring.

FAQs

Q: Can I use the FeatherWing Proto with any Feather board? A: Yes, the FeatherWing Proto is designed to be universally compatible with all Feather boards.

Q: How many FeatherWing Proto boards can I stack on top of each other? A: You can stack as many as physically possible, but ensure that pin functions do not conflict and power requirements are within limits.

Q: Do I need to power the FeatherWing Proto separately? A: No, the FeatherWing Proto does not require separate power. It draws power from the connected Feather board.

Example Code for Arduino UNO

The following is a simple example of how to use the FeatherWing Proto with an Arduino UNO for a blinking LED circuit.

// Define the LED pin
const int LED_PIN = 13; // Use pin 13, which has an LED on most Arduino boards

// Setup function runs once when you press reset or power the board
void setup() {
  // Initialize the LED pin as an output
  pinMode(LED_PIN, OUTPUT);
}

// Loop function runs over and over again forever
void loop() {
  digitalWrite(LED_PIN, HIGH);   // Turn the LED on
  delay(1000);                   // Wait for a second
  digitalWrite(LED_PIN, LOW);    // Turn the LED off
  delay(1000);                   // Wait for a second
}

Note: While the example code is for an Arduino UNO, the FeatherWing Proto is designed for use with Adafruit Feather boards. The code is provided for illustrative purposes and may require adjustments for specific Feather board pin assignments.