How to Use Yahboom OV2710: Examples, Pinouts, and Specs

 Design with Yahboom OV2710 in Cirkit Designer
Introduction
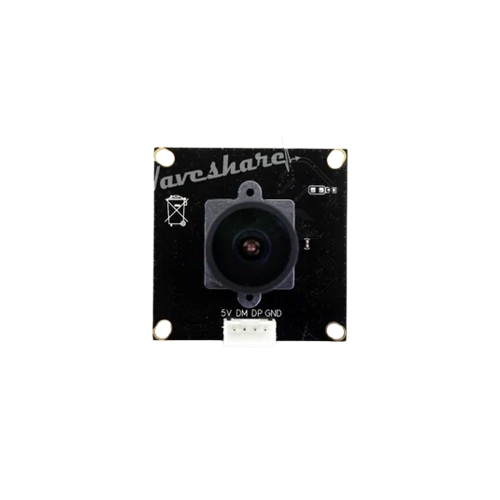
The Yahboom OV2710 is a high-performance camera module designed for applications requiring high-quality image and video capture. Featuring a 2MP (megapixel) image sensor, this module is capable of delivering high-resolution images and videos with excellent low-light performance and a wide dynamic range. Its compact design and robust capabilities make it ideal for robotics, computer vision, surveillance, and machine learning projects.
Explore Projects Built with Yahboom OV2710

 Open Project in Cirkit Designer
 Open Project in Cirkit Designer
 Open Project in Cirkit Designer
 Open Project in Cirkit Designer
Explore Projects Built with Yahboom OV2710

 Open Project in Cirkit Designer
 Open Project in Cirkit Designer
 Open Project in Cirkit Designer
 Open Project in Cirkit Designer
Common Applications and Use Cases
- Robotics and autonomous vehicles
- Computer vision and object detection
- Surveillance and security systems
- Machine learning and AI-based image processing
- Video streaming and recording
Technical Specifications
The Yahboom OV2710 camera module is built to deliver reliable performance in a variety of environments. Below are its key technical specifications:
Key Technical Details
| Parameter | Specification |
|---|---|
| Image Sensor | OV2710 (2MP CMOS sensor) |
| Resolution | 1920 x 1080 (Full HD) |
| Frame Rate | Up to 60 FPS (frames per second) |
| Pixel Size | 3.0 µm x 3.0 µm |
| Dynamic Range | 69 dB |
| Lens Type | Wide-angle lens (adjustable focus) |
| Interface | USB 2.0 |
| Power Supply Voltage | 5V (via USB) |
| Operating Temperature | -20°C to 70°C |
| Dimensions | 38mm x 38mm |
Pin Configuration and Descriptions
The Yahboom OV2710 camera module uses a USB interface for power and data transmission. Below is the pin configuration for the USB connector:
| Pin Number | Pin Name | Description |
|---|---|---|
| 1 | VCC | Power supply (5V) |
| 2 | D- | USB data line (-) |
| 3 | D+ | USB data line (+) |
| 4 | GND | Ground |
Usage Instructions
The Yahboom OV2710 camera module is straightforward to use and can be integrated into various systems, including microcontrollers like the Arduino UNO or single-board computers like the Raspberry Pi.
How to Use the Component in a Circuit
Connect the Camera Module:
- Plug the USB connector of the camera module into a USB port on your computer or development board.
- Ensure the power supply is stable (5V via USB).
Install Drivers (if required):
- On most modern operating systems, the camera module is plug-and-play. However, if drivers are required, download them from the Yahboom website.
Access the Camera:
- Use software like OpenCV, VLC Media Player, or any compatible video capture application to access the camera feed.
Adjust the Lens:
- Manually adjust the focus of the lens to achieve the desired image clarity.
Important Considerations and Best Practices
- Power Supply: Ensure the USB port provides a stable 5V power supply to avoid performance issues.
- Lens Adjustment: Handle the lens carefully to avoid damage while adjusting the focus.
- Environmental Conditions: Operate the camera within the specified temperature range (-20°C to 70°C) for optimal performance.
- Software Compatibility: The camera is compatible with OpenCV, Python, and other image processing libraries. Ensure your software environment supports USB camera modules.
Example Code for Arduino UNO
While the Yahboom OV2710 is primarily a USB camera, it can be used with an Arduino UNO for triggering or controlling external devices based on image processing results. Below is an example of how to use the Arduino UNO to control an LED based on a signal from a computer running OpenCV:
// Example: Arduino UNO controlling an LED based on a signal from a computer
// The computer processes the camera feed and sends a signal via Serial.

const int ledPin = 13; // Pin connected to the LED

void setup() {
  pinMode(ledPin, OUTPUT); // Set the LED pin as an output
  Serial.begin(9600);      // Initialize serial communication at 9600 baud
}

void loop() {
  if (Serial.available() > 0) { // Check if data is available on Serial
    char command = Serial.read(); // Read the incoming byte
    if (command == '1') {
      digitalWrite(ledPin, HIGH); // Turn on the LED
    } else if (command == '0') {
      digitalWrite(ledPin, LOW);  // Turn off the LED
    }
  }
}
Note: The above code assumes that the computer processes the camera feed using OpenCV or similar software and sends a '1' or '0' to the Arduino via Serial to control the LED.
Troubleshooting and FAQs
Common Issues Users Might Face
Camera Not Detected:
- Cause: Missing drivers or faulty USB connection.
- Solution: Ensure the USB cable is securely connected. Install the required drivers from the Yahboom website.
Blurry Image:
- Cause: Lens not properly focused.
- Solution: Manually adjust the lens to achieve a clear image.
Low Frame Rate:
- Cause: Insufficient system resources or USB bandwidth.
- Solution: Close unnecessary applications and ensure the USB port supports high-speed data transfer.
Camera Overheating:
- Cause: Prolonged use in high-temperature environments.
- Solution: Operate the camera within the specified temperature range (-20°C to 70°C).
Solutions and Tips for Troubleshooting
- Check Connections: Ensure all connections are secure and the USB cable is not damaged.
- Update Software: Use the latest version of your operating system and image processing libraries.
- Test on Another Device: If the camera is not working, test it on another computer or development board to rule out hardware issues.
By following this documentation, users can effectively integrate and utilize the Yahboom OV2710 camera module in their projects.