How to Use ESP32_Oled: Examples, Pinouts, and Specs
Introduction
The ESP32 with OLED display is a compact and powerful development board that integrates the popular ESP32 microcontroller with a monochrome OLED display. This combination allows for the creation of standalone applications that can display information while maintaining connectivity via WiFi and Bluetooth. Common applications include IoT devices, user interfaces, data monitoring systems, and small handheld devices.
Explore Projects Built with ESP32_Oled


Explore Projects Built with ESP32_Oled
Technical Specifications
General Features
- Microcontroller: ESP32
- Display: OLED, typically 0.96 inches
- Display Resolution: 128x64 pixels
- Connectivity: WiFi (802.11 b/g/n), Bluetooth (Classic and BLE)
- Flash Memory: 4MB
- SRAM: 520 KB
- GPIO Pins: Varies by model
- ADC Channels: Varies by model
- DAC Channels: Varies by model
- Operating Voltage: 3.3V
- Input Voltage: Typically 5V via micro USB
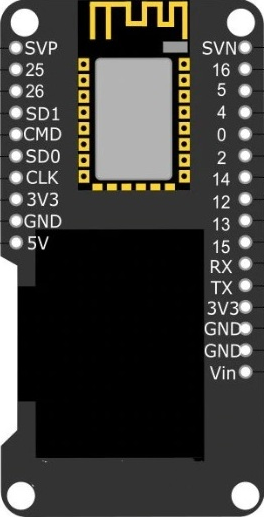
Pin Configuration and Descriptions
| Pin Number | Function | Description |
|---|---|---|
| 1 | GND | Ground |
| 2 | 3V3 | 3.3V power supply |
| 3 | EN | Chip enable, active high |
| 4 | VP | GPIO36, ADC1 Channel 0, Sensor VP |
| 5 | VN | GPIO39, ADC1 Channel 3, Sensor VN |
| ... | ... | ... |
| n | SDA (OLED) | I2C Data for OLED display |
| n+1 | SCL (OLED) | I2C Clock for OLED display |
Note: The pin configuration can vary depending on the specific model of the ESP32 with OLED display. Please refer to the manufacturer's datasheet for the exact pinout.
Usage Instructions
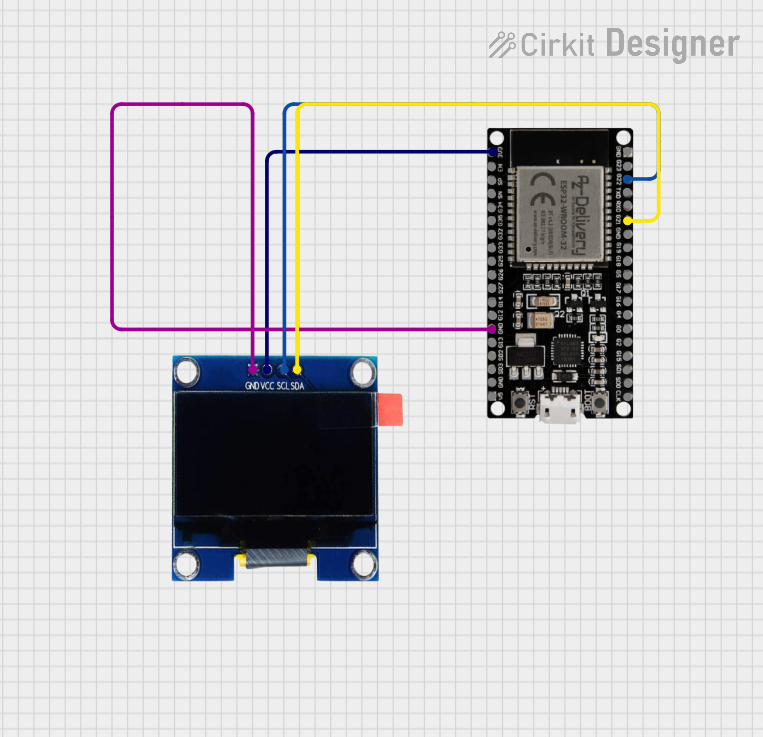
Integrating with a Circuit
To use the ESP32 with OLED display in a circuit:
- Connect the power supply to the VIN (5V) and GND pins.
- Ensure that the I2C pins (SDA and SCL) are connected to the OLED display if not internally connected.
- Additional components can be connected to the GPIO pins as required.
Programming the ESP32
- Install the necessary drivers and the Arduino IDE or other preferred development environment.
- Select the appropriate board and port in your IDE.
- Write or upload your code to the ESP32.
Displaying Text on the OLED
To display text on the OLED screen, you can use libraries such as Adafruit_SSD1306 for Arduino. Here is a simple example of initializing the display and displaying text:
#include <Wire.h>
#include <Adafruit_GFX.h>
#include <Adafruit_SSD1306.h>

#define SCREEN_WIDTH 128 // OLED display width, in pixels
#define SCREEN_HEIGHT 64 // OLED display height, in pixels

// Declaration for an SSD1306 display connected to I2C (SDA, SCL pins)
Adafruit_SSD1306 display(SCREEN_WIDTH, SCREEN_HEIGHT, &Wire);

void setup() {
  // Initialize the OLED display
  if(!display.begin(SSD1306_SWITCHCAPVCC, 0x3C)) {
    Serial.println(F("SSD1306 allocation failed"));
    for(;;);
  }
  display.clearDisplay();
  display.setTextSize(1);      // Normal 1:1 pixel scale
  display.setTextColor(SSD1306_WHITE); // Draw white text
  display.setCursor(0,0);     // Start at top-left corner
  display.println(F("Hello, ESP32!"));
  display.display();
}

void loop() {
  // Code to update the display continuously
}
Note: The I2C address (0x3C in the example) may vary based on the OLED module. Check the datasheet or use an I2C scanner to find the correct address.
Best Practices
- Always disconnect the power source before making changes to the circuit.
- Use a logic level converter if interfacing with components that operate at different voltage levels.
- Avoid drawing too much current from the GPIO pins to prevent damage to the ESP32.
Troubleshooting and FAQs
Common Issues
- Display not lighting up: Check the connections to the OLED display and ensure the correct I2C address is used in the code.
- ESP32 not recognized by the computer: Ensure that the drivers are installed correctly and the USB cable is functioning.
- Sketch upload fails: Verify that the correct board and port are selected in the IDE, and the boot mode is correctly set if necessary.
FAQs
Q: Can the ESP32 with OLED display be powered by a battery? A: Yes, it can be powered by a battery, but ensure the voltage is within the recommended range.
Q: How do I clear the OLED display?
A: Use display.clearDisplay() in your code before updating the display with new content.
Q: What is the maximum current that the GPIO pins can handle? A: The maximum current per GPIO pin is typically around 12 mA. Refer to the ESP32 datasheet for exact specifications.
Q: How can I save power when using the ESP32 with OLED? A: Utilize the ESP32's deep sleep mode and turn off the OLED display when not needed.
For further assistance, consult the ESP32 and OLED display datasheets, or reach out to the community forums for support.