Cirkit Designer
Your all-in-one circuit design IDE
Home /
Component Documentation
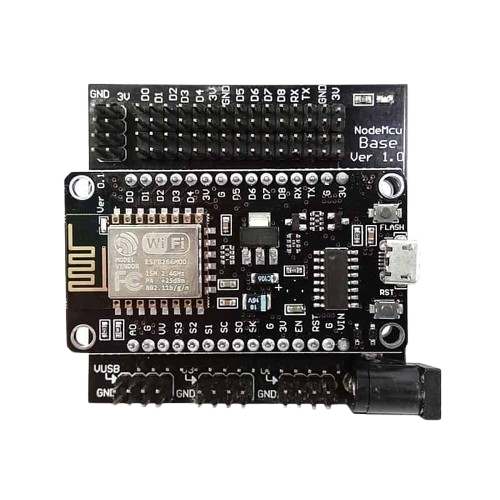
How to Use ESP8266 w/ Expansion Board: Examples, Pinouts, and Specs
Introduction
The ESP8266 w/ Expansion Board, manufactured by Arduino (Part ID: Expansion Board), is a versatile Wi-Fi module designed to provide wireless connectivity and additional I/O options for various projects. This component is ideal for IoT applications, home automation, and remote data logging, among other use cases. Its integration with the expansion board simplifies the connection process, making it a popular choice for both beginners and experienced developers.
Explore Projects Built with ESP8266 w/ Expansion Board
Wi-Fi Controlled Relay Module with ESP8266 and MCP23017

This circuit is a WiFi-enabled relay control system using an ESP8266-01 module and an MCP23017 I/O expander. The ESP8266 communicates with the MCP23017 via I2C to control an 8-channel relay module based on the state of 8 rocker switches, allowing for remote and manual control of connected devices.
ESP32-Based Smart Irrigation and Environmental Monitoring System
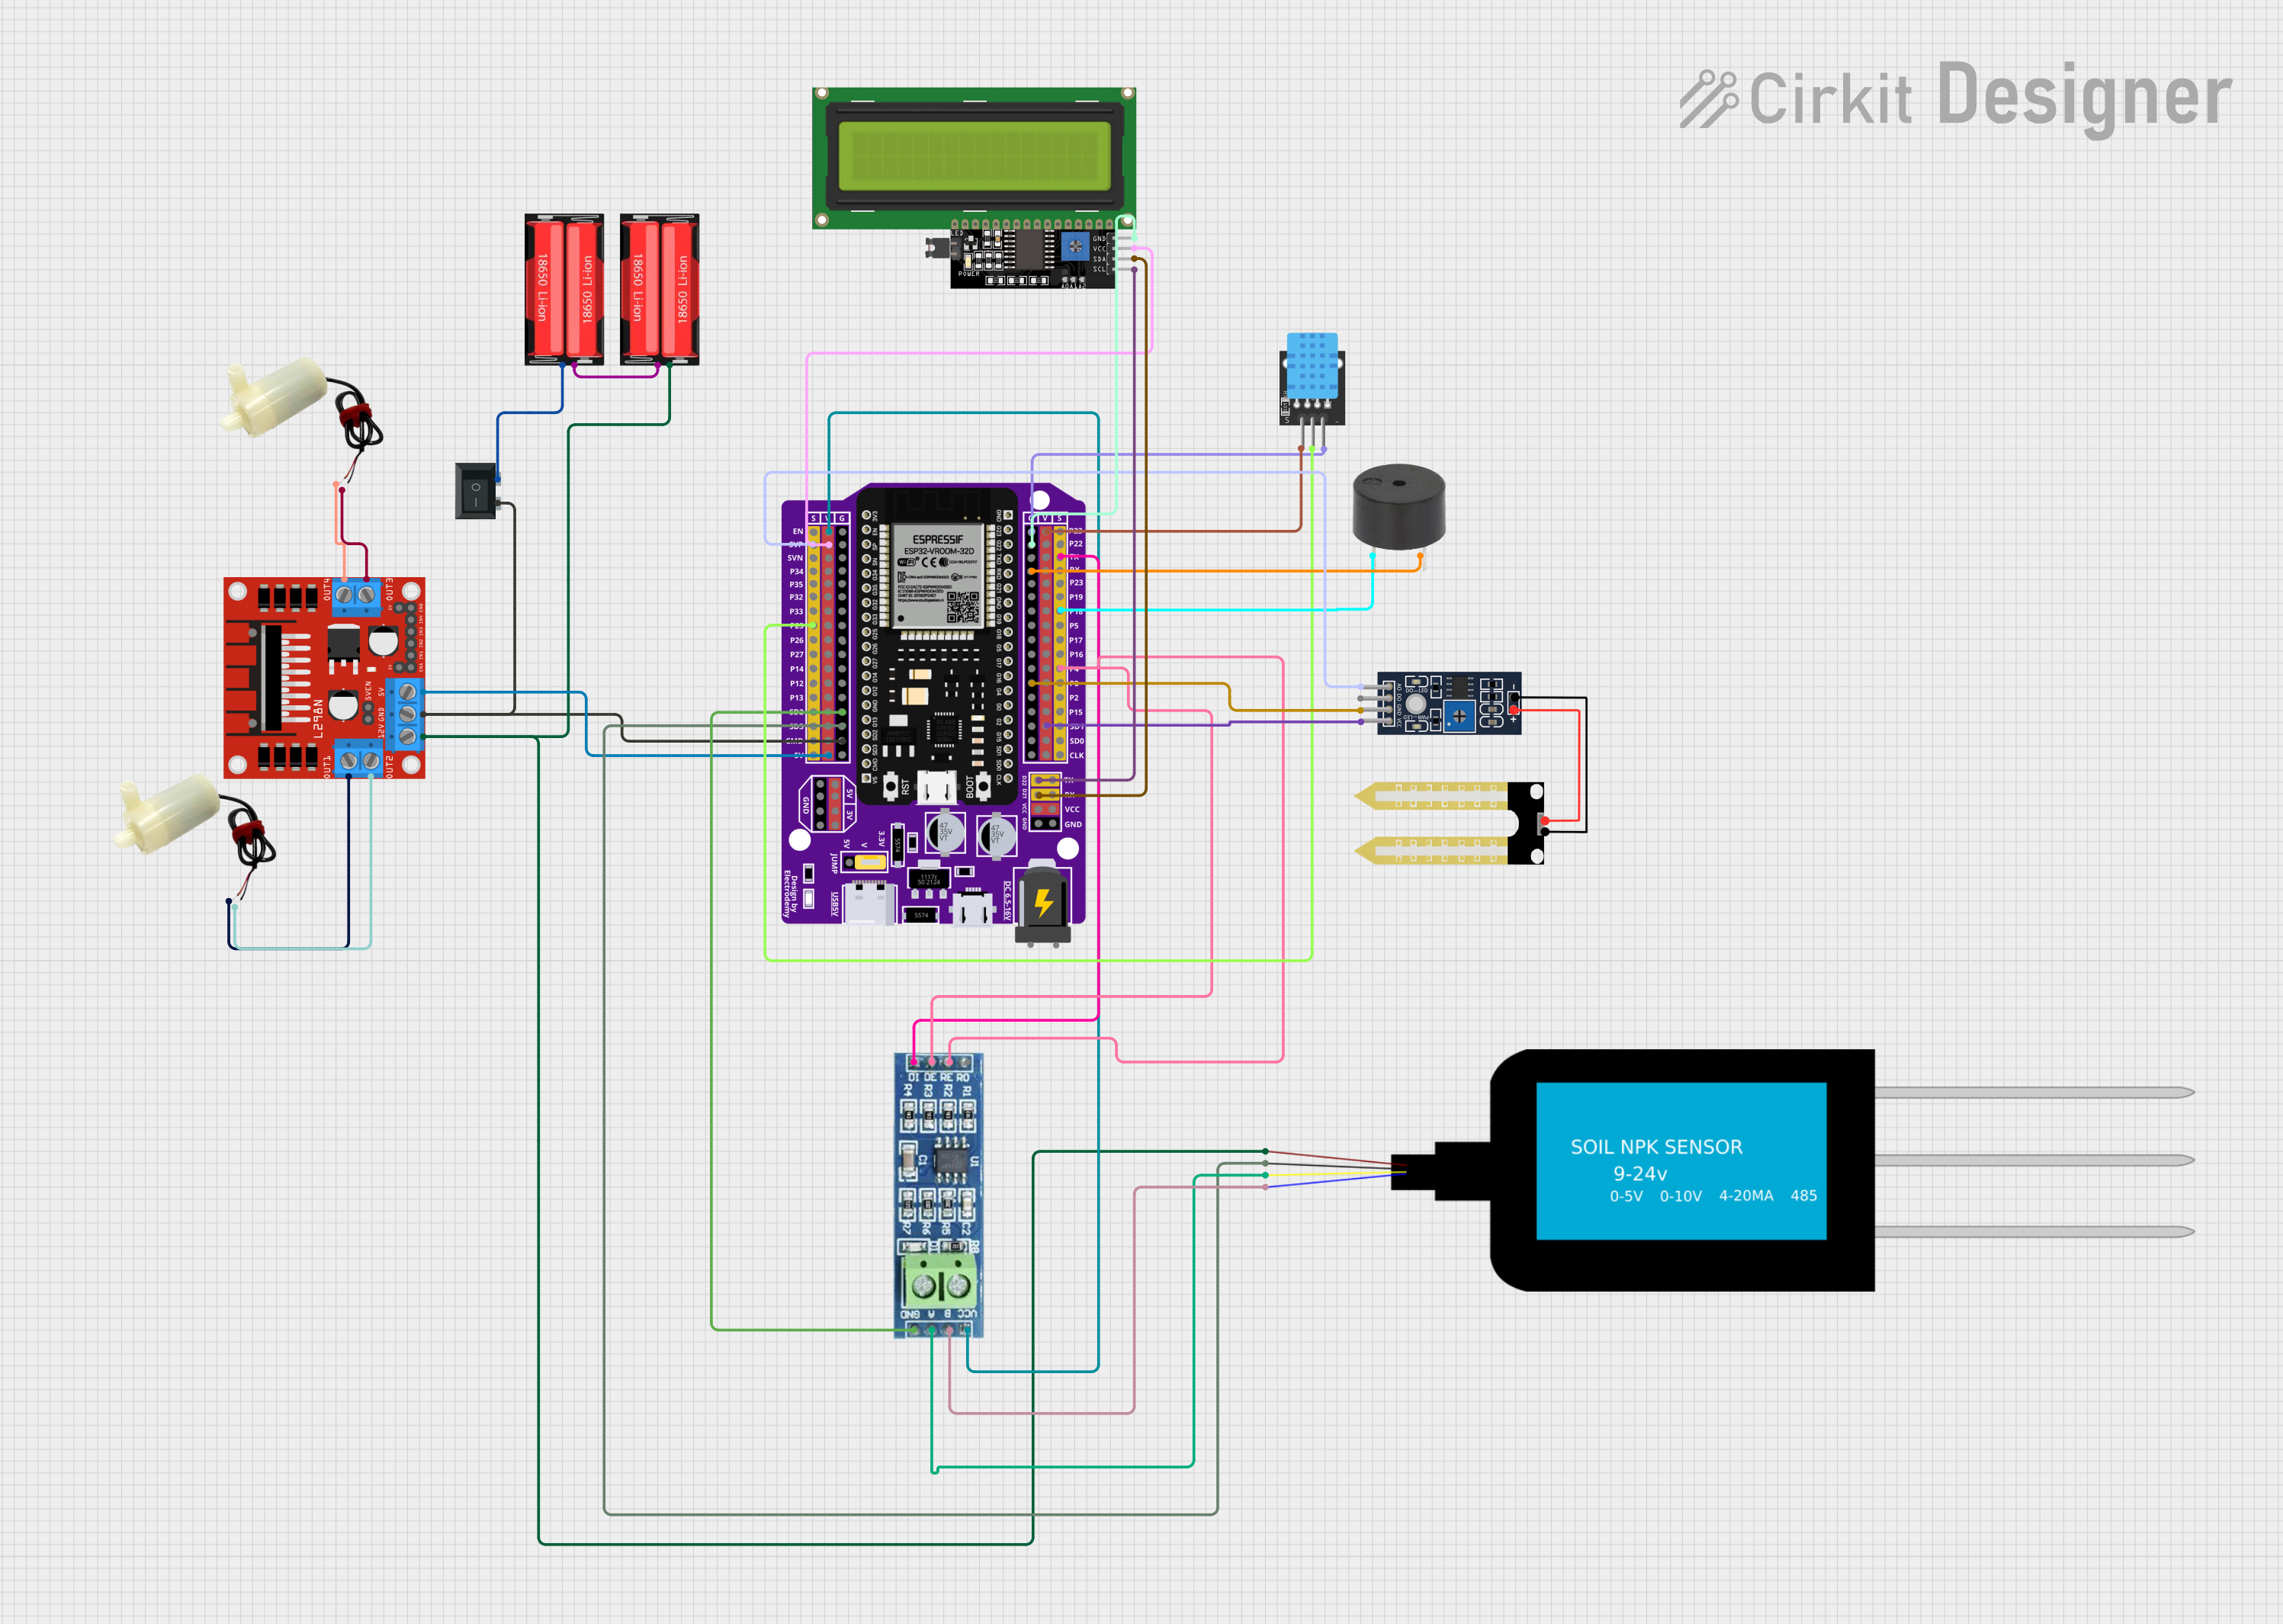
This circuit features an ESP32 microcontroller as the central processing unit, interfaced with various sensors and actuators. It includes a humidity sensor (YL-69), a temperature and humidity sensor (DHT11), a buzzer, an RS485 transceiver for serial communication, and an LCD display for user interface. The circuit also controls two 5V mini water pumps via an L298N motor driver, powered by a series connection of two 18650 Li-Ion batteries, with a rocker switch for power control. Additionally, it integrates an NPK soil sensor for measuring soil nutrients.
ESP32-Based Vibration Motor Controller with I2C IO Expansion

This circuit features an ESP32 Wroom Dev Kit microcontroller interfaced with an MCP23017 I/O expansion board via I2C communication, utilizing GPIO 21 and GPIO 22 for SDA and SCL lines, respectively. A vibration motor is controlled by an NPN transistor acting as a switch, with a diode for back EMF protection and a resistor to limit base current. The ESP32 can control the motor by sending signals to the MCP23017, which then interfaces with the transistor to turn the motor on or off.
ESP8266-Based Smart Irrigation System with Solar Power and Environmental Monitoring

This circuit features an ESP8266 microcontroller as the central processing unit, interfacing with a variety of sensors and devices. It includes a DHT11 humidity and temperature sensor, a 16x2 I2C LCD for display, an RTC module for real-time clock functionality, and a soil moisture sensor for detecting water levels in soil. Additionally, the circuit controls a relay module connected to a water pump, which can be powered by a solar panel, indicating a potential application in automated plant watering systems.
Explore Projects Built with ESP8266 w/ Expansion Board
Wi-Fi Controlled Relay Module with ESP8266 and MCP23017
This circuit is a WiFi-enabled relay control system using an ESP8266-01 module and an MCP23017 I/O expander. The ESP8266 communicates with the MCP23017 via I2C to control an 8-channel relay module based on the state of 8 rocker switches, allowing for remote and manual control of connected devices.
ESP32-Based Smart Irrigation and Environmental Monitoring System
This circuit features an ESP32 microcontroller as the central processing unit, interfaced with various sensors and actuators. It includes a humidity sensor (YL-69), a temperature and humidity sensor (DHT11), a buzzer, an RS485 transceiver for serial communication, and an LCD display for user interface. The circuit also controls two 5V mini water pumps via an L298N motor driver, powered by a series connection of two 18650 Li-Ion batteries, with a rocker switch for power control. Additionally, it integrates an NPK soil sensor for measuring soil nutrients.
ESP32-Based Vibration Motor Controller with I2C IO Expansion
This circuit features an ESP32 Wroom Dev Kit microcontroller interfaced with an MCP23017 I/O expansion board via I2C communication, utilizing GPIO 21 and GPIO 22 for SDA and SCL lines, respectively. A vibration motor is controlled by an NPN transistor acting as a switch, with a diode for back EMF protection and a resistor to limit base current. The ESP32 can control the motor by sending signals to the MCP23017, which then interfaces with the transistor to turn the motor on or off.
ESP8266-Based Smart Irrigation System with Solar Power and Environmental Monitoring
This circuit features an ESP8266 microcontroller as the central processing unit, interfacing with a variety of sensors and devices. It includes a DHT11 humidity and temperature sensor, a 16x2 I2C LCD for display, an RTC module for real-time clock functionality, and a soil moisture sensor for detecting water levels in soil. Additionally, the circuit controls a relay module connected to a water pump, which can be powered by a solar panel, indicating a potential application in automated plant watering systems.
Technical Specifications
Key Technical Details
| Parameter | Value |
|---|---|
| Operating Voltage | 3.3V |
| Input Voltage | 5V (via USB) |
| Current Consumption | 80mA (average) |
| Wi-Fi Standard | 802.11 b/g/n |
| Flash Memory | 4MB |
| GPIO Pins | 11 |
| UART | 1 |
| SPI | 1 |
| I2C | 1 |
| ADC | 1 (10-bit) |
Pin Configuration and Descriptions
| Pin Number | Pin Name | Description |
|---|---|---|
| 1 | GND | Ground |
| 2 | 3V3 | 3.3V Power Supply |
| 3 | RST | Reset |
| 4 | EN | Chip Enable (Active High) |
| 5 | TX | UART Transmit |
| 6 | RX | UART Receive |
| 7 | GPIO0 | General Purpose I/O 0 |
| 8 | GPIO1 | General Purpose I/O 1 |
| 9 | GPIO2 | General Purpose I/O 2 |
| 10 | GPIO3 | General Purpose I/O 3 |
| 11 | GPIO4 | General Purpose I/O 4 |
| 12 | GPIO5 | General Purpose I/O 5 |
| 13 | GPIO6 | General Purpose I/O 6 |
| 14 | GPIO7 | General Purpose I/O 7 |
| 15 | GPIO8 | General Purpose I/O 8 |
| 16 | GPIO9 | General Purpose I/O 9 |
| 17 | GPIO10 | General Purpose I/O 10 |
| 18 | ADC | Analog to Digital Converter (10-bit resolution) |
Usage Instructions
How to Use the Component in a Circuit
- Power Supply: Connect the 3V3 pin to a 3.3V power source and the GND pin to ground.
- UART Communication: Connect the TX pin to the RX pin of your microcontroller and the RX pin to the TX pin of your microcontroller for serial communication.
- GPIO Usage: Use the GPIO pins for digital input/output operations. Configure them as needed in your code.
- Wi-Fi Configuration: Use the appropriate AT commands or a library (e.g.,
ESP8266WiFifor Arduino) to configure the Wi-Fi settings.
Important Considerations and Best Practices
- Voltage Levels: Ensure that the voltage levels are compatible. The ESP8266 operates at 3.3V, so avoid applying 5V directly to its pins.
- Antenna Placement: For optimal Wi-Fi performance, place the module in an area with minimal obstructions and away from sources of interference.
- Heat Dissipation: The module can get warm during operation. Ensure adequate ventilation to prevent overheating.
Example Code for Arduino UNO
#include <ESP8266WiFi.h>

// Replace with your network credentials
const char* ssid = "your_SSID";
const char* password = "your_PASSWORD";

void setup() {
  Serial.begin(115200); // Initialize serial communication at 115200 baud
  delay(10);

  // Connect to Wi-Fi network
  Serial.println();
  Serial.println("Connecting to ");
  Serial.println(ssid);

  WiFi.begin(ssid, password);

  while (WiFi.status() != WL_CONNECTED) {
    delay(500);
    Serial.print(".");
  }

  Serial.println("");
  Serial.println("WiFi connected");
  Serial.println("IP address: ");
  Serial.println(WiFi.localIP()); // Print the IP address
}

void loop() {
  // Your code here
}
Troubleshooting and FAQs
Common Issues Users Might Face
Module Not Connecting to Wi-Fi
- Solution: Double-check the SSID and password. Ensure that the Wi-Fi network is within range and not experiencing issues.
Serial Communication Problems
- Solution: Verify the baud rate settings in your code and serial monitor. Ensure that the TX and RX pins are correctly connected.
Overheating
- Solution: Ensure proper ventilation and avoid placing the module in enclosed spaces without airflow.
Solutions and Tips for Troubleshooting
- Check Connections: Ensure all connections are secure and correctly oriented.
- Use a Logic Level Converter: If interfacing with a 5V microcontroller, use a logic level converter to protect the ESP8266.
- Update Firmware: Ensure the ESP8266 firmware is up to date to benefit from the latest features and bug fixes.
By following this documentation, users can effectively integrate the ESP8266 w/ Expansion Board into their projects, leveraging its wireless capabilities and additional I/O options for a wide range of applications.