How to Use power supply for Raspberry Pi 5: Examples, Pinouts, and Specs
Introduction
The Power Supply for Raspberry Pi 5 is a high-quality power adapter specifically designed by Raspberry Pi to meet the power requirements of the Raspberry Pi 5. This power supply ensures stable operation and optimal performance by delivering the necessary voltage and current. It is engineered to provide reliable power delivery, even under heavy workloads, making it an essential accessory for Raspberry Pi 5 users.
Explore Projects Built with power supply for Raspberry Pi 5

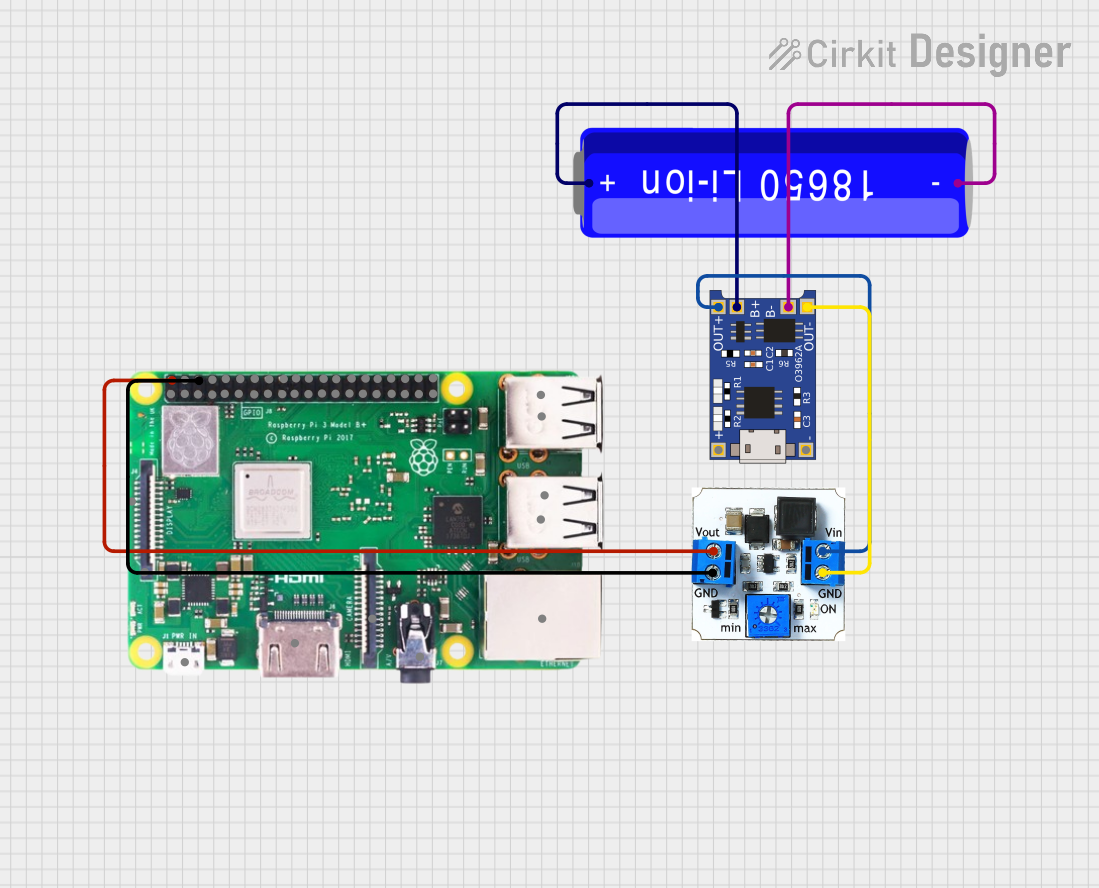

Explore Projects Built with power supply for Raspberry Pi 5
Common Applications and Use Cases
- Powering the Raspberry Pi 5 for general computing tasks
- Supporting high-performance applications such as AI/ML workloads, media servers, and gaming
- Ensuring stable operation for peripherals connected to the Raspberry Pi 5
- Suitable for use in educational, industrial, and hobbyist projects
Technical Specifications
The following table outlines the key technical specifications of the power supply:
| Specification | Details |
|---|---|
| Manufacturer | Raspberry Pi |
| Manufacturer Part ID | 5 |
| Input Voltage Range | 100-240V AC, 50/60Hz |
| Output Voltage | 5.1V DC |
| Output Current | 5A |
| Connector Type | USB-C |
| Cable Length | 1.5 meters |
| Power Rating | 25.5W |
| Certifications | CE, FCC, UL, RoHS |
| Operating Temperature | 0°C to 40°C |
| Dimensions | 85mm x 55mm x 30mm (excluding cable) |
| Weight | 150g |
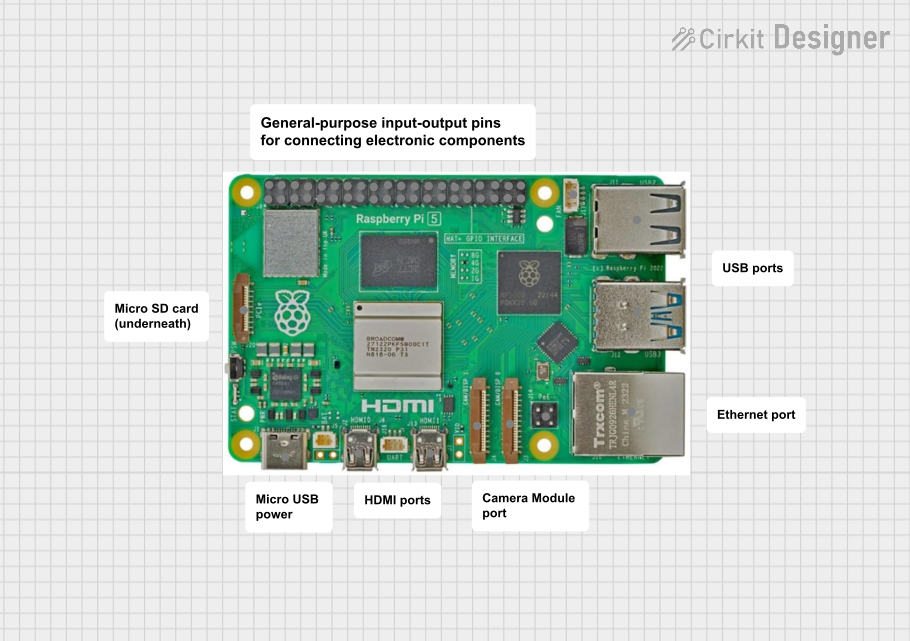
Pin Configuration and Descriptions
The power supply uses a USB-C connector, which has the following pin configuration:
| Pin | Name | Description |
|---|---|---|
| 1 | VBUS | Supplies 5.1V DC to the Raspberry Pi 5 |
| 2 | GND | Ground connection for the power supply |
| 3 | CC1/CC2 | Configuration channel for USB-C power delivery |
| 4 | D+ | Data line for USB communication (not used for power) |
| 5 | D- | Data line for USB communication (not used for power) |
Usage Instructions
How to Use the Power Supply
- Connect the Power Supply: Plug the USB-C connector of the power supply into the power port of the Raspberry Pi 5.
- Plug into a Power Outlet: Connect the power supply to a standard AC power outlet (100-240V AC).
- Power On the Raspberry Pi 5: Once connected, the Raspberry Pi 5 will automatically power on.
Important Considerations and Best Practices
- Use Only the Official Power Supply: To ensure stable operation, always use the official Raspberry Pi 5 power supply. Third-party power supplies may not provide the required voltage and current, leading to instability or damage.
- Avoid Overloading: Ensure that the total power consumption of the Raspberry Pi 5 and connected peripherals does not exceed the power supply's 5A output limit.
- Check for Secure Connections: Ensure the USB-C connector is securely plugged into the Raspberry Pi 5 to prevent intermittent power issues.
- Ventilation: Operate the power supply in a well-ventilated area to prevent overheating.
Example: Using the Power Supply with an Arduino UNO
While the power supply is designed for the Raspberry Pi 5, it can also be used to power other devices, such as an Arduino UNO, via a USB-C to barrel jack adapter. Below is an example of powering an Arduino UNO and running a simple LED blink program:
// Example code for Arduino UNO: Blink an LED
// This code blinks an LED connected to pin 13 of the Arduino UNO

void setup() {
  pinMode(13, OUTPUT); // Set pin 13 as an output
}

void loop() {
  digitalWrite(13, HIGH); // Turn the LED on
  delay(1000);            // Wait for 1 second
  digitalWrite(13, LOW);  // Turn the LED off
  delay(1000);            // Wait for 1 second
}
Note: When using the power supply with an Arduino UNO, ensure the adapter is compatible and does not exceed the Arduino's voltage input limits.
Troubleshooting and FAQs
Common Issues and Solutions
Raspberry Pi 5 Does Not Power On
- Cause: Loose connection or insufficient power.
- Solution: Ensure the USB-C connector is securely plugged into the Raspberry Pi 5. Verify that the power supply is connected to a working AC outlet.
Undervoltage Warning on Raspberry Pi 5
- Cause: The power supply is not delivering sufficient voltage.
- Solution: Use the official Raspberry Pi 5 power supply to avoid undervoltage issues.
Overheating of the Power Supply
- Cause: Poor ventilation or excessive load.
- Solution: Operate the power supply in a well-ventilated area and ensure the total load does not exceed 5A.
Intermittent Power Loss
- Cause: Faulty cable or connector.
- Solution: Inspect the USB-C cable for damage and replace if necessary.
Frequently Asked Questions
Q: Can I use this power supply with older Raspberry Pi models?
A: While the power supply is designed for the Raspberry Pi 5, it can be used with older models that support USB-C power input. However, ensure the voltage and current requirements of the older model are compatible.Q: Is the power supply compatible with USB-C PD (Power Delivery)?
A: No, this power supply does not support USB-C Power Delivery. It provides a fixed 5.1V output.Q: Can I use an extension cable with the power supply?
A: Yes, but ensure the extension cable is of high quality and does not introduce significant voltage drop.Q: What should I do if the power supply stops working?
A: Check the fuse in the plug (if applicable) and inspect the cable for damage. If the issue persists, contact Raspberry Pi support for assistance.
This concludes the documentation for the Power Supply for Raspberry Pi 5.