Cirkit Designer Logo
Cirkit Designer
Your all-in-one circuit design IDE
Home / 
Component Documentation

How to Use Adafruit FTDI Friend: Examples, Pinouts, and Specs

Image of Adafruit FTDI Friend
Cirkit Designer LogoDesign with Adafruit FTDI Friend in Cirkit Designer

Introduction

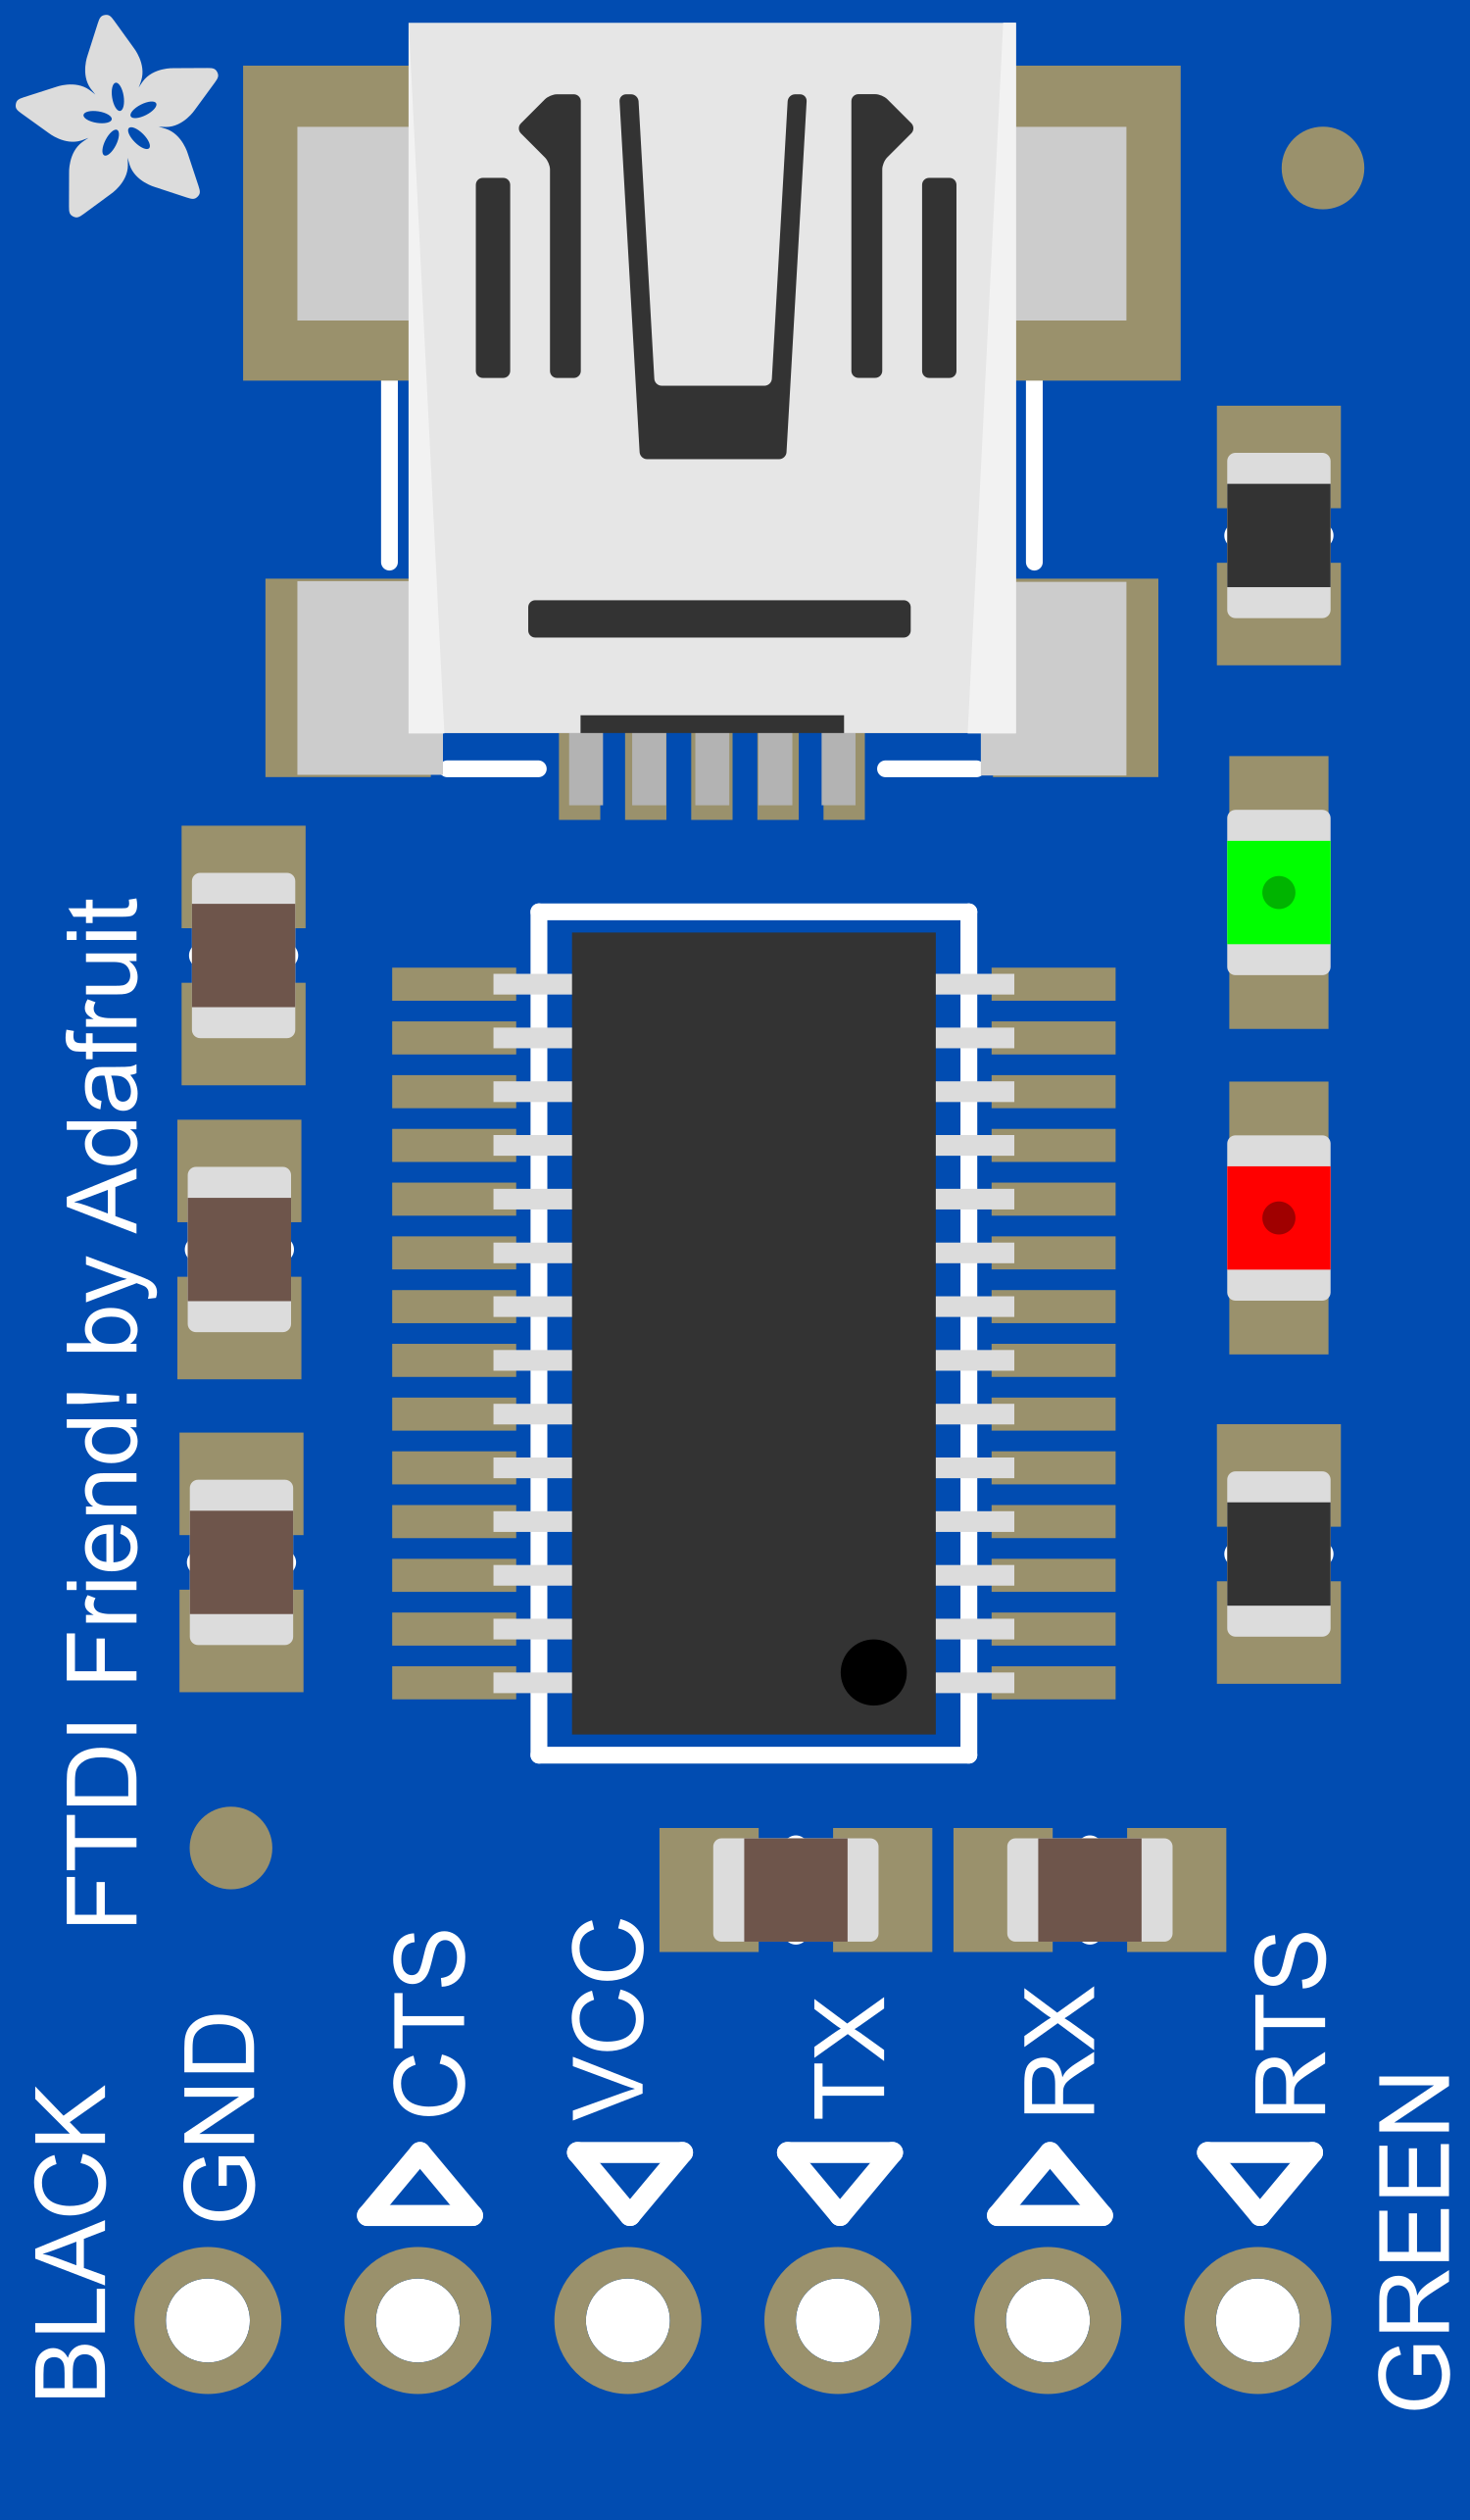
The Adafruit FTDI Friend is a versatile and compact USB-to-serial converter module based on the industry-standard FT232RL chipset. It is designed to facilitate serial communication between a computer's USB port and the UART (Universal Asynchronous Receiver/Transmitter) interface of microcontrollers, such as those found on Arduino boards. This module is particularly useful for programming, debugging, and serial communication for microcontroller projects.

Explore Projects Built with Adafruit FTDI Friend

Use Cirkit Designer to design, explore, and prototype these projects online. Some projects support real-time simulation. Click "Open Project" to start designing instantly!
ESP8266 WiFi Module Serial Interface with Pushbutton Control
Image of esp01 progrmmer: A project utilizing Adafruit FTDI Friend in a practical application
This circuit features an ESP8266 ESP-01 WiFi module interfaced with an Adafruit FTDI Friend for serial communication. The ESP8266's TXD and RXD pins are connected to the FTDI's RX and TX pins respectively, allowing for data exchange between the microcontroller and a computer. Additionally, a pushbutton is connected to the ESP8266's reset pin, enabling manual resets of the module.
Cirkit Designer LogoOpen Project in Cirkit Designer
FTDI to UART Adapter with J26 Connector
Image of J26 CLOSEUP: A project utilizing Adafruit FTDI Friend in a practical application
This circuit connects an FTDI USB-to-serial converter to a standard serial interface via a J26 connector. It facilitates serial communication by linking the ground, transmit, receive, data terminal ready, and request to send signals between the FTDI chip and the J26 connector.
Cirkit Designer LogoOpen Project in Cirkit Designer
ATmega328P-Based Sensor Hub with OLED Display and LIDAR
Image of TILTPCB: A project utilizing Adafruit FTDI Friend in a practical application
This circuit features an Mtiny Uno ATmega328P microcontroller as its central processing unit, interfacing with a variety of sensors and peripherals. It includes a 0.96" OLED display and an MPU6050 accelerometer/gyroscope for user interface and motion sensing, respectively. The circuit also integrates a TF LUNA LIDAR for distance measurement, a DHT11 sensor for temperature and humidity readings, and uses a 9V battery with a 7805 voltage regulator for power management. Communication with a computer for programming and data exchange is facilitated by an Adafruit FTDI Friend module.
Cirkit Designer LogoOpen Project in Cirkit Designer
ESP32-CAM and Arduino UNO Serial Communication Circuit with Status Indicator LEDs
Image of traffic analysis : A project utilizing Adafruit FTDI Friend in a practical application
This circuit features an ESP32-CAM module interfaced with an Arduino UNO for control and communication purposes, with the ESP32-CAM powered via a 5V connection from an Adafruit FTDI Friend. Three LEDs (red, green, and yellow) are connected to digital pins on the Arduino UNO through 220-ohm resistors, likely for status indication. The provided code for the Arduino UNO is a template with empty setup and loop functions, indicating that the specific functionality is yet to be implemented.
Cirkit Designer LogoOpen Project in Cirkit Designer

Explore Projects Built with Adafruit FTDI Friend

Use Cirkit Designer to design, explore, and prototype these projects online. Some projects support real-time simulation. Click "Open Project" to start designing instantly!
Image of esp01 progrmmer: A project utilizing Adafruit FTDI Friend in a practical application
ESP8266 WiFi Module Serial Interface with Pushbutton Control
This circuit features an ESP8266 ESP-01 WiFi module interfaced with an Adafruit FTDI Friend for serial communication. The ESP8266's TXD and RXD pins are connected to the FTDI's RX and TX pins respectively, allowing for data exchange between the microcontroller and a computer. Additionally, a pushbutton is connected to the ESP8266's reset pin, enabling manual resets of the module.
Cirkit Designer LogoOpen Project in Cirkit Designer
Image of J26 CLOSEUP: A project utilizing Adafruit FTDI Friend in a practical application
FTDI to UART Adapter with J26 Connector
This circuit connects an FTDI USB-to-serial converter to a standard serial interface via a J26 connector. It facilitates serial communication by linking the ground, transmit, receive, data terminal ready, and request to send signals between the FTDI chip and the J26 connector.
Cirkit Designer LogoOpen Project in Cirkit Designer
Image of TILTPCB: A project utilizing Adafruit FTDI Friend in a practical application
ATmega328P-Based Sensor Hub with OLED Display and LIDAR
This circuit features an Mtiny Uno ATmega328P microcontroller as its central processing unit, interfacing with a variety of sensors and peripherals. It includes a 0.96" OLED display and an MPU6050 accelerometer/gyroscope for user interface and motion sensing, respectively. The circuit also integrates a TF LUNA LIDAR for distance measurement, a DHT11 sensor for temperature and humidity readings, and uses a 9V battery with a 7805 voltage regulator for power management. Communication with a computer for programming and data exchange is facilitated by an Adafruit FTDI Friend module.
Cirkit Designer LogoOpen Project in Cirkit Designer
Image of traffic analysis : A project utilizing Adafruit FTDI Friend in a practical application
ESP32-CAM and Arduino UNO Serial Communication Circuit with Status Indicator LEDs
This circuit features an ESP32-CAM module interfaced with an Arduino UNO for control and communication purposes, with the ESP32-CAM powered via a 5V connection from an Adafruit FTDI Friend. Three LEDs (red, green, and yellow) are connected to digital pins on the Arduino UNO through 220-ohm resistors, likely for status indication. The provided code for the Arduino UNO is a template with empty setup and loop functions, indicating that the specific functionality is yet to be implemented.
Cirkit Designer LogoOpen Project in Cirkit Designer

Common Applications and Use Cases

  • Programming Arduino and other microcontroller boards without onboard USB.
  • Serial communication for debugging and data logging.
  • Bridging between a computer and microcontroller for software development.
  • Uploading sketches to Arduino boards using the bootloader.

Technical Specifications

Key Technical Details

  • Chipset: FT232RL
  • Operating Voltage: 5V (VCC and I/O)
  • Logic Level: 3.3V or 5V (selectable via jumper)
  • Max Baud Rate: Up to 3 Mbps
  • USB Standard: USB 2.0 Full Speed
  • Connectivity: Mini-B USB connector

Pin Configuration and Descriptions

Pin Number Name Description
1 GND Ground connection
2 CTS Clear to Send, flow control input signal
3 VCC Power supply (5V from USB)
4 TXD Transmit Data, outputs UART serial data
5 RXD Receive Data, receives UART serial data
6 RTS Request to Send, flow control output signal
7 DTR Data Terminal Ready, used to reset Arduino in bootloader mode

Usage Instructions

How to Use the Component in a Circuit

  1. Connect the FTDI Friend to the Microcontroller:

    • Connect the TXD pin of the FTDI Friend to the RX pin of the microcontroller.
    • Connect the RXD pin of the FTDI Friend to the TX pin of the microcontroller.
    • Connect the GND pin of the FTDI Friend to the GND pin of the microcontroller.
    • Optionally, connect the DTR pin of the FTDI Friend to the reset pin of the microcontroller through a 0.1uF capacitor to enable auto-reset during programming.
  2. Connect the FTDI Friend to the Computer:

    • Use a Mini-B USB cable to connect the FTDI Friend to a USB port on the computer.
  3. Install Drivers:

    • Ensure that the necessary drivers for the FT232RL chipset are installed on the computer.
  4. Select the Correct Serial Port:

    • In the Arduino IDE or other development environment, select the serial port that corresponds to the FTDI Friend.
  5. Program or Communicate:

    • Use the Arduino IDE or other terminal software to program the microcontroller or communicate with it.

Important Considerations and Best Practices

  • Always ensure that the logic level (3.3V or 5V) is correctly set for the microcontroller being used.
  • Avoid connecting or disconnecting the FTDI Friend while the microcontroller circuit is powered to prevent damage.
  • Use proper ESD precautions when handling the FTDI Friend to avoid damaging the sensitive electronics.

Troubleshooting and FAQs

Common Issues Users Might Face

  • Driver Installation: If the computer does not recognize the FTDI Friend, ensure that the drivers are correctly installed.
  • Incorrect Wiring: Double-check the TX and RX connections; they should be cross-connected (TX to RX and RX to TX).
  • Logic Level Mismatch: Ensure that the logic level jumper is set to match the microcontroller's operating voltage.

Solutions and Tips for Troubleshooting

  • If the device is not recognized, try using a different USB port or cable.
  • Verify that the correct COM port is selected in your development environment.
  • If you encounter issues with auto-reset, ensure that the DTR pin is correctly connected through a 0.1uF capacitor to the reset pin of the microcontroller.

FAQs

Q: Can the FTDI Friend be used with 3.3V devices? A: Yes, the FTDI Friend has a jumper that allows you to select between 3.3V and 5V operating voltages.

Q: Does the FTDI Friend come with a USB cable? A: No, a Mini-B USB cable must be purchased separately.

Q: Can I use the FTDI Friend to program an Arduino Pro Mini? A: Yes, the FTDI Friend is ideal for programming boards like the Arduino Pro Mini that do not have onboard USB.

Q: Is it necessary to install drivers for all operating systems? A: Drivers are typically required for Windows. MacOS and Linux usually have built-in support for the FT232RL chipset.

Example Code for Arduino UNO

// This example demonstrates basic serial communication between
// an Arduino UNO and a computer using the Adafruit FTDI Friend.

void setup() {
  // Begin serial communication at a baud rate of 9600:
  Serial.begin(9600);
}

void loop() {
  // Check if data has been received:
  if (Serial.available() > 0) {
    // Read the incoming byte:
    char incomingByte = Serial.read();

    // Echo the byte back to the serial port:
    Serial.write(incomingByte);
  }
}

Remember to select the correct COM port and board settings in the Arduino IDE before uploading this sketch. This code will echo any character sent from the computer back to the computer's serial monitor, demonstrating basic serial communication using the FTDI Friend.