Cirkit Designer Logo
Cirkit Designer
Your all-in-one circuit design IDE
Home / 
Component Documentation

How to Use SparkFun Proximity Sensor Breakout - 20cm, VCNL4040 (Qwiic): Examples, Pinouts, and Specs

Image of SparkFun Proximity Sensor Breakout - 20cm, VCNL4040 (Qwiic)
Cirkit Designer LogoDesign with SparkFun Proximity Sensor Breakout - 20cm, VCNL4040 (Qwiic) in Cirkit Designer

Introduction

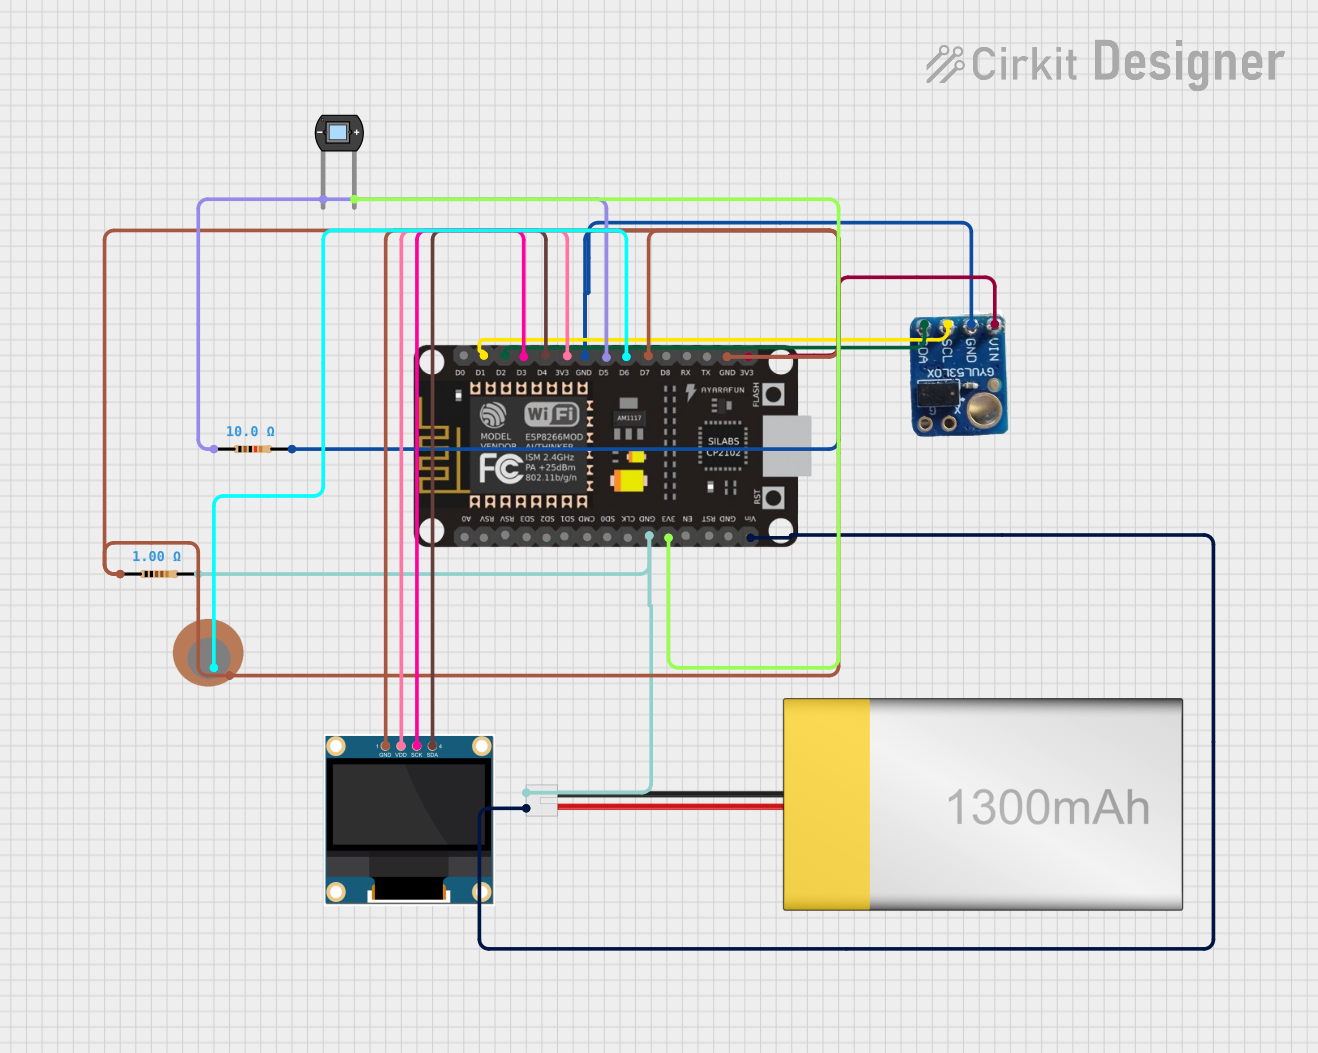
The SparkFun Proximity Sensor Breakout - 20cm, VCNL4040 (Qwiic) is a versatile sensor module that combines proximity sensing and ambient light measurement capabilities. Equipped with the VCNL4040 sensor, it is capable of detecting objects within a 20cm range and measuring ambient light levels. This sensor is ideal for applications such as user presence detection, touchless gesture recognition, and light intensity monitoring. Its Qwiic connect system allows for easy daisy-chaining and quick setup with compatible microcontrollers, such as the Arduino platform.

Explore Projects Built with SparkFun Proximity Sensor Breakout - 20cm, VCNL4040 (Qwiic)

Use Cirkit Designer to design, explore, and prototype these projects online. Some projects support real-time simulation. Click "Open Project" to start designing instantly!
Battery-Powered Smart Sensor Hub with Adafruit QT Py RP2040
Image of wearable final: A project utilizing SparkFun Proximity Sensor Breakout - 20cm, VCNL4040 (Qwiic) in a practical application
This circuit features an Adafruit QT Py RP2040 microcontroller interfaced with an APDS9960 proximity sensor, an MPU6050 accelerometer and gyroscope, and an OLED display via I2C communication. It also includes a buzzer controlled by the microcontroller and is powered by a 3.7V LiPo battery with a toggle switch for power control.
Cirkit Designer LogoOpen Project in Cirkit Designer
ESP8266 NodeMCU-Based Smart Eye Pressure Monitor with OLED Display and Wi-Fi Connectivity
Image of Copy of test 2 (7): A project utilizing SparkFun Proximity Sensor Breakout - 20cm, VCNL4040 (Qwiic) in a practical application
This circuit features an ESP8266 NodeMCU microcontroller interfaced with a VL53L0X time-of-flight distance sensor, a 0.96" OLED display, a piezo sensor, and a photodiode for light detection. The ESP8266 collects data from the sensors, displays readings on the OLED, and hosts a web server to present the information. It is likely designed for distance measurement, light intensity detection, and pressure sensing, with the capability to monitor and display these parameters in real-time over WiFi.
Cirkit Designer LogoOpen Project in Cirkit Designer
STM32 Nucleo F303RE Controlled Ultrasonic Sensing with RGB Feedback and I2C LCD Display
Image of CS435-final: A project utilizing SparkFun Proximity Sensor Breakout - 20cm, VCNL4040 (Qwiic) in a practical application
This circuit features a STM32 Nucleo F303RE microcontroller interfaced with three HC-SR04 ultrasonic sensors for distance measurement and a 20x4 LCD display over I2C for data output. Additionally, there is a WS2812 RGB LED strip controlled by the microcontroller for visual feedback. The power supply provides a common 5V to the LCD, ultrasonic sensors, LED strip, and the microcontroller's +5V input, with all components sharing a common ground.
Cirkit Designer LogoOpen Project in Cirkit Designer
Battery-Powered Smart Light with Proximity Sensor and OLED Display using Adafruit QT Py RP2040
Image of lab: A project utilizing SparkFun Proximity Sensor Breakout - 20cm, VCNL4040 (Qwiic) in a practical application
This circuit is a portable, battery-powered system featuring an Adafruit QT Py RP2040 microcontroller that interfaces with an OLED display, a proximity sensor, an accelerometer, and an RGB LED strip. The system is powered by a lithium-ion battery with a step-up boost converter to provide 5V for the LED strip, and it includes a toggle switch for power control. The microcontroller communicates with the sensors and display via I2C.
Cirkit Designer LogoOpen Project in Cirkit Designer

Explore Projects Built with SparkFun Proximity Sensor Breakout - 20cm, VCNL4040 (Qwiic)

Use Cirkit Designer to design, explore, and prototype these projects online. Some projects support real-time simulation. Click "Open Project" to start designing instantly!
Image of wearable final: A project utilizing SparkFun Proximity Sensor Breakout - 20cm, VCNL4040 (Qwiic) in a practical application
Battery-Powered Smart Sensor Hub with Adafruit QT Py RP2040
This circuit features an Adafruit QT Py RP2040 microcontroller interfaced with an APDS9960 proximity sensor, an MPU6050 accelerometer and gyroscope, and an OLED display via I2C communication. It also includes a buzzer controlled by the microcontroller and is powered by a 3.7V LiPo battery with a toggle switch for power control.
Cirkit Designer LogoOpen Project in Cirkit Designer
Image of Copy of test 2 (7): A project utilizing SparkFun Proximity Sensor Breakout - 20cm, VCNL4040 (Qwiic) in a practical application
ESP8266 NodeMCU-Based Smart Eye Pressure Monitor with OLED Display and Wi-Fi Connectivity
This circuit features an ESP8266 NodeMCU microcontroller interfaced with a VL53L0X time-of-flight distance sensor, a 0.96" OLED display, a piezo sensor, and a photodiode for light detection. The ESP8266 collects data from the sensors, displays readings on the OLED, and hosts a web server to present the information. It is likely designed for distance measurement, light intensity detection, and pressure sensing, with the capability to monitor and display these parameters in real-time over WiFi.
Cirkit Designer LogoOpen Project in Cirkit Designer
Image of CS435-final: A project utilizing SparkFun Proximity Sensor Breakout - 20cm, VCNL4040 (Qwiic) in a practical application
STM32 Nucleo F303RE Controlled Ultrasonic Sensing with RGB Feedback and I2C LCD Display
This circuit features a STM32 Nucleo F303RE microcontroller interfaced with three HC-SR04 ultrasonic sensors for distance measurement and a 20x4 LCD display over I2C for data output. Additionally, there is a WS2812 RGB LED strip controlled by the microcontroller for visual feedback. The power supply provides a common 5V to the LCD, ultrasonic sensors, LED strip, and the microcontroller's +5V input, with all components sharing a common ground.
Cirkit Designer LogoOpen Project in Cirkit Designer
Image of lab: A project utilizing SparkFun Proximity Sensor Breakout - 20cm, VCNL4040 (Qwiic) in a practical application
Battery-Powered Smart Light with Proximity Sensor and OLED Display using Adafruit QT Py RP2040
This circuit is a portable, battery-powered system featuring an Adafruit QT Py RP2040 microcontroller that interfaces with an OLED display, a proximity sensor, an accelerometer, and an RGB LED strip. The system is powered by a lithium-ion battery with a step-up boost converter to provide 5V for the LED strip, and it includes a toggle switch for power control. The microcontroller communicates with the sensors and display via I2C.
Cirkit Designer LogoOpen Project in Cirkit Designer

Technical Specifications

Key Technical Details

  • Proximity Sensor Range: Up to 20cm
  • Ambient Light Sensor Range: 0.25 lux to 16k lux
  • Supply Voltage (VDD): 2.5V to 3.6V
  • I2C Bus Voltage (VDDIO): 1.8V to 3.6V
  • Operating Current: 200 µA (typical)
  • I2C Address: 0x60 (7-bit)

Pin Configuration and Descriptions

Pin Name Description
VIN Supply voltage for the sensor (2.5V to 3.6V)
GND Ground connection
SDA I2C data line
SCL I2C clock line
INT Interrupt pin (active low)

Usage Instructions

Integration with a Circuit

To use the VCNL4040 sensor breakout with an Arduino UNO, follow these steps:

  1. Connect VIN to a 3.3V output on the Arduino.
  2. Connect GND to a ground pin on the Arduino.
  3. Connect SDA to the A4 pin (SDA) on the Arduino.
  4. Connect SCL to the A5 pin (SCL) on the Arduino.
  5. (Optional) Connect INT to an interrupt-capable pin on the Arduino if interrupt functionality is required.

Best Practices

  • Ensure that the power supply is stable and within the specified voltage range.
  • Avoid placing objects too close to the sensor during startup, as this may affect calibration.
  • Use pull-up resistors on the I2C lines if multiple devices are connected to the bus.

Example Code for Arduino UNO

#include <Wire.h>
#include "SparkFun_VCNL4040_Arduino_Library.h" // Click here to get the library: http://librarymanager/All#SparkFun_VCNL4040

VCNL4040 proximitySensor;

void setup() {
  Wire.begin();
  Serial.begin(9600);
  Serial.println("VCNL4040 Proximity Sensor Example");

  if (proximitySensor.begin() == false) {
    Serial.println("Sensor not detected. Please check wiring. Freezing...");
    while (1);
  }
}

void loop() {
  Serial.print("Proximity: ");
  Serial.println(proximitySensor.getProximity());
  Serial.print("Ambient light: ");
  Serial.println(proximitySensor.getAmbient());
  delay(500);
}

Ensure that the SparkFun VCNL4040 library is installed in the Arduino IDE before uploading this code to the Arduino UNO.

Troubleshooting and FAQs

Common Issues

  • Sensor Not Detected: Check the wiring and ensure that the correct I2C address is being used.
  • Inaccurate Readings: Ensure that there are no obstructions near the sensor and that it is not exposed to direct sunlight or strong artificial light sources.
  • No Response from Sensor: Verify that the supply voltage is within the specified range and that the sensor is not in a power-saving mode.

FAQs

Q: Can the sensor detect objects beyond 20cm? A: The sensor is optimized for a range of up to 20cm. While it may detect objects slightly beyond this range, accuracy and reliability decrease with distance.

Q: How do I change the I2C address of the sensor? A: The I2C address of the VCNL4040 sensor is fixed and cannot be changed.

Q: Is the sensor compatible with 5V systems? A: The sensor's I2C bus can tolerate up to 3.6V. For 5V systems, use a level shifter to prevent damage to the sensor.

Q: Can I use the sensor with a Raspberry Pi? A: Yes, the sensor can be used with a Raspberry Pi or any other microcontroller that supports I2C communication, provided the correct logic levels are used.

For further assistance, consult the SparkFun VCNL4040 datasheet and the Qwiic system documentation.