How to Use 10A fuse: Examples, Pinouts, and Specs
Documentation for 10A Fuse (Blade-Type Automotive Fuse - ATO/ATC-10)
1. Introduction
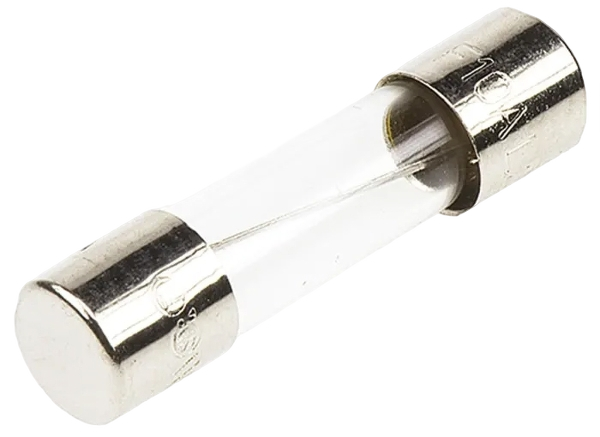
The 10A Blade-Type Automotive Fuse (ATO/ATC-10) is a compact, reliable, and widely used protective device designed to safeguard electrical circuits. It interrupts the flow of current when the current exceeds 10 amperes, thereby preventing damage to sensitive components and reducing the risk of fire or equipment failure.
This fuse is part of the ATO/ATC series, which is commonly used in automotive, marine, and industrial applications. Its blade-type design allows for easy installation and replacement in fuse holders or fuse blocks.
Common Applications:
- Automotive electrical systems (e.g., car stereos, lighting, and power outlets)
- Marine electrical systems
- Industrial equipment
- Low-voltage DC circuits
- DIY electronics projects
2. Technical Specifications
The following table outlines the key technical details of the 10A Blade-Type Automotive Fuse (ATO/ATC-10):
| Parameter | Specification |
|---|---|
| Manufacturer | Generic |
| Part ID | ATO/ATC-10 |
| Rated Current | 10 Amperes |
| Rated Voltage | 32 Volts DC |
| Interrupting Capacity | 1000 Amperes @ 32V DC |
| Fuse Type | Blade-Type (ATO/ATC) |
| Material | Plastic body with zinc alloy blades |
| Operating Temperature | -40°C to +105°C |
| Dimensions | 19.1mm x 5.1mm x 18.5mm |
| Color Code | Red (indicates 10A rating) |
Pin Configuration and Description
The blade-type fuse has two metal terminals (blades) that connect to the circuit. These terminals are designed to fit into standard automotive fuse holders.
| Pin | Description |
|---|---|
| Blade 1 | Input terminal (connects to power) |
| Blade 2 | Output terminal (connects to load) |
3. Usage Instructions
How to Use the 10A Fuse in a Circuit:
Determine the Current Rating: Ensure the 10A fuse is appropriate for your circuit. The fuse should have a current rating slightly higher than the normal operating current of the circuit but lower than the maximum current the circuit can handle.
Select a Fuse Holder: Use a compatible ATO/ATC fuse holder or fuse block. Ensure the holder is rated for at least 10A and 32V DC.
Insert the Fuse: Insert the fuse into the holder, ensuring the blades make firm contact with the terminals.
Connect the Fuse Holder: Wire the fuse holder in series with the circuit. The input terminal of the fuse holder should connect to the power source, and the output terminal should connect to the load.
Test the Circuit: Power on the circuit and verify that it operates correctly. If the fuse blows, check for overcurrent conditions or short circuits.
Important Considerations:
- Do Not Exceed Ratings: Never use a fuse with a lower or higher current rating than required for the circuit.
- Inspect for Damage: Regularly inspect the fuse for signs of damage, such as discoloration or melted plastic.
- Replace with Identical Fuses: Always replace a blown fuse with one of the same type, current rating, and voltage rating.
- Avoid Overheating: Ensure proper ventilation around the fuse to prevent overheating.
4. Example Application with Arduino UNO
The 10A fuse can be used to protect an Arduino UNO and its connected components from overcurrent conditions. Below is an example of how to integrate the fuse into a simple Arduino circuit.
Circuit Description:
In this example, the fuse is used to protect an Arduino UNO and a 12V DC motor connected to a motor driver. The fuse is placed between the 12V power supply and the motor driver.
Circuit Diagram:
+12V Power Supply
   |
   |----> [10A Fuse] ----> Motor Driver ----> DC Motor
   |
   |----> Arduino UNO (via voltage regulator)
Arduino Code:
The following code demonstrates how to control the motor using the Arduino UNO. The fuse ensures that the circuit is protected from overcurrent conditions.
// Example code to control a DC motor using Arduino UNO
// Ensure the circuit is protected with a 10A fuse

const int motorPin = 9; // PWM pin connected to motor driver

void setup() {
  pinMode(motorPin, OUTPUT); // Set motor pin as output
}

void loop() {
  // Gradually increase motor speed
  for (int speed = 0; speed <= 255; speed += 5) {
    analogWrite(motorPin, speed); // Set motor speed
    delay(50); // Wait for 50ms
  }

  // Gradually decrease motor speed
  for (int speed = 255; speed >= 0; speed -= 5) {
    analogWrite(motorPin, speed); // Set motor speed
    delay(50); // Wait for 50ms
  }
}
5. Troubleshooting and FAQs
Common Issues and Solutions:
| Issue | Possible Cause | Solution |
|---|---|---|
| Fuse blows immediately after power-on | Short circuit in the circuit | Check for wiring errors or damaged components. |
| Fuse blows intermittently | Overcurrent condition in the circuit | Verify the load current and ensure it does not exceed 10A. |
| Fuse does not fit in the holder | Incompatible fuse holder | Use a holder designed for ATO/ATC fuses. |
| Circuit does not power on | Blown fuse | Replace the fuse with an identical 10A fuse. |
FAQs:
Can I use a 15A fuse instead of a 10A fuse?
- No, using a higher-rated fuse can compromise circuit protection and may lead to damage or fire.
How do I know if the fuse is blown?
- A blown fuse typically has a visible break in the metal strip inside the plastic housing. You can also test it with a multimeter for continuity.
Can this fuse be used in AC circuits?
- No, this fuse is designed for low-voltage DC circuits (up to 32V DC). For AC applications, use a fuse rated for AC voltage.
What happens if I use a fuse with a lower current rating?
- The fuse may blow under normal operating conditions, causing unnecessary interruptions.
6. Conclusion
The 10A Blade-Type Automotive Fuse (ATO/ATC-10) is an essential component for protecting electrical circuits from overcurrent conditions. Its compact design, ease of use, and reliable performance make it a popular choice for automotive, marine, and industrial applications. By following the usage instructions and best practices outlined in this documentation, you can ensure the safe and efficient operation of your circuits.
Explore Projects Built with 10A fuse

Explore Projects Built with 10A fuse