How to Use XL-ZF12C-ZW: Examples, Pinouts, and Specs
Introduction
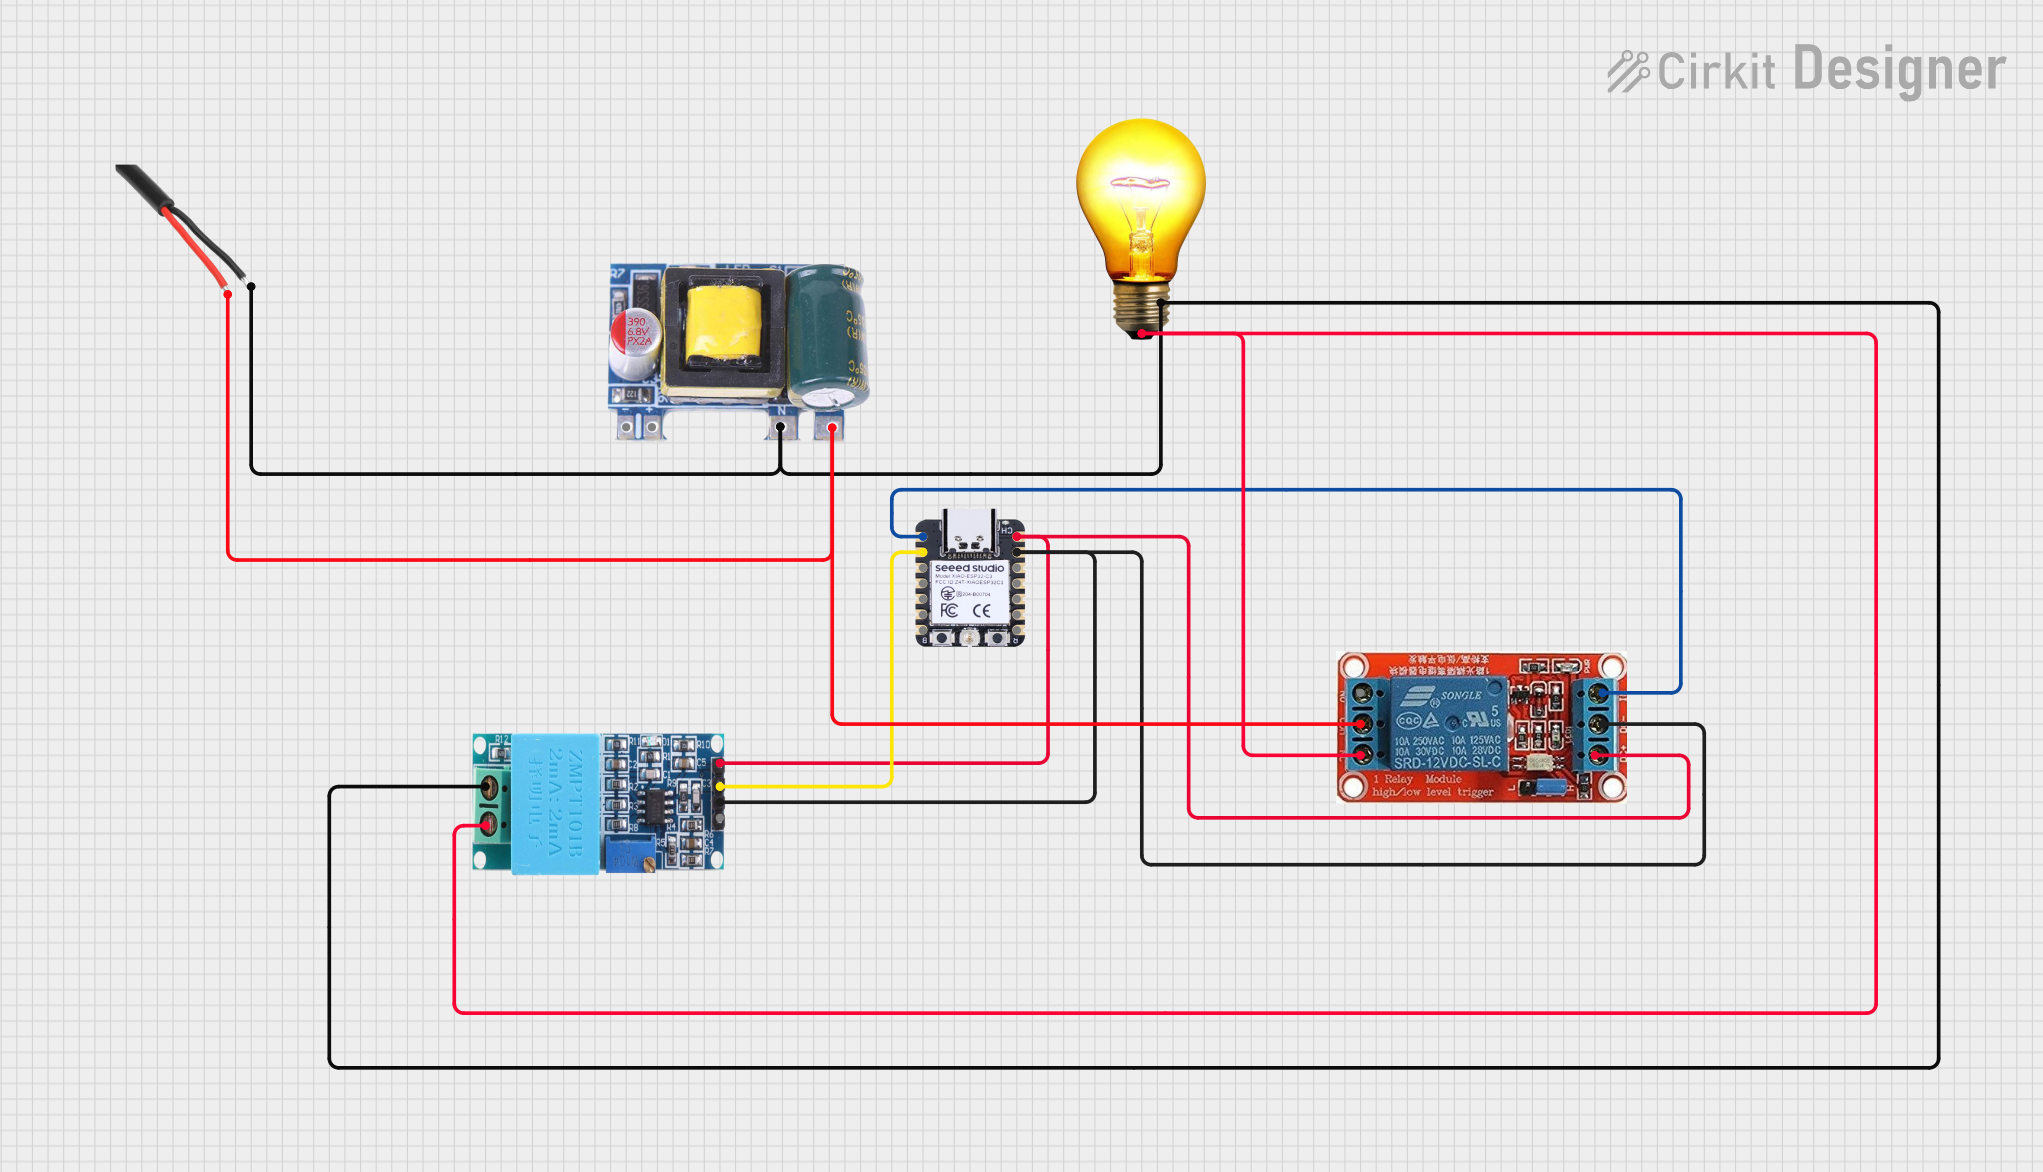
The XL-ZF12C-ZW is a wireless relay module designed for remote control applications. It operates on a 12V power supply and enables the control of electrical devices via a wireless signal. This module is widely used in automation systems, smart home projects, and other applications requiring remote switching of devices. Its compact design and reliable performance make it a popular choice for hobbyists and professionals alike.
Explore Projects Built with XL-ZF12C-ZW


Explore Projects Built with XL-ZF12C-ZW
Common Applications
- Smart home automation (e.g., controlling lights, fans, or appliances)
- Remote control of industrial equipment
- Wireless switching in IoT projects
- Security systems for activating alarms or locks
Technical Specifications
Below are the key technical details of the XL-ZF12C-ZW wireless relay module:
| Parameter | Specification |
|---|---|
| Operating Voltage | 12V DC |
| Relay Output Voltage | 250V AC / 30V DC (Max) |
| Relay Output Current | 10A (Max) |
| Wireless Frequency | 433 MHz |
| Control Distance | Up to 100 meters (open space) |
| Operating Modes | Momentary, Toggle, Latching |
| Dimensions | 68mm x 48mm x 19mm |
| Operating Temperature | -20°C to 60°C |
Pin Configuration and Descriptions
The XL-ZF12C-ZW module has the following pin connections:
| Pin Name | Description |
|---|---|
| VCC | Power input (12V DC) |
| GND | Ground |
| NO | Normally Open terminal of the relay |
| COM | Common terminal of the relay |
| NC | Normally Closed terminal of the relay |
Usage Instructions
How to Use the XL-ZF12C-ZW in a Circuit
- Power the Module: Connect the
VCCpin to a 12V DC power supply and theGNDpin to ground. - Connect the Load:
- For devices that should be powered when the relay is activated, connect one terminal of the load to the
NOpin and the other terminal to the power source. - For devices that should be powered when the relay is deactivated, connect one terminal of the load to the
NCpin and the other terminal to the power source. - Always connect the
COMpin to the other side of the power source.
- For devices that should be powered when the relay is activated, connect one terminal of the load to the
- Wireless Control: Use the paired remote control to send signals to the module. The relay will switch based on the selected operating mode (momentary, toggle, or latching).
- Set the Operating Mode: Use the onboard jumpers or switches to configure the desired operating mode:
- Momentary: The relay stays active only while the button on the remote is pressed.
- Toggle: The relay changes state (ON/OFF) with each press of the button.
- Latching: The relay remains in its last state until the next signal is received.
Important Considerations
- Ensure the load connected to the relay does not exceed the maximum voltage (250V AC / 30V DC) or current (10A).
- Use proper insulation and safety precautions when working with high-voltage loads.
- Avoid placing the module in areas with strong electromagnetic interference, as this may affect wireless performance.
- For optimal wireless range, ensure there are minimal obstructions between the remote and the module.
Example: Connecting to an Arduino UNO
The XL-ZF12C-ZW can also be controlled via an Arduino UNO by simulating button presses on the remote. Below is an example code snippet:
// Example code to control XL-ZF12C-ZW using Arduino UNO
// This code simulates button presses on the remote control
// by sending HIGH/LOW signals to the relay module.

const int relayPin = 7; // Pin connected to the relay module

void setup() {
  pinMode(relayPin, OUTPUT); // Set the relay pin as an output
  digitalWrite(relayPin, LOW); // Ensure the relay is off initially
}

void loop() {
  digitalWrite(relayPin, HIGH); // Activate the relay
  delay(1000); // Keep the relay on for 1 second
  digitalWrite(relayPin, LOW); // Deactivate the relay
  delay(1000); // Wait for 1 second before repeating
}
Note: To use this code, connect the relay module's control input to the Arduino's
relayPin(pin 7 in this example). Ensure the Arduino and the relay module share a common ground.
Troubleshooting and FAQs
Common Issues and Solutions
The relay does not activate when the remote is pressed.
- Ensure the module is powered with a stable 12V DC supply.
- Check the wireless range and ensure there are no obstructions between the remote and the module.
- Verify that the remote is paired with the module.
The relay clicks but the connected device does not turn on.
- Check the wiring of the load to the
NO,NC, andCOMpins. - Ensure the load does not exceed the relay's voltage or current ratings.
- Check the wiring of the load to the
The wireless range is shorter than expected.
- Ensure the antenna on the module is properly connected and not damaged.
- Avoid placing the module near metal objects or other sources of interference.
The module overheats during operation.
- Verify that the load current does not exceed 10A.
- Use a heatsink or cooling fan if the module is used for extended periods with high loads.
FAQs
Can I use a 5V power supply instead of 12V? No, the XL-ZF12C-ZW requires a 12V DC power supply for proper operation.
Can I control multiple relays with one remote? Yes, depending on the remote's configuration, you can pair it with multiple relay modules.
Is the module suitable for outdoor use? The module is not weatherproof. If used outdoors, it must be enclosed in a waterproof housing.
Can I use this module with a Raspberry Pi? Yes, the module can be controlled by a Raspberry Pi using GPIO pins, similar to the Arduino example provided.
By following this documentation, you can effectively integrate the XL-ZF12C-ZW wireless relay module into your projects for reliable and efficient remote control functionality.