
How to Use 4-Electrode TENS Unit: Examples, Pinouts, and Specs
 Design with 4-Electrode TENS Unit in Cirkit Designer
Introduction
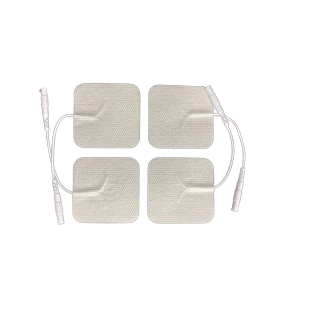
The 4-Electrode Transcutaneous Electrical Nerve Stimulation (TENS) unit is an electronic device designed for pain relief. It works by delivering low-voltage electrical impulses through four electrodes placed on the skin. These impulses stimulate the nerves, helping to reduce pain perception and promote relaxation. The device is commonly used for managing chronic pain, muscle tension, and post-injury recovery.
Explore Projects Built with 4-Electrode TENS Unit
 Open Project in Cirkit Designer
 Open Project in Cirkit Designer
 Open Project in Cirkit Designer
 Open Project in Cirkit Designer
Explore Projects Built with 4-Electrode TENS Unit
Open Project in Cirkit DesignerOpen Project in Cirkit DesignerOpen Project in Cirkit DesignerOpen Project in Cirkit DesignerCommon Applications and Use Cases
- Chronic pain management (e.g., back pain, arthritis)
- Muscle relaxation and tension relief
- Post-surgical recovery
- Sports injury rehabilitation
- Nerve stimulation for therapeutic purposes
Technical Specifications
Key Technical Details
| Parameter | Value |
|---|---|
| Power Supply | 3V DC (2x AA batteries) |
| Output Voltage Range | 0V to 50V (adjustable) |
| Output Current | 0mA to 80mA (adjustable) |
| Frequency Range | 1Hz to 150Hz |
| Pulse Width | 50µs to 300µs |
| Number of Channels | 2 (supports 4 electrodes) |
| Electrode Type | Self-adhesive gel pads |
| Dimensions | 120mm x 60mm x 20mm |
| Weight | 150g (including batteries) |
Pin Configuration and Descriptions
The 4-Electrode TENS unit typically has the following connectors and controls:
| Pin/Connector Name | Description |
|---|---|
| CH1+ | Positive terminal for Channel 1 electrode pair |
| CH1- | Negative terminal for Channel 1 electrode pair |
| CH2+ | Positive terminal for Channel 2 electrode pair |
| CH2- | Negative terminal for Channel 2 electrode pair |
| Power Switch | Turns the device ON/OFF |
| Intensity Knob | Adjusts the output current intensity for both channels |
| Mode Selector | Selects the stimulation mode (e.g., burst, continuous, modulation) |
| Frequency Knob | Adjusts the frequency of the electrical impulses |
| Pulse Width Knob | Adjusts the duration of each electrical pulse |
| Battery Compartment | Holds 2x AA batteries for powering the device |
Usage Instructions
How to Use the Component in a Circuit
The 4-Electrode TENS unit is a standalone device and does not require integration into a circuit. However, proper placement and usage of the electrodes are critical for effective operation. Follow these steps:
- Insert Batteries: Open the battery compartment and insert 2x AA batteries, ensuring correct polarity.
- Connect Electrodes: Attach the self-adhesive electrodes to the CH1+/- and CH2+/- connectors.
- Place Electrodes on Skin: Clean the skin where the electrodes will be placed. Position the electrodes around the area of pain, ensuring they are not too close to each other.
- Turn On the Device: Use the power switch to turn on the TENS unit.
- Adjust Settings:
- Use the intensity knob to set the desired current level.
- Select the stimulation mode using the mode selector.
- Adjust the frequency and pulse width as needed for comfort and effectiveness.
- Begin Therapy: Allow the device to run for the recommended duration (typically 15–30 minutes per session).
- Turn Off and Remove Electrodes: After the session, turn off the device and carefully remove the electrodes. Clean and store them properly for future use.
Important Considerations and Best Practices
- Skin Preparation: Ensure the skin is clean and dry before applying electrodes to improve conductivity and adhesion.
- Electrode Placement: Avoid placing electrodes over broken skin, near the heart, or on the head.
- Start Low: Begin with the lowest intensity setting and gradually increase to a comfortable level.
- Session Duration: Do not exceed the recommended session duration to prevent skin irritation or overstimulation.
- Consult a Professional: If unsure about electrode placement or settings, consult a healthcare professional.
Arduino Integration
The 4-Electrode TENS unit is not typically designed for direct integration with microcontrollers like Arduino. However, if you wish to control a similar device or simulate its functionality using an Arduino, you can use a PWM signal to generate pulses. Below is an example code snippet for generating a basic pulse signal:
// Arduino code to generate a PWM signal for simulating TENS pulses
const int outputPin = 9; // Pin connected to the output circuit
const int pulseWidth = 100; // Pulse width in microseconds
const int frequency = 100; // Frequency in Hz

void setup() {
  pinMode(outputPin, OUTPUT); // Set the pin as output
}

void loop() {
  digitalWrite(outputPin, HIGH); // Turn the signal ON
  delayMicroseconds(pulseWidth); // Wait for the pulse width duration
  digitalWrite(outputPin, LOW); // Turn the signal OFF
  delayMicroseconds((1000000 / frequency) - pulseWidth);
  // Wait for the remaining time in the cycle
}
Note: This code is for educational purposes only and does not replicate the full functionality of a TENS unit. Always use a certified TENS device for medical applications.
Troubleshooting and FAQs
Common Issues and Solutions
| Issue | Possible Cause | Solution |
|---|---|---|
| Device does not turn on | Batteries are dead or inserted incorrectly | Replace or correctly insert batteries |
| No sensation from electrodes | Intensity is too low or electrodes are not properly connected | Increase intensity or check connections |
| Skin irritation after use | Prolonged use or poor electrode placement | Reduce session duration or reposition electrodes |
| Uneven sensation between electrodes | Poor contact or worn-out electrodes | Ensure proper adhesion or replace electrodes |
| Device shuts off unexpectedly | Low battery or internal fault | Replace batteries or contact manufacturer |
Frequently Asked Questions
Can I use the TENS unit on any part of my body?
- No, avoid using the device on the head, near the heart, or over broken skin. Always follow the manufacturer's guidelines.
How often can I use the TENS unit?
- It is generally safe to use the device 1–3 times per day, with each session lasting 15–30 minutes. Consult a healthcare professional for personalized advice.
What should I do if the electrodes lose their stickiness?
- Clean the electrodes with a damp cloth to remove debris. If they no longer adhere, replace them with new ones.
Can I use rechargeable batteries?
- Yes, rechargeable AA batteries can be used, but ensure they are fully charged for optimal performance.
Is the TENS unit safe for everyone?
- The device is not recommended for individuals with pacemakers, pregnant women, or those with certain medical conditions. Consult a doctor before use.
By following this documentation, users can safely and effectively operate the 4-Electrode TENS unit for pain relief and therapeutic purposes.