Cirkit Designer Logo
Cirkit Designer
Your all-in-one circuit design IDE
Home / 
Component Documentation

How to Use Floatless Relay: Examples, Pinouts, and Specs

Image of Floatless Relay
Cirkit Designer LogoDesign with Floatless Relay in Cirkit Designer

Introduction

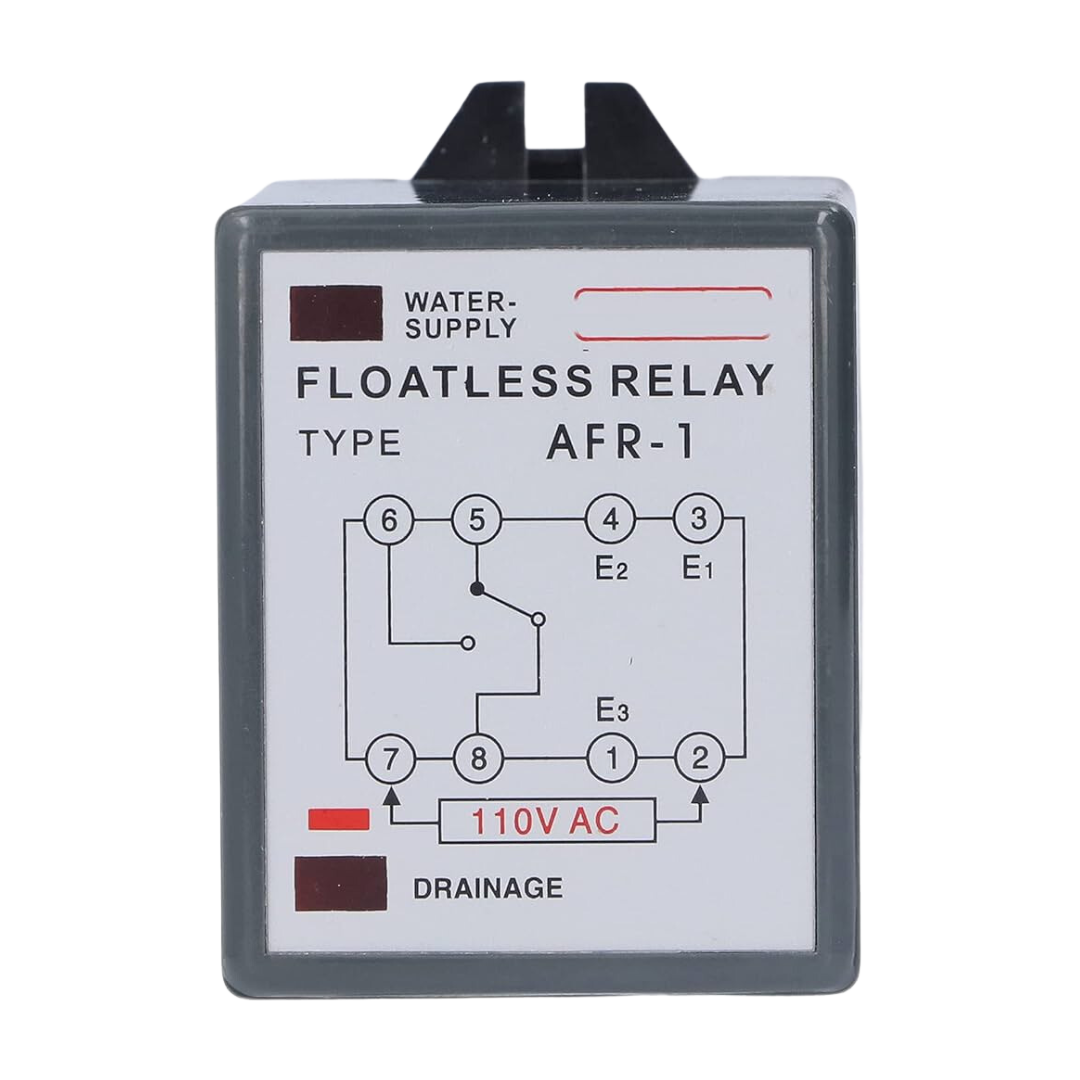
A floatless relay is an electronic device used to detect the level of liquid in a tank or container without the use of a mechanical float. It operates by sensing the conductivity of the liquid and is commonly used in applications such as water level control and automatic water supply systems. This component is highly reliable and maintenance-free, making it ideal for various industrial and domestic applications.

Explore Projects Built with Floatless Relay

Use Cirkit Designer to design, explore, and prototype these projects online. Some projects support real-time simulation. Click "Open Project" to start designing instantly!
Battery-Powered ESP32-Controlled Water Valve with Distance Sensing
Image of smart urinal flusher: A project utilizing Floatless Relay in a practical application
This circuit features an ESP32 Devkit V1 microcontroller interfaced with a VL53L1X time-of-flight distance sensor and controls a 5V relay module, which in turn operates a water solenoid valve. The ESP32 reads distance measurements from the VL53L1X via I2C (using SDA and SCL lines) and can interrupt (INT) or shut down (SHUT) the sensor. The relay module is actuated by the ESP32 to control the power to the solenoid valve, allowing for automated water flow based on the sensor input or other logic programmed into the ESP32.
Cirkit Designer LogoOpen Project in Cirkit Designer
ESP32-Based Smart Home Automation System with Bluetooth Control
Image of Home automation: A project utilizing Floatless Relay in a practical application
This circuit is a smart home automation system that uses an ESP32 microcontroller to control multiple relays, which in turn control AC bulbs and fans. The system includes several flush switches for manual control and an HC-05 Bluetooth module for wireless communication, all powered by a 5V adapter.
Cirkit Designer LogoOpen Project in Cirkit Designer
Intel Galileo-Based Automated Water Pump with Float Switch and Relay Control
Image of Indigenous Water Pump Circuit: A project utilizing Floatless Relay in a practical application
This circuit uses an Intel Galileo microcontroller to control a water pump via a 5V relay module. A float switch is used to detect water levels, and the microcontroller activates the relay to power the water pump based on the float switch's state.
Cirkit Designer LogoOpen Project in Cirkit Designer
ESP32-C6 Feather Controlled Smart Relay for AC Bulb Automation
Image of ESP32 Based ZigBee Device: A project utilizing Floatless Relay in a practical application
This circuit uses an ESP32-C6 Feather microcontroller to control an AC bulb via a KY-019 5V relay module. The ESP32 is programmed to receive Zigbee wireless commands to toggle the relay, which in turn switches the AC bulb on or off. The relay module is powered by a DC power source, and the bulb is connected to an AC supply, with the relay acting as an intermediary to control the bulb's power state.
Cirkit Designer LogoOpen Project in Cirkit Designer

Explore Projects Built with Floatless Relay

Use Cirkit Designer to design, explore, and prototype these projects online. Some projects support real-time simulation. Click "Open Project" to start designing instantly!
Image of smart urinal flusher: A project utilizing Floatless Relay in a practical application
Battery-Powered ESP32-Controlled Water Valve with Distance Sensing
This circuit features an ESP32 Devkit V1 microcontroller interfaced with a VL53L1X time-of-flight distance sensor and controls a 5V relay module, which in turn operates a water solenoid valve. The ESP32 reads distance measurements from the VL53L1X via I2C (using SDA and SCL lines) and can interrupt (INT) or shut down (SHUT) the sensor. The relay module is actuated by the ESP32 to control the power to the solenoid valve, allowing for automated water flow based on the sensor input or other logic programmed into the ESP32.
Cirkit Designer LogoOpen Project in Cirkit Designer
Image of Home automation: A project utilizing Floatless Relay in a practical application
ESP32-Based Smart Home Automation System with Bluetooth Control
This circuit is a smart home automation system that uses an ESP32 microcontroller to control multiple relays, which in turn control AC bulbs and fans. The system includes several flush switches for manual control and an HC-05 Bluetooth module for wireless communication, all powered by a 5V adapter.
Cirkit Designer LogoOpen Project in Cirkit Designer
Image of Indigenous Water Pump Circuit: A project utilizing Floatless Relay in a practical application
Intel Galileo-Based Automated Water Pump with Float Switch and Relay Control
This circuit uses an Intel Galileo microcontroller to control a water pump via a 5V relay module. A float switch is used to detect water levels, and the microcontroller activates the relay to power the water pump based on the float switch's state.
Cirkit Designer LogoOpen Project in Cirkit Designer
Image of ESP32 Based ZigBee Device: A project utilizing Floatless Relay in a practical application
ESP32-C6 Feather Controlled Smart Relay for AC Bulb Automation
This circuit uses an ESP32-C6 Feather microcontroller to control an AC bulb via a KY-019 5V relay module. The ESP32 is programmed to receive Zigbee wireless commands to toggle the relay, which in turn switches the AC bulb on or off. The relay module is powered by a DC power source, and the bulb is connected to an AC supply, with the relay acting as an intermediary to control the bulb's power state.
Cirkit Designer LogoOpen Project in Cirkit Designer

Technical Specifications

Key Technical Details

Parameter Value
Operating Voltage 24V DC / 110V AC / 220V AC
Operating Current 10mA - 100mA
Power Consumption < 3W
Contact Capacity 5A at 250V AC
Sensitivity Range 0 - 100kΩ
Response Time < 100ms
Operating Temperature -10°C to 55°C
Storage Temperature -25°C to 75°C

Pin Configuration and Descriptions

Pin No. Pin Name Description
1 COM Common terminal for power supply
2 NC Normally Closed contact
3 NO Normally Open contact
4 E1 Electrode 1 (connected to the liquid level sensor)
5 E2 Electrode 2 (connected to the liquid level sensor)
6 GND Ground terminal

Usage Instructions

How to Use the Component in a Circuit

  1. Power Supply Connection:

    • Connect the power supply to the COM pin (Pin 1) and GND pin (Pin 6).
    • Ensure the power supply voltage matches the operating voltage of the floatless relay.
  2. Sensor Connection:

    • Connect the liquid level sensor electrodes to E1 (Pin 4) and E2 (Pin 5).
    • Ensure the electrodes are properly placed in the tank or container to detect the desired liquid level.
  3. Output Connection:

    • Connect the load (e.g., pump, alarm) to the NO (Pin 3) or NC (Pin 2) contact based on the desired operation.
    • NO contact will close when the liquid level is detected, while NC contact will open.

Important Considerations and Best Practices

  • Proper Grounding: Ensure the GND pin is properly connected to avoid false triggering.
  • Electrode Placement: Place the electrodes at appropriate levels to accurately detect the liquid level.
  • Power Supply: Use a stable power supply to avoid fluctuations that may affect the relay's operation.
  • Regular Inspection: Periodically inspect the electrodes for any buildup or corrosion that may affect conductivity.

Troubleshooting and FAQs

Common Issues Users Might Face

  1. False Triggering:

    • Solution: Check the grounding and ensure the electrodes are clean and properly placed.
  2. No Response from Relay:

    • Solution: Verify the power supply voltage and connections. Ensure the electrodes are submerged in the liquid.
  3. Intermittent Operation:

    • Solution: Check for loose connections and ensure the power supply is stable.

FAQs

Q1: Can the floatless relay be used with any type of liquid?

  • A1: The floatless relay is designed to work with conductive liquids. It may not work with non-conductive liquids like oil.

Q2: How do I adjust the sensitivity of the floatless relay?

  • A2: Sensitivity can be adjusted using a potentiometer or a similar adjustment mechanism provided on the relay.

Q3: Can I use the floatless relay with an Arduino UNO?

  • A3: Yes, the floatless relay can be interfaced with an Arduino UNO. Below is an example code for interfacing:
// Arduino UNO and Floatless Relay Interface
const int relayPin = 2; // Pin connected to the relay's NO contact
const int sensorPin = A0; // Pin connected to the sensor output

void setup() {
  pinMode(relayPin, OUTPUT); // Set relay pin as output
  pinMode(sensorPin, INPUT); // Set sensor pin as input
  Serial.begin(9600); // Initialize serial communication
}

void loop() {
  int sensorValue = analogRead(sensorPin); // Read sensor value
  Serial.println(sensorValue); // Print sensor value to serial monitor

  if (sensorValue > 500) { // Adjust threshold as needed
    digitalWrite(relayPin, HIGH); // Activate relay
  } else {
    digitalWrite(relayPin, LOW); // Deactivate relay
  }

  delay(500); // Wait for 500 milliseconds
}

This code reads the sensor value and activates the relay when the liquid level is detected. Adjust the threshold value based on your specific requirements.

By following this documentation, users can effectively utilize the floatless relay in their applications, ensuring reliable and maintenance-free liquid level detection.