Cirkit Designer Logo
Cirkit Designer
Your all-in-one circuit design IDE
Home / 
Component Documentation

How to Use Adafruit 2.2in PiTFT HAT: Examples, Pinouts, and Specs

Image of Adafruit 2.2in PiTFT HAT
Cirkit Designer LogoDesign with Adafruit 2.2in PiTFT HAT in Cirkit Designer

Introduction

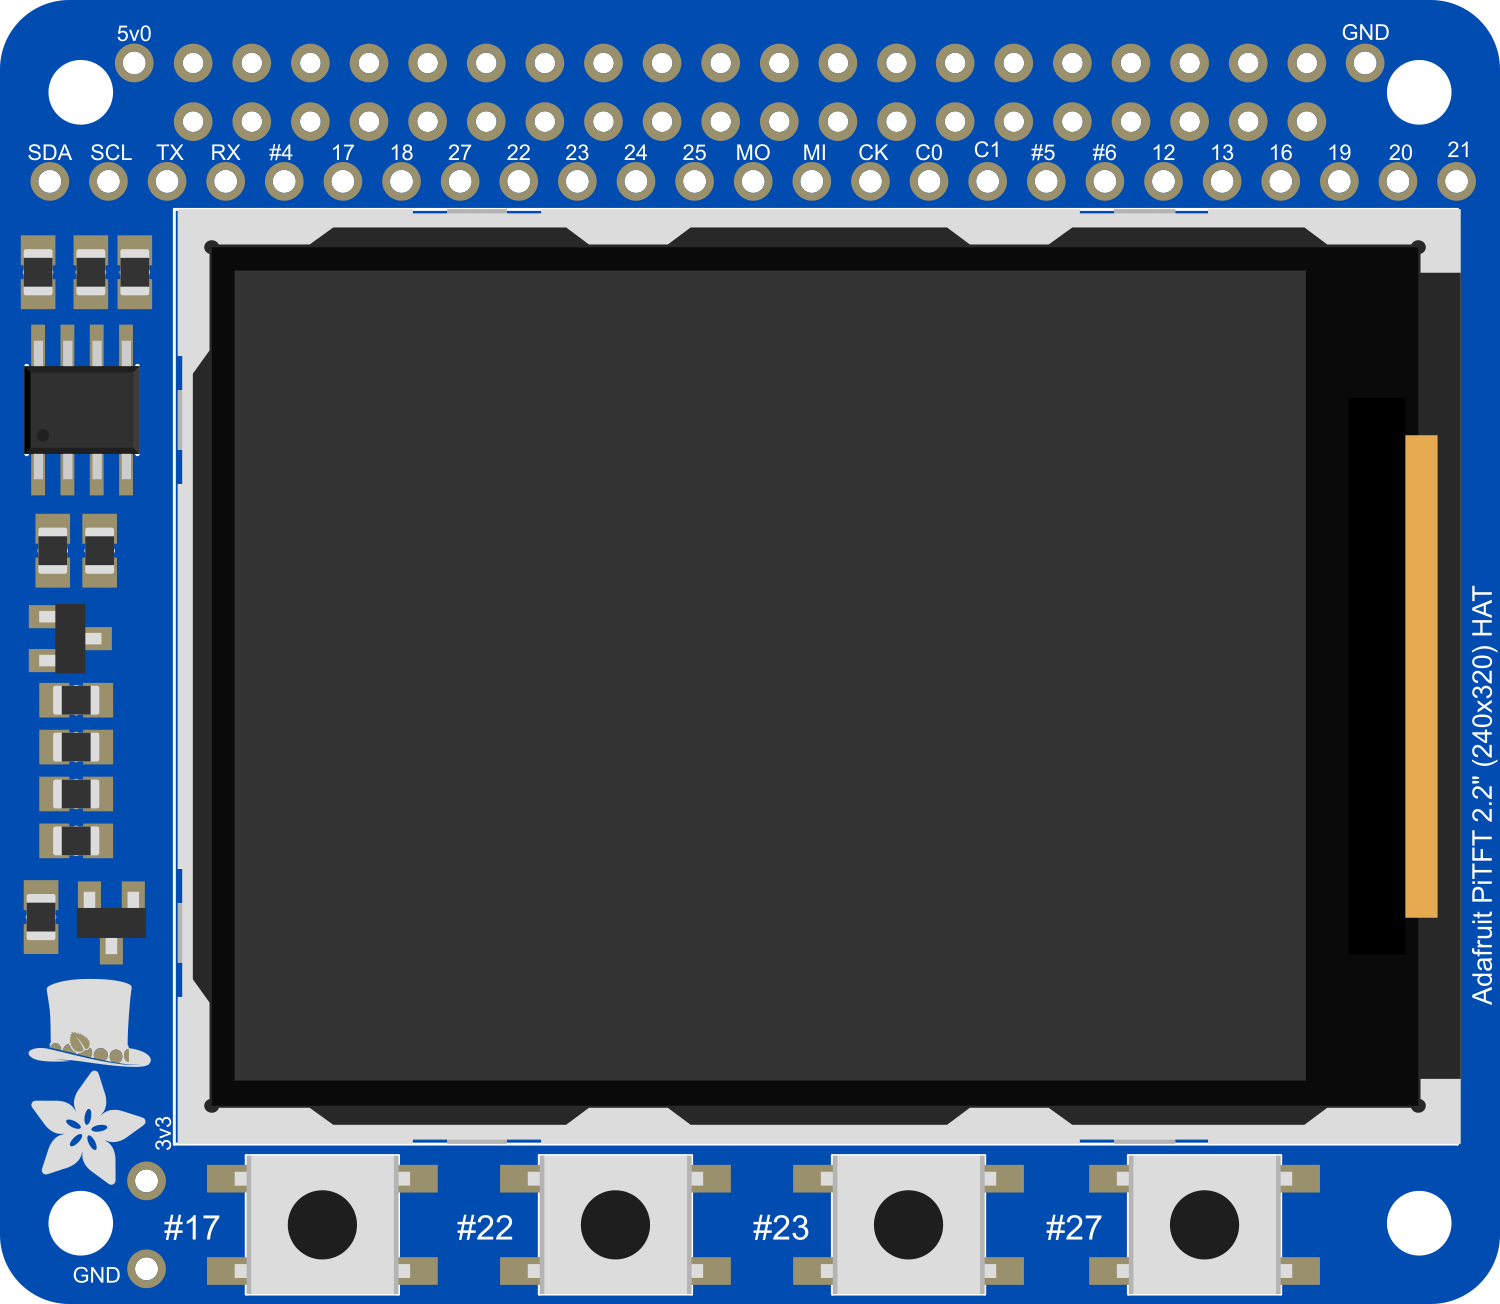
The Adafruit 2.2in PiTFT HAT is a compact and versatile display module featuring a 2.2-inch TFT LCD screen with a resolution of 320x240 pixels. This HAT (Hardware Attached on Top) is specifically designed for compatibility with the Raspberry Pi, making it an excellent choice for projects that require a small display with good resolution and color representation. Common applications include handheld devices, mini gaming consoles, and user interfaces for various Raspberry Pi projects.

Explore Projects Built with Adafruit 2.2in PiTFT HAT

Use Cirkit Designer to design, explore, and prototype these projects online. Some projects support real-time simulation. Click "Open Project" to start designing instantly!
Raspberry Pi 4B-Based Multi-Sensor Interface Hub with GPS and GSM
Image of Rocket: A project utilizing Adafruit 2.2in PiTFT HAT in a practical application
This circuit features a Raspberry Pi 4B interfaced with an IMX296 color global shutter camera, a Neo 6M GPS module, an Adafruit BMP388 barometric pressure sensor, an MPU-6050 accelerometer/gyroscope, and a Sim800l GSM module for cellular connectivity. Power management is handled by an MT3608 boost converter, which steps up the voltage from a Lipo battery, with a resettable fuse PTC and a 1N4007 diode for protection. The Adafruit Perma-Proto HAT is used for organizing connections and interfacing the sensors and modules with the Raspberry Pi via I2C and GPIO pins.
Cirkit Designer LogoOpen Project in Cirkit Designer
Raspberry Pi 5 Smart Weather Station with GPS and AI Integration
Image of Senior Design: A project utilizing Adafruit 2.2in PiTFT HAT in a practical application
This circuit integrates a Raspberry Pi 5 with various peripherals including an 8MP 3D stereo camera, an AI Hat, a BMP388 sensor, a 16x2 I2C LCD, and an Adafruit Ultimate GPS module. The Raspberry Pi serves as the central processing unit, interfacing with the camera for image capture, the AI Hat for AI processing, the BMP388 for environmental sensing, the LCD for display, and the GPS module for location tracking, with a USB Serial TTL for serial communication.
Cirkit Designer LogoOpen Project in Cirkit Designer
Raspberry Pi Pico and OV7670 Camera-Based Robotic System with TFT Display
Image of REF Speed Bot V3 CKT: A project utilizing Adafruit 2.2in PiTFT HAT in a practical application
This circuit features two Raspberry Pi Pico microcontrollers interfacing with various peripherals including an OV7670 camera module, a TFT display, and an OLED display. It also includes a multiplexer and a motor driver to control two planetary gearbox motors, powered by a battery and regulated through buck converters. The setup is designed for image capture, display, and motor control applications.
Cirkit Designer LogoOpen Project in Cirkit Designer
Raspberry Pi 4B with I2C Current Sensing and OLED Display
Image of iot task 2: A project utilizing Adafruit 2.2in PiTFT HAT in a practical application
This circuit features a Raspberry Pi 4B as the central processing unit, interfaced with an Adafruit ADS1115 16-bit I2C ADC for analog-to-digital conversion and a 0.96" OLED display for visual output. The ADC is connected to a current sensor for measuring electrical current, with the sensor's output connected to the ADC's AIN0 pin and the burden resistor connected to AIN1. The Raspberry Pi communicates with both the ADC and the OLED display over the I2C bus, using GPIO2 (SDA) and GPIO3 (SCL) for data exchange.
Cirkit Designer LogoOpen Project in Cirkit Designer

Explore Projects Built with Adafruit 2.2in PiTFT HAT

Use Cirkit Designer to design, explore, and prototype these projects online. Some projects support real-time simulation. Click "Open Project" to start designing instantly!
Image of Rocket: A project utilizing Adafruit 2.2in PiTFT HAT in a practical application
Raspberry Pi 4B-Based Multi-Sensor Interface Hub with GPS and GSM
This circuit features a Raspberry Pi 4B interfaced with an IMX296 color global shutter camera, a Neo 6M GPS module, an Adafruit BMP388 barometric pressure sensor, an MPU-6050 accelerometer/gyroscope, and a Sim800l GSM module for cellular connectivity. Power management is handled by an MT3608 boost converter, which steps up the voltage from a Lipo battery, with a resettable fuse PTC and a 1N4007 diode for protection. The Adafruit Perma-Proto HAT is used for organizing connections and interfacing the sensors and modules with the Raspberry Pi via I2C and GPIO pins.
Cirkit Designer LogoOpen Project in Cirkit Designer
Image of Senior Design: A project utilizing Adafruit 2.2in PiTFT HAT in a practical application
Raspberry Pi 5 Smart Weather Station with GPS and AI Integration
This circuit integrates a Raspberry Pi 5 with various peripherals including an 8MP 3D stereo camera, an AI Hat, a BMP388 sensor, a 16x2 I2C LCD, and an Adafruit Ultimate GPS module. The Raspberry Pi serves as the central processing unit, interfacing with the camera for image capture, the AI Hat for AI processing, the BMP388 for environmental sensing, the LCD for display, and the GPS module for location tracking, with a USB Serial TTL for serial communication.
Cirkit Designer LogoOpen Project in Cirkit Designer
Image of REF Speed Bot V3 CKT: A project utilizing Adafruit 2.2in PiTFT HAT in a practical application
Raspberry Pi Pico and OV7670 Camera-Based Robotic System with TFT Display
This circuit features two Raspberry Pi Pico microcontrollers interfacing with various peripherals including an OV7670 camera module, a TFT display, and an OLED display. It also includes a multiplexer and a motor driver to control two planetary gearbox motors, powered by a battery and regulated through buck converters. The setup is designed for image capture, display, and motor control applications.
Cirkit Designer LogoOpen Project in Cirkit Designer
Image of iot task 2: A project utilizing Adafruit 2.2in PiTFT HAT in a practical application
Raspberry Pi 4B with I2C Current Sensing and OLED Display
This circuit features a Raspberry Pi 4B as the central processing unit, interfaced with an Adafruit ADS1115 16-bit I2C ADC for analog-to-digital conversion and a 0.96" OLED display for visual output. The ADC is connected to a current sensor for measuring electrical current, with the sensor's output connected to the ADC's AIN0 pin and the burden resistor connected to AIN1. The Raspberry Pi communicates with both the ADC and the OLED display over the I2C bus, using GPIO2 (SDA) and GPIO3 (SCL) for data exchange.
Cirkit Designer LogoOpen Project in Cirkit Designer

Technical Specifications

Display Characteristics

  • Screen Size: 2.2 inches diagonal
  • LCD Type: TFT
  • Resolution: 320x240 pixels
  • Interface: SPI
  • Backlight: LED

Electrical Specifications

  • Operating Voltage: 3.3V
  • Logic Level: 3.3V compatible

Pin Configuration and Descriptions

Pin Number Name Description
1 3V3 3.3V Power Supply
2 5V 5V Power Supply (for backlight)
3 GND Ground
4 MOSI SPI Data Input to TFT
5 SCLK SPI Clock to TFT
6 CS SPI Chip Select for TFT
7 RST Reset Pin for TFT
8 D/C Data/Command Control Pin

Usage Instructions

Connecting to Raspberry Pi

  1. Power Off Raspberry Pi: Ensure that your Raspberry Pi is turned off before connecting the PiTFT HAT.
  2. Align Pins: Carefully align the GPIO pins of the PiTFT HAT with the corresponding pins on the Raspberry Pi.
  3. Attach the HAT: Gently press down on the PiTFT HAT to connect it to the Raspberry Pi GPIO header.

Software Configuration

To use the Adafruit 2.2in PiTFT HAT with your Raspberry Pi, you'll need to install the necessary software and configure the Pi to use the display.

  1. Install Adafruit Helper: Run the following commands in the terminal to install the Adafruit helper utility:
cd ~
sudo apt-get update
sudo apt-get install -y git python3-pip
git clone https://github.com/adafruit/Raspberry-Pi-Installer-Scripts.git
cd Raspberry-Pi-Installer-Scripts
sudo python3 adafruit-pitft.py
  1. Follow On-Screen Prompts: The installation script will guide you through the setup process. Choose the appropriate options for your PiTFT model and desired configuration.

  2. Reboot: Once the installation is complete, reboot your Raspberry Pi.

Testing the Display

After installation and configuration, you can test the display using the following Python script:

import os
import pygame
import time
import random

Initialize the display

os.putenv('SDL_FBDEV', '/dev/fb1') pygame.init()

Set up the display surface

size = (320, 240) pygame.display.set_mode(size) screen = pygame.display.get_surface()

Fill the screen with red, green, blue, and then black

colors = [(255, 0, 0), (0, 255, 0), (0, 0, 255), (0, 0, 0)] for color in colors: screen.fill(color) pygame.display.flip() time.sleep(1)


Important Considerations and Best Practices

  • Power Supply: Ensure that your Raspberry Pi has an adequate power supply, as the PiTFT HAT will draw additional current.
  • GPIO Access: Be aware that the PiTFT HAT will cover the GPIO pins. If you need to access other GPIO pins for your project, consider using a GPIO extension board or ribbon cable.
  • Display Protection: The TFT screen is delicate. Consider using a case or screen protector to prevent damage.

Troubleshooting and FAQs

Common Issues

  • Display Not Working: Ensure that all connections are secure and that the PiTFT HAT is properly seated on the Raspberry Pi GPIO header.
  • Screen is White: A white screen usually indicates a problem with the software configuration or a loose connection. Recheck the software setup and ensure all pins are connected correctly.

Solutions and Tips

  • Recheck Software Installation: If the display isn't working as expected, go through the software installation steps again to ensure that all settings are correct.
  • Update Raspberry Pi: Make sure your Raspberry Pi is updated with the latest version of the operating system and packages.

FAQs

Q: Can I use the PiTFT HAT with any Raspberry Pi model? A: The PiTFT HAT is compatible with most Raspberry Pi models with a 40-pin GPIO header. Check the Adafruit website for specific model compatibility.

Q: How do I calibrate the touchscreen? A: If your PiTFT HAT includes a touchscreen, you can calibrate it using the adafruit-pitft-touch-cal script found in the Raspberry-Pi-Installer-Scripts repository.

Q: Can I use the PiTFT HAT with other operating systems besides Raspbian? A: The PiTFT HAT is designed to work with Raspbian, but it may work with other Raspberry Pi-compatible operating systems. Check the documentation for your specific OS for compatibility.

For further assistance, visit the Adafruit support forums or contact Adafruit customer service.