
How to Use MPU6050: Examples, Pinouts, and Specs
 Design with MPU6050 in Cirkit Designer
Introduction
The MPU6050 is a 6-axis motion tracking device that combines a 3-axis gyroscope and a 3-axis accelerometer on a single chip. This compact and versatile sensor is widely used in applications requiring motion sensing and orientation detection. Its ability to measure angular velocity and linear acceleration makes it ideal for robotics, drones, smartphones, gaming devices, and wearable technology. Additionally, the MPU6050 features a Digital Motion Processor (DMP) that can process complex motion algorithms internally, reducing the computational load on the host microcontroller.
Explore Projects Built with MPU6050
 Open Project in Cirkit Designer
 Open Project in Cirkit Designer
 Open Project in Cirkit Designer
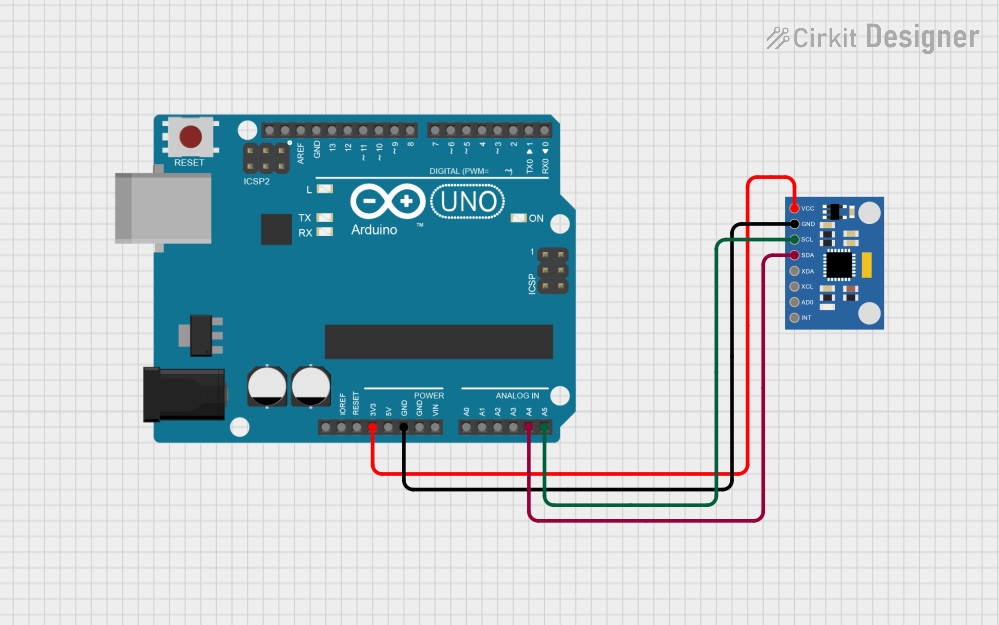 Open Project in Cirkit Designer
Explore Projects Built with MPU6050
Open Project in Cirkit DesignerOpen Project in Cirkit DesignerOpen Project in Cirkit DesignerOpen Project in Cirkit DesignerTechnical Specifications
The following are the key technical details of the MPU6050:
- Supply Voltage: 2.375V to 3.46V (3.3V typical)
- Communication Interface: I2C (up to 400kHz)
- Gyroscope Range: ±250, ±500, ±1000, ±2000 degrees/second
- Accelerometer Range: ±2g, ±4g, ±8g, ±16g
- Operating Temperature: -40°C to +85°C
- Power Consumption: 3.9mA (typical in active mode)
- Package: 24-pin QFN
Pin Configuration and Descriptions
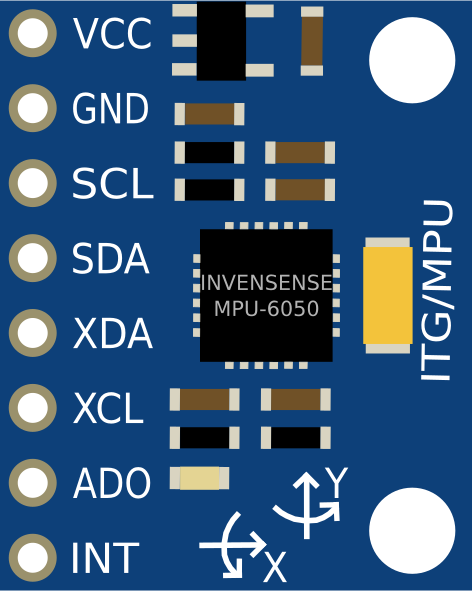
The MPU6050 has 8 primary pins for interfacing. Below is the pin configuration:
| Pin | Name | Description |
|---|---|---|
| 1 | VCC | Power supply input (2.375V to 3.46V). Typically connected to 3.3V. |
| 2 | GND | Ground connection. |
| 3 | SCL | I2C clock line. Connect to the SCL pin of the microcontroller. |
| 4 | SDA | I2C data line. Connect to the SDA pin of the microcontroller. |
| 5 | XDA | Auxiliary I2C data line (used for connecting additional sensors). |
| 6 | XCL | Auxiliary I2C clock line (used for connecting additional sensors). |
| 7 | AD0 | I2C address selection pin. Connect to GND for address 0x68, or VCC for 0x69. |
| 8 | INT | Interrupt output pin. Used to signal data availability or motion detection. |
Usage Instructions
How to Use the MPU6050 in a Circuit
- Power Supply: Connect the VCC pin to a 3.3V power source and the GND pin to ground.
- I2C Communication: Connect the SCL and SDA pins to the corresponding I2C pins on your microcontroller. Use pull-up resistors (typically 4.7kΩ) on the SCL and SDA lines if not already present.
- Address Selection: Set the AD0 pin to GND for the default I2C address
0x68, or to VCC for the alternate address0x69. - Interrupt Pin: Optionally, connect the INT pin to a GPIO pin on your microcontroller to handle interrupts for motion detection or data availability.
Important Considerations and Best Practices
- Bypass Capacitor: Place a 0.1µF decoupling capacitor close to the VCC pin to reduce noise.
- I2C Pull-Up Resistors: Ensure proper pull-up resistors are used on the I2C lines to maintain signal integrity.
- Mounting Orientation: Properly align the sensor on your PCB to ensure accurate motion readings.
- DMP Usage: If using the Digital Motion Processor, ensure your firmware supports DMP initialization and configuration.
Example Code for Arduino UNO
Below is an example of how to interface the MPU6050 with an Arduino UNO using the I2C protocol:
#include <Wire.h>
#include <MPU6050.h> // Include the MPU6050 library

MPU6050 mpu; // Create an MPU6050 object

void setup() {
  Wire.begin(); // Initialize I2C communication
  Serial.begin(9600); // Start serial communication for debugging

  // Initialize the MPU6050
  Serial.println("Initializing MPU6050...");
  if (!mpu.begin(MPU6050_SCALE_2000DPS, MPU6050_RANGE_2G)) {
    Serial.println("Could not find a valid MPU6050 sensor. Check connections.");
    while (1); // Halt execution if initialization fails
  }

  // Configure the sensor
  mpu.setThreshold(3); // Set motion detection threshold
  Serial.println("MPU6050 initialized successfully.");
}

void loop() {
  // Read raw accelerometer and gyroscope data
  Vector rawAccel = mpu.readRawAccel();
  Vector rawGyro = mpu.readRawGyro();

  // Print accelerometer data
  Serial.print("Accel X: "); Serial.print(rawAccel.XAxis);
  Serial.print(" | Y: "); Serial.print(rawAccel.YAxis);
  Serial.print(" | Z: "); Serial.println(rawAccel.ZAxis);

  // Print gyroscope data
  Serial.print("Gyro X: "); Serial.print(rawGyro.XAxis);
  Serial.print(" | Y: "); Serial.print(rawGyro.YAxis);
  Serial.print(" | Z: "); Serial.println(rawGyro.ZAxis);

  delay(500); // Delay for readability
}
Troubleshooting and FAQs
Common Issues
No Response from the Sensor:
- Cause: Incorrect I2C address or wiring.
- Solution: Verify the AD0 pin connection and ensure the correct I2C address (
0x68or0x69) is used in your code.
Inconsistent Readings:
- Cause: Electrical noise or improper mounting.
- Solution: Add a decoupling capacitor near the VCC pin and ensure the sensor is securely mounted.
I2C Communication Errors:
- Cause: Missing or incorrect pull-up resistors on the I2C lines.
- Solution: Add 4.7kΩ pull-up resistors to the SDA and SCL lines.
Interrupt Pin Not Working:
- Cause: Interrupts not enabled in the sensor configuration.
- Solution: Check the MPU6050 library documentation to enable and configure interrupts.
FAQs
Q: Can the MPU6050 operate at 5V?
A: No, the MPU6050 operates at a maximum of 3.46V. Use a voltage regulator or level shifter if interfacing with a 5V system.Q: How do I calibrate the MPU6050?
A: Calibration involves reading the raw sensor data and calculating offsets for the accelerometer and gyroscope. Many libraries include built-in calibration functions.Q: Can I connect multiple MPU6050 sensors to the same I2C bus?
A: Yes, but each sensor must have a unique I2C address. Use the AD0 pin to set different addresses.Q: What is the maximum sampling rate of the MPU6050?
A: The MPU6050 supports a maximum sampling rate of 1kHz for both the accelerometer and gyroscope.
This concludes the documentation for the MPU6050.