How to Use BMP 388: Examples, Pinouts, and Specs

Introduction
The BMP 388 is a high-precision barometric pressure sensor designed to measure atmospheric pressure and temperature. It is a compact, low-power device that provides accurate readings, making it ideal for a wide range of applications. The sensor is commonly used in weather stations, altimeters, drones, and IoT devices for environmental monitoring. Its small size and high accuracy make it a popular choice for both hobbyists and professionals.
Explore Projects Built with BMP 388
Explore Projects Built with BMP 388
Common Applications
- Weather monitoring systems
- Altitude measurement in drones and aircraft
- IoT devices for environmental sensing
- Indoor navigation and floor detection
- Wearable devices for fitness and health tracking
Technical Specifications
The BMP 388 offers excellent performance and flexibility. Below are its key technical details:
| Parameter | Value |
|---|---|
| Operating Voltage | 1.7V to 3.6V |
| Current Consumption | 3.4 µA (low-power mode) |
| Pressure Measurement Range | 300 hPa to 1250 hPa |
| Temperature Range | -40°C to +85°C |
| Pressure Accuracy | ±0.5 hPa |
| Temperature Accuracy | ±0.5°C |
| Communication Interface | I2C, SPI |
| Package Size | 2.0 mm × 2.0 mm × 0.75 mm |
Pin Configuration and Descriptions
The BMP 388 typically comes in a 10-pin LGA package. Below is the pinout description:
| Pin | Name | Description |
|---|---|---|
| 1 | VDD | Power supply (1.7V to 3.6V) |
| 2 | GND | Ground |
| 3 | SCL | I2C clock line / SPI clock |
| 4 | SDA | I2C data line / SPI data input |
| 5 | CSB | Chip select for SPI (active low) |
| 6 | SDO | SPI data output / I2C address selection |
| 7-10 | NC | Not connected (leave floating or connect to ground) |
Usage Instructions
How to Use the BMP 388 in a Circuit
- Power Supply: Connect the VDD pin to a 3.3V power source and the GND pin to ground.
- Communication Interface: Choose between I2C or SPI for communication:
- For I2C, connect the SCL and SDA pins to the corresponding I2C lines on your microcontroller.
- For SPI, connect the SCL, SDA, CSB, and SDO pins to the appropriate SPI lines.
- Pull-Up Resistors: If using I2C, ensure pull-up resistors (typically 4.7kΩ) are connected to the SCL and SDA lines.
- Address Selection: For I2C, the SDO pin determines the device address:
- Connect SDO to GND for address
0x76. - Connect SDO to VDD for address
0x77.
- Connect SDO to GND for address
Important Considerations
- Power Supply: Ensure the supply voltage is within the specified range (1.7V to 3.6V).
- Decoupling Capacitor: Place a 0.1 µF capacitor close to the VDD pin to reduce noise.
- Temperature Compensation: Use the temperature readings from the sensor to compensate for pressure measurements in your application.
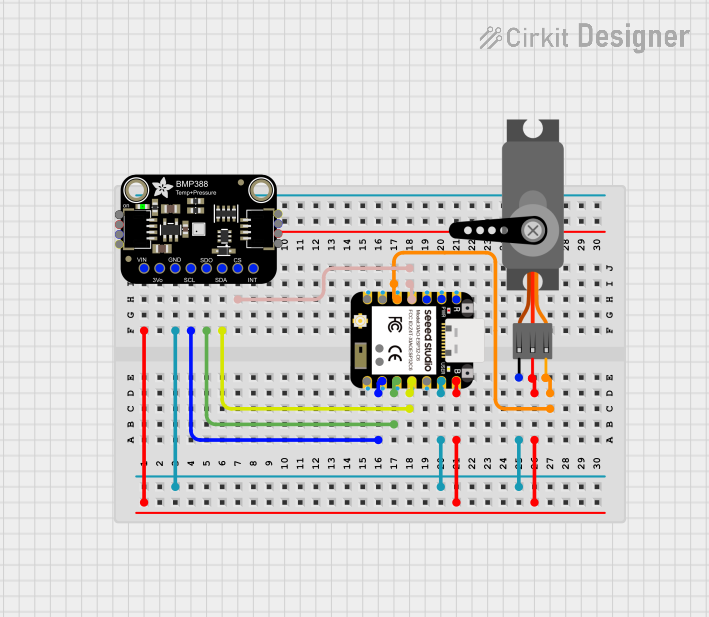
Example: Connecting BMP 388 to Arduino UNO
Below is an example of how to connect and use the BMP 388 with an Arduino UNO via I2C:
Wiring Diagram
| BMP 388 Pin | Arduino UNO Pin |
|---|---|
| VDD | 3.3V |
| GND | GND |
| SCL | A5 (SCL) |
| SDA | A4 (SDA) |
| SDO | GND (for address 0x76) |
| CSB | Leave unconnected |
Arduino Code Example
#include <Wire.h>
#include <Adafruit_Sensor.h>
#include <Adafruit_BMP3XX.h>

// Create an instance of the BMP388 sensor
Adafruit_BMP3XX bmp;

void setup() {
  Serial.begin(9600);
  while (!Serial); // Wait for Serial Monitor to open

  // Initialize I2C communication
  if (!bmp.begin(0x76)) {
    // 0x76 is the I2C address when SDO is connected to GND
    Serial.println("Could not find a valid BMP388 sensor, check wiring!");
    while (1);
  }

  // Configure the sensor
  bmp.setTemperatureOversampling(BMP3_OVERSAMPLING_8X);
  bmp.setPressureOversampling(BMP3_OVERSAMPLING_4X);
  bmp.setIIRFilterCoeff(BMP3_IIR_FILTER_COEFF_3);
  bmp.setOutputDataRate(BMP3_ODR_50_HZ);
}

void loop() {
  // Read temperature and pressure
  if (!bmp.performReading()) {
    Serial.println("Failed to perform reading!");
    return;
  }

  // Print the readings to the Serial Monitor
  Serial.print("Temperature = ");
  Serial.print(bmp.temperature);
  Serial.println(" °C");

  Serial.print("Pressure = ");
  Serial.print(bmp.pressure / 100.0); // Convert Pa to hPa
  Serial.println(" hPa");

  delay(1000); // Wait 1 second before the next reading
}
Troubleshooting and FAQs
Common Issues
Sensor Not Detected
- Cause: Incorrect wiring or I2C address mismatch.
- Solution: Double-check the connections and ensure the SDO pin is set correctly for the desired I2C address.
Inaccurate Readings
- Cause: Lack of temperature compensation or environmental interference.
- Solution: Use the temperature readings for compensation and avoid placing the sensor near heat sources.
No Data Output
- Cause: Incorrect initialization or communication failure.
- Solution: Verify the initialization code and ensure the correct communication protocol (I2C or SPI) is selected.
FAQs
Q: Can the BMP 388 measure altitude?
- A: Yes, the sensor can calculate altitude based on pressure readings using the barometric formula.
Q: What is the maximum sampling rate of the BMP 388?
- A: The sensor supports a maximum output data rate of 200 Hz.
Q: Can I use the BMP 388 with a 5V microcontroller?
- A: Yes, but you will need a level shifter to step down the logic levels to 3.3V.
By following this documentation, you can effectively integrate the BMP 388 into your projects for accurate pressure and temperature measurements.