Cirkit Designer Logo
Cirkit Designer
Your all-in-one circuit design IDE
Home / 
Component Documentation

How to Use SparkFun Digital Sandbox: Examples, Pinouts, and Specs

Image of SparkFun Digital Sandbox
Cirkit Designer LogoDesign with SparkFun Digital Sandbox in Cirkit Designer

Introduction

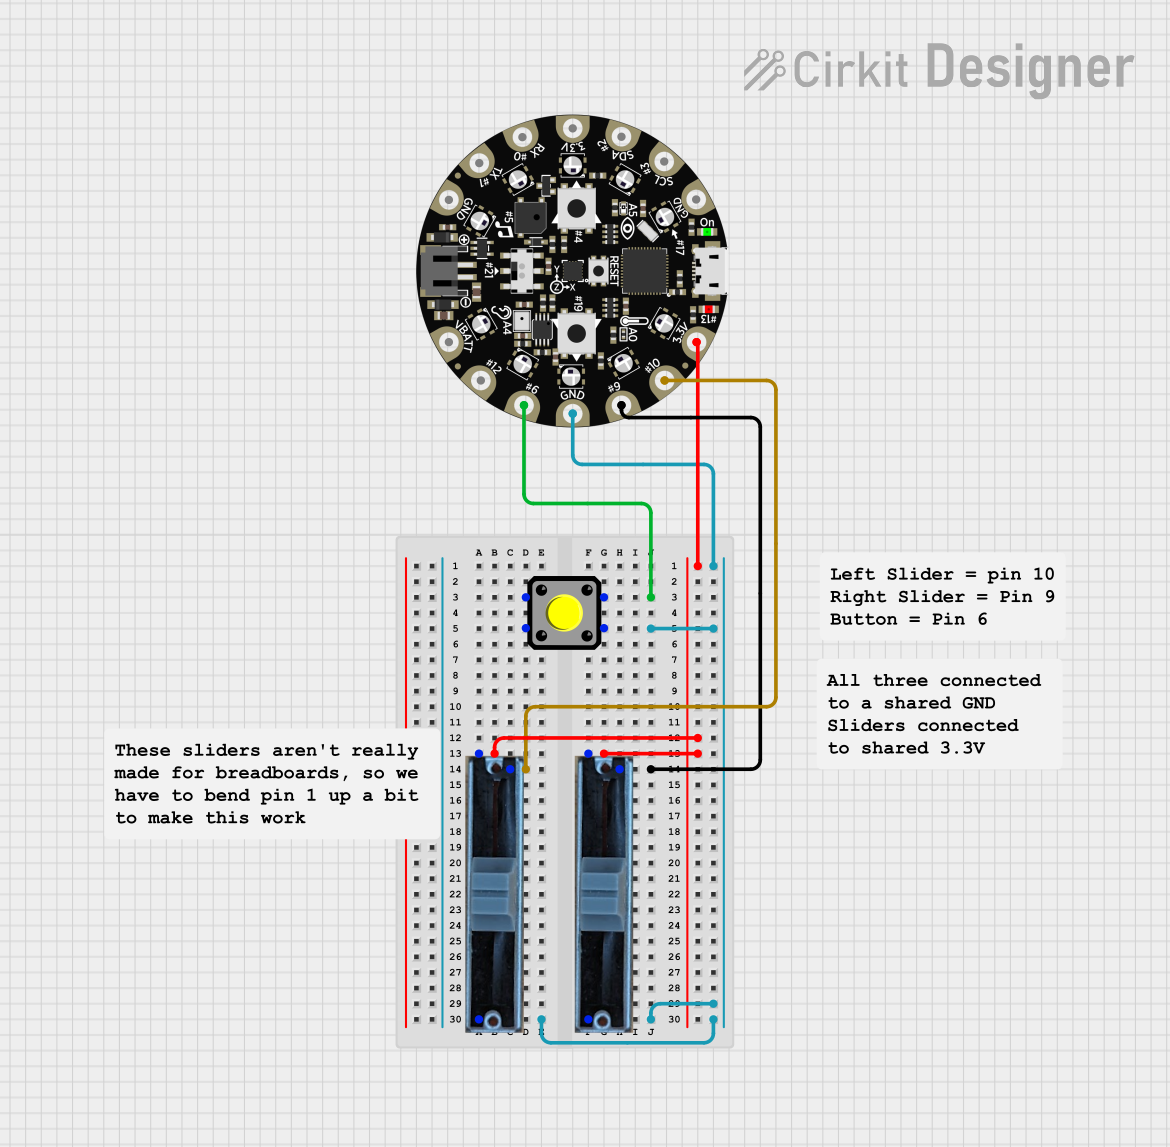
The SparkFun Digital Sandbox (Sandbox) is an educational platform designed to introduce electronics and programming in an easy-to-understand format. It is equipped with built-in sensors and components, making it an ideal tool for beginners to experiment with and learn the basics of electronic circuits and coding without the need for soldering or breadboarding.

Explore Projects Built with SparkFun Digital Sandbox

Use Cirkit Designer to design, explore, and prototype these projects online. Some projects support real-time simulation. Click "Open Project" to start designing instantly!
Adafruit Circuit Playground-Based Interactive Control System with Pushbutton and Slide Potentiometers
Image of Lever Up Controller: A project utilizing SparkFun Digital Sandbox in a practical application
This circuit features an Adafruit Circuit Playground Dev Edition microcontroller interfaced with a pushbutton and two slide potentiometers. The pushbutton is connected to digital pin D6, while the potentiometers provide analog input to pins D9 and D10, allowing for variable control inputs.
Cirkit Designer LogoOpen Project in Cirkit Designer
Arduino-Controlled Interactive LED and Sound System with Motion Detection
Image of project 1: A project utilizing SparkFun Digital Sandbox in a practical application
This circuit features an Arduino UNO microcontroller interfaced with an Adafruit ADXL345 accelerometer, an HC-SR04 ultrasonic sensor, two SG90 servomotors, a DFPlayer Mini MP3 module, a WS2812 RGB LED strip, and a loudspeaker. The Arduino controls the LED strip and servomotors based on distance measurements from the ultrasonic sensor and plays sounds through the DFPlayer Mini when motion is detected by the accelerometer. The circuit is designed for interactive displays or installations where visual and auditory feedback is provided in response to object proximity and movement.
Cirkit Designer LogoOpen Project in Cirkit Designer
ESP32-Based RFID Music Player with Arcade Button Controls
Image of Robot Music Player: A project utilizing SparkFun Digital Sandbox in a practical application
This circuit features an ESP32 Devkit V1 microcontroller interfaced with a DFPlayer Mini MP3 player module, an RFID-RC522 reader, a piezo speaker, and two arcade buttons. The ESP32 controls audio playback through the DFPlayer Mini, which is connected to the speaker, and uses the RFID reader to trigger specific audio tracks based on RFID tag data. The arcade buttons are used to control playback and adjust volume, while a rocker switch and battery mount provide power management.
Cirkit Designer LogoOpen Project in Cirkit Designer
Arduino Nano-Controlled Audio Player with Interactive LED Effects
Image of Darth Vader Chest Box: A project utilizing SparkFun Digital Sandbox in a practical application
This circuit features an Arduino Nano microcontroller interfaced with a DFPlayer Mini MP3 module for audio playback, a WS2812 RGB LED strip for visual effects, and a pushbutton for user input. The Arduino controls the LED strip to create lighting effects and uses the DFPlayer Mini to play sounds from an SD card when the button is pressed. Additional components like resistors and capacitors are used for signal conditioning and power stabilization, while a toggle switch and a lithium battery provide power management capabilities.
Cirkit Designer LogoOpen Project in Cirkit Designer

Explore Projects Built with SparkFun Digital Sandbox

Use Cirkit Designer to design, explore, and prototype these projects online. Some projects support real-time simulation. Click "Open Project" to start designing instantly!
Image of Lever Up Controller: A project utilizing SparkFun Digital Sandbox in a practical application
Adafruit Circuit Playground-Based Interactive Control System with Pushbutton and Slide Potentiometers
This circuit features an Adafruit Circuit Playground Dev Edition microcontroller interfaced with a pushbutton and two slide potentiometers. The pushbutton is connected to digital pin D6, while the potentiometers provide analog input to pins D9 and D10, allowing for variable control inputs.
Cirkit Designer LogoOpen Project in Cirkit Designer
Image of project 1: A project utilizing SparkFun Digital Sandbox in a practical application
Arduino-Controlled Interactive LED and Sound System with Motion Detection
This circuit features an Arduino UNO microcontroller interfaced with an Adafruit ADXL345 accelerometer, an HC-SR04 ultrasonic sensor, two SG90 servomotors, a DFPlayer Mini MP3 module, a WS2812 RGB LED strip, and a loudspeaker. The Arduino controls the LED strip and servomotors based on distance measurements from the ultrasonic sensor and plays sounds through the DFPlayer Mini when motion is detected by the accelerometer. The circuit is designed for interactive displays or installations where visual and auditory feedback is provided in response to object proximity and movement.
Cirkit Designer LogoOpen Project in Cirkit Designer
Image of Robot Music Player: A project utilizing SparkFun Digital Sandbox in a practical application
ESP32-Based RFID Music Player with Arcade Button Controls
This circuit features an ESP32 Devkit V1 microcontroller interfaced with a DFPlayer Mini MP3 player module, an RFID-RC522 reader, a piezo speaker, and two arcade buttons. The ESP32 controls audio playback through the DFPlayer Mini, which is connected to the speaker, and uses the RFID reader to trigger specific audio tracks based on RFID tag data. The arcade buttons are used to control playback and adjust volume, while a rocker switch and battery mount provide power management.
Cirkit Designer LogoOpen Project in Cirkit Designer
Image of Darth Vader Chest Box: A project utilizing SparkFun Digital Sandbox in a practical application
Arduino Nano-Controlled Audio Player with Interactive LED Effects
This circuit features an Arduino Nano microcontroller interfaced with a DFPlayer Mini MP3 module for audio playback, a WS2812 RGB LED strip for visual effects, and a pushbutton for user input. The Arduino controls the LED strip to create lighting effects and uses the DFPlayer Mini to play sounds from an SD card when the button is pressed. Additional components like resistors and capacitors are used for signal conditioning and power stabilization, while a toggle switch and a lithium battery provide power management capabilities.
Cirkit Designer LogoOpen Project in Cirkit Designer

Common Applications and Use Cases

  • Educational environments (schools, workshops, and maker spaces)
  • Prototyping simple electronics projects
  • Learning the basics of Arduino programming
  • Experimenting with digital and analog inputs and outputs
  • Introduction to sensors and actuators

Technical Specifications

Key Technical Details

  • Operating Voltage: 5V (USB powered)
  • Digital I/O Pins: 14 (of which 6 provide PWM output)
  • Analog Input Pins: 6
  • DC Current per I/O Pin: 40 mA
  • Flash Memory: 32 KB (ATmega328)
  • SRAM: 2 KB (ATmega328)
  • EEPROM: 1 KB (ATmega328)
  • Clock Speed: 16 MHz

Pin Configuration and Descriptions

Pin Number Function Description
1 Reset Resets the microcontroller
2-13 Digital I/O Digital input/output pins
A0-A5 Analog Input Analog input pins
5V Power 5V power supply
GND Ground Ground connection
AREF Analog Reference Reference voltage for the analog inputs
3.3V 3.3V Supply 3.3V power supply

Usage Instructions

How to Use the Component in a Circuit

  1. Connect the Digital Sandbox to your computer using a USB cable.
  2. Use the Arduino IDE to write and upload sketches to the Sandbox.
  3. Interact with the built-in components or connect external components to the Sandbox using jumper wires.

Important Considerations and Best Practices

  • Always ensure the Sandbox is disconnected from the USB port before making or altering connections.
  • Avoid connecting components that draw more current than the Sandbox can provide (40 mA per I/O pin).
  • Use the provided examples as a starting point for learning and experimentation.
  • When connecting external components, ensure correct polarity and voltage levels to prevent damage to the Sandbox.

Example Code for Arduino UNO

// Blink an LED connected to pin 13
void setup() {
  pinMode(13, OUTPUT); // Set pin 13 as an output
}

void loop() {
  digitalWrite(13, HIGH); // Turn the LED on
  delay(1000);            // Wait for a second
  digitalWrite(13, LOW);  // Turn the LED off
  delay(1000);            // Wait for a second
}

Troubleshooting and FAQs

Common Issues

  • LED not blinking: Ensure the LED is connected to the correct pin and that the code has been uploaded successfully.
  • Sensor readings are erratic: Check connections and ensure that there is no loose contact. Also, verify that the code is correctly reading the sensor values.
  • Sandbox not recognized by computer: Try a different USB cable or port, and ensure the drivers are installed correctly.

Solutions and Tips for Troubleshooting

  • Double-check all connections against the circuit diagram.
  • Make sure the correct board and port are selected in the Arduino IDE.
  • Use the Serial Monitor to debug and print out values from sensors to help diagnose issues.
  • Reset the Sandbox if it becomes unresponsive.

FAQs

Q: Can I power the Digital Sandbox with a battery? A: Yes, you can use a battery pack with a USB connector or a regulated 5V supply connected to the VIN pin.

Q: Is the Digital Sandbox compatible with all Arduino shields? A: Not all shields will be compatible due to the Sandbox's unique form factor and pin layout. Check compatibility before attempting to connect a shield.

Q: How do I extend the capabilities of the Digital Sandbox? A: You can connect additional sensors and actuators to the Sandbox using the I/O pins, following the Sandbox's voltage and current specifications.