How to Use DYNAMIXEL AX 12A: Examples, Pinouts, and Specs
Introduction
The DYNAMIXEL AX-12A is a smart servo motor designed for robotics applications. It features high torque, precise control, and advanced communication capabilities via a serial interface. This servo motor is widely used in dynamic movement and positioning tasks, making it ideal for robotic arms, humanoid robots, and other motion-intensive systems. Its ability to provide feedback on position, speed, and load makes it a versatile and intelligent component for robotics enthusiasts and professionals alike.
Explore Projects Built with DYNAMIXEL AX 12A


Explore Projects Built with DYNAMIXEL AX 12A
Common Applications
- Robotic arms and manipulators
- Humanoid robots
- Autonomous vehicles
- Animatronics
- Educational robotics projects
Technical Specifications
The DYNAMIXEL AX-12A offers robust performance and flexibility. Below are its key technical details:
General Specifications
| Parameter | Value |
|---|---|
| Operating Voltage | 9V to 12V (recommended 11.1V) |
| Stall Torque | 1.5 N·m (at 12V, 1.5A) |
| No-Load Speed | 59 RPM (at 12V) |
| Communication Protocol | TTL Serial (Half Duplex) |
| Resolution | 0.29° per step (300° range) |
| Weight | 54.6 g |
| Dimensions | 32 mm x 50 mm x 40 mm |
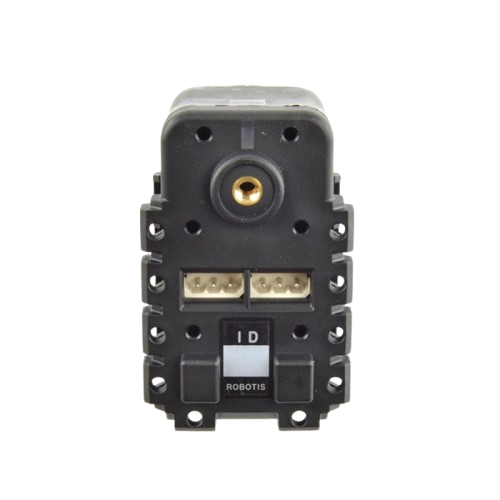
Pin Configuration
The DYNAMIXEL AX-12A uses a 3-pin connector for power and communication. The pinout is as follows:
| Pin Number | Name | Description |
|---|---|---|
| 1 | GND | Ground |
| 2 | VCC | Power supply (9V to 12V) |
| 3 | Data | TTL Serial communication line |
Usage Instructions
The DYNAMIXEL AX-12A is controlled via a serial interface, allowing for precise movement and feedback. Below are the steps to use the component in a circuit:
Connecting the AX-12A
- Power Supply: Connect the VCC pin to a 9V-12V power source and the GND pin to the ground of your circuit.
- Communication: Use a TTL-compatible serial interface (e.g., a USB-to-TTL adapter or a microcontroller like Arduino) to connect to the Data pin.
- Daisy-Chaining: Multiple AX-12A servos can be connected in series using their 3-pin connectors.
Arduino Example Code
The following example demonstrates how to control the AX-12A using an Arduino UNO. This code sets the servo to a specific position.
#include <SoftwareSerial.h>

// Define the TX and RX pins for communication with the AX-12A
#define DYNAMIXEL_TX 2
#define DYNAMIXEL_RX 3

// Create a SoftwareSerial object for communication
SoftwareSerial dynamixelSerial(DYNAMIXEL_RX, DYNAMIXEL_TX);

void setup() {
  // Initialize the serial communication
  dynamixelSerial.begin(1000000); // AX-12A uses 1 Mbps baud rate
  Serial.begin(9600); // For debugging

  // Set the servo to position 512 (center position)
  setServoPosition(1, 512); // Servo ID = 1, Position = 512
}

void loop() {
  // Add your main code here
}

// Function to set the position of the AX-12A servo
void setServoPosition(uint8_t id, uint16_t position) {
  uint8_t checksum = ~(id + 0x07 + 0x03 + (position & 0xFF) + (position >> 8));

  // Send the instruction packet
  dynamixelSerial.write(0xFF); // Header 1
  dynamixelSerial.write(0xFF); // Header 2
  dynamixelSerial.write(id);   // Servo ID
  dynamixelSerial.write(0x07); // Length
  dynamixelSerial.write(0x03); // Instruction (WRITE_DATA)
  dynamixelSerial.write(0x1E); // Address (Goal Position)
  dynamixelSerial.write(position & 0xFF); // Position LSB
  dynamixelSerial.write(position >> 8);  // Position MSB
  dynamixelSerial.write(checksum);       // Checksum
}
Important Considerations
- Power Supply: Ensure the power supply can provide sufficient current (at least 1.5A per servo).
- Baud Rate: The default baud rate for the AX-12A is 1 Mbps. Ensure your controller supports this speed.
- ID Configuration: Each servo must have a unique ID when daisy-chained. Use the DYNAMIXEL Wizard or a custom program to configure IDs.
Troubleshooting and FAQs
Common Issues
Servo Not Responding
- Cause: Incorrect wiring or power supply issues.
- Solution: Verify the connections and ensure the power supply meets the voltage and current requirements.
Erratic Movement
- Cause: Noise on the communication line or insufficient power.
- Solution: Use shielded cables for communication and ensure a stable power source.
Overheating
- Cause: Prolonged high-torque operation.
- Solution: Allow the servo to cool down periodically during intensive tasks.
Cannot Change ID
- Cause: Multiple servos with the same ID connected.
- Solution: Connect one servo at a time when configuring IDs.
FAQs
Q: Can I use the AX-12A with a Raspberry Pi?
A: Yes, the AX-12A can be controlled using a Raspberry Pi via a USB-to-TTL adapter. Ensure the baud rate is set to 1 Mbps.
Q: What is the maximum number of servos I can daisy-chain?
A: The maximum number depends on the power supply and communication line quality. Typically, up to 254 servos can be daisy-chained.
Q: How do I read feedback from the servo?
A: Use the READ_DATA instruction to query parameters like position, speed, and load. Refer to the DYNAMIXEL protocol documentation for details.
Q: Can I rotate the servo continuously?
A: Yes, by enabling the "wheel mode," the AX-12A can rotate continuously instead of operating within its positional range.