
How to Use esp32 30 pin: Examples, Pinouts, and Specs
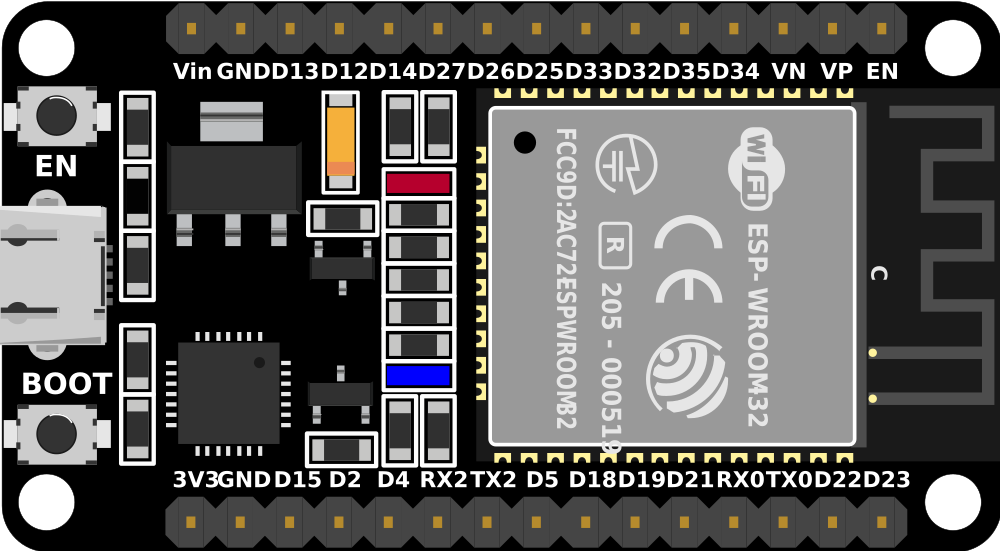
 Design with esp32 30 pin in Cirkit Designer
Introduction
The ESP32 Development Board 30 Pin, manufactured by Espressif Systems, is a versatile microcontroller designed for a wide range of applications. It features built-in Wi-Fi and Bluetooth capabilities, making it an excellent choice for Internet of Things (IoT) projects. With 30 GPIO pins, the board provides ample flexibility for interfacing with sensors, actuators, and other peripherals.
Explore Projects Built with esp32 30 pin
 Open Project in Cirkit Designer
 Open Project in Cirkit Designer
 Open Project in Cirkit Designer
 Open Project in Cirkit Designer
Explore Projects Built with esp32 30 pin
Open Project in Cirkit DesignerOpen Project in Cirkit DesignerOpen Project in Cirkit DesignerOpen Project in Cirkit DesignerCommon Applications and Use Cases
- IoT devices and smart home automation
- Wireless sensor networks
- Robotics and control systems
- Data logging and monitoring
- Wearable technology
- Prototyping and educational projects
Technical Specifications
The ESP32 Development Board 30 Pin is built around the ESP32 microcontroller, which is based on a dual-core Tensilica Xtensa LX6 processor. Below are the key technical details:
Key Specifications
| Parameter | Value |
|---|---|
| Microcontroller | ESP32 (Tensilica Xtensa LX6 dual-core) |
| Clock Speed | Up to 240 MHz |
| Flash Memory | 4 MB (varies by model) |
| SRAM | 520 KB |
| GPIO Pins | 30 |
| Wi-Fi | 802.11 b/g/n |
| Bluetooth | v4.2 BR/EDR and BLE |
| Operating Voltage | 3.3V |
| Input Voltage (VIN) | 5V (via USB or external power supply) |
| Power Consumption | Ultra-low power (varies by mode) |
| Interfaces | UART, SPI, I2C, I2S, PWM, ADC, DAC |
| ADC Resolution | 12-bit |
| DAC Resolution | 8-bit |
| Dimensions | 51mm x 25.4mm |
Pin Configuration and Descriptions
The ESP32 Development Board 30 Pin has a total of 30 pins, each with specific functions. Below is the pinout description:
| Pin Number | Pin Name | Functionality |
|---|---|---|
| 1 | EN | Enable pin (active high) |
| 2 | IO23 | GPIO23, SPI MOSI |
| 3 | IO22 | GPIO22, I2C SCL |
| 4 | IO21 | GPIO21, I2C SDA |
| 5 | GND | Ground |
| 6 | IO19 | GPIO19, SPI MISO |
| 7 | IO18 | GPIO18, SPI SCK |
| 8 | IO5 | GPIO5, PWM, ADC |
| 9 | IO17 | GPIO17, UART2 TX |
| 10 | IO16 | GPIO16, UART2 RX |
| 11 | IO4 | GPIO4, PWM, ADC |
| 12 | IO0 | GPIO0, Boot Mode Selection |
| 13 | IO2 | GPIO2, PWM, ADC |
| 14 | IO15 | GPIO15, PWM, ADC |
| 15 | IO13 | GPIO13, PWM, ADC |
| 16 | IO12 | GPIO12, PWM, ADC |
| 17 | IO14 | GPIO14, PWM, ADC |
| 18 | IO27 | GPIO27, PWM, ADC |
| 19 | IO26 | GPIO26, PWM, ADC |
| 20 | IO25 | GPIO25, PWM, DAC |
| 21 | IO33 | GPIO33, PWM, ADC |
| 22 | IO32 | GPIO32, PWM, ADC |
| 23 | IO35 | GPIO35, ADC (input only) |
| 24 | IO34 | GPIO34, ADC (input only) |
| 25 | IO39 | GPIO39, ADC (input only) |
| 26 | IO36 | GPIO36, ADC (input only) |
| 27 | 3V3 | 3.3V Power Output |
| 28 | GND | Ground |
| 29 | VIN | Input Voltage (5V) |
| 30 | IO1 | GPIO1, UART TX |
Usage Instructions
How to Use the ESP32 Development Board in a Circuit
Powering the Board:
- Connect the board to a 5V power source via the USB port or the VIN pin.
- Ensure the power supply provides sufficient current (at least 500mA).
Programming the Board:
- Install the Arduino IDE and add the ESP32 board package via the Board Manager.
- Select "ESP32 Dev Module" as the board type.
- Connect the board to your computer using a USB cable and select the appropriate COM port.
Connecting Peripherals:
- Use the GPIO pins to interface with sensors, actuators, and other devices.
- Ensure peripherals operate at 3.3V logic levels to avoid damaging the board.
Uploading Code:
- Write your code in the Arduino IDE or another compatible environment.
- Click the "Upload" button to flash the code to the ESP32.
Example Code: Blinking an LED
The following example demonstrates how to blink an LED connected to GPIO2:
// Define the GPIO pin where the LED is connected
const int ledPin = 2;

void setup() {
  // Set the LED pin as an output
  pinMode(ledPin, OUTPUT);
}

void loop() {
  // Turn the LED on
  digitalWrite(ledPin, HIGH);
  delay(1000); // Wait for 1 second

  // Turn the LED off
  digitalWrite(ledPin, LOW);
  delay(1000); // Wait for 1 second
}
Important Considerations and Best Practices
- Use level shifters if interfacing with 5V devices.
- Avoid connecting high-current loads directly to GPIO pins.
- Use decoupling capacitors to stabilize the power supply.
- Ensure proper grounding to minimize noise and interference.
Troubleshooting and FAQs
Common Issues and Solutions
The board is not detected by the computer:
- Ensure the USB cable is functional and supports data transfer.
- Install the correct USB-to-serial driver (e.g., CP2102 or CH340).
Code upload fails:
- Check the selected COM port in the Arduino IDE.
- Press and hold the "BOOT" button on the board while uploading.
Wi-Fi connection issues:
- Verify the SSID and password in your code.
- Ensure the router is within range and supports 2.4 GHz Wi-Fi.
GPIO pins not working as expected:
- Check if the pin is being used for another function (e.g., ADC, UART).
- Avoid using GPIO0, GPIO2, and GPIO15 for critical functions during boot.
FAQs
Q: Can the ESP32 operate on battery power?
A: Yes, the ESP32 can be powered by a LiPo battery connected to the VIN pin. Use a voltage regulator if necessary.
Q: What is the maximum current draw of the ESP32?
A: The ESP32 can draw up to 500mA during peak operation, especially when using Wi-Fi or Bluetooth.
Q: Can I use the ESP32 with MicroPython?
A: Yes, the ESP32 supports MicroPython. Flash the MicroPython firmware to the board to get started.
Q: How do I reset the ESP32?
A: Press the "EN" button on the board to reset the microcontroller.
This concludes the documentation for the ESP32 Development Board 30 Pin. For further assistance, refer to the official Espressif Systems documentation.