Cirkit Designer Logo
Cirkit Designer
Your all-in-one circuit design IDE
Home / 
Component Documentation

How to Use 3.5 TFT LCD Shield (320 x 480): Examples, Pinouts, and Specs

Image of 3.5 TFT LCD Shield (320 x 480)
Cirkit Designer LogoDesign with 3.5 TFT LCD Shield (320 x 480) in Cirkit Designer

Introduction

The 3.5-inch TFT LCD Shield is a vibrant, colorful display module that can be mounted directly onto an Arduino UNO or compatible boards. With a resolution of 320 x 480 pixels, it provides a rich and immersive visual interface for a wide range of electronic projects, including touch screen applications, gaming, and real-time data displays.

Explore Projects Built with 3.5 TFT LCD Shield (320 x 480)

Use Cirkit Designer to design, explore, and prototype these projects online. Some projects support real-time simulation. Click "Open Project" to start designing instantly!
Arduino Nano and 3.5 TFT LCD Shield Display Interface
Image of BAROMETR BMP280 TFT 9488: A project utilizing 3.5 TFT LCD Shield (320 x 480) in a practical application
This circuit interfaces an Arduino Nano with a 3.5-inch TFT LCD Shield, allowing the Arduino to control the display and read/write data to it. The connections include data lines, control signals, and power, enabling the Arduino to drive the LCD for various display applications.
Cirkit Designer LogoOpen Project in Cirkit Designer
Arduino Mega 2560 Controlled TFT Touchscreen Interface
Image of Tablero Moto: A project utilizing 3.5 TFT LCD Shield (320 x 480) in a practical application
This circuit connects an Arduino Mega 2560 microcontroller to a 3.5-inch 480x320 TFT LCD display. The Arduino provides power, ground, and digital signals to control the display, including data lines for pixel information and control lines for reset, write, and command/data selection. The embedded code initializes the display and configures the Arduino's pins for communication, likely to create a user interface or visual output for a project.
Cirkit Designer LogoOpen Project in Cirkit Designer
Arduino UNO and HC-05 Bluetooth Controlled TFT LCD Display
Image of TFT LCD based interactive notice board: A project utilizing 3.5 TFT LCD Shield (320 x 480) in a practical application
This circuit integrates an Arduino UNO with an HC-05 Bluetooth module and a 3.5 TFT LCD Shield. The Arduino UNO serves as the central controller, receiving data via Bluetooth from the HC-05 module and displaying information on the TFT LCD screen.
Cirkit Designer LogoOpen Project in Cirkit Designer
ESP32-C6 and ST7735S Display: Wi-Fi Controlled TFT Display Module
Image of ESP32-C6sm-ST7735: A project utilizing 3.5 TFT LCD Shield (320 x 480) in a practical application
This circuit features an ESP32-C6 microcontroller interfaced with a China ST7735S 160x128 TFT display. The ESP32-C6 controls the display via SPI communication, providing power, ground, and control signals to render graphics and text on the screen.
Cirkit Designer LogoOpen Project in Cirkit Designer

Explore Projects Built with 3.5 TFT LCD Shield (320 x 480)

Use Cirkit Designer to design, explore, and prototype these projects online. Some projects support real-time simulation. Click "Open Project" to start designing instantly!
Image of BAROMETR BMP280 TFT 9488: A project utilizing 3.5 TFT LCD Shield (320 x 480) in a practical application
Arduino Nano and 3.5 TFT LCD Shield Display Interface
This circuit interfaces an Arduino Nano with a 3.5-inch TFT LCD Shield, allowing the Arduino to control the display and read/write data to it. The connections include data lines, control signals, and power, enabling the Arduino to drive the LCD for various display applications.
Cirkit Designer LogoOpen Project in Cirkit Designer
Image of Tablero Moto: A project utilizing 3.5 TFT LCD Shield (320 x 480) in a practical application
Arduino Mega 2560 Controlled TFT Touchscreen Interface
This circuit connects an Arduino Mega 2560 microcontroller to a 3.5-inch 480x320 TFT LCD display. The Arduino provides power, ground, and digital signals to control the display, including data lines for pixel information and control lines for reset, write, and command/data selection. The embedded code initializes the display and configures the Arduino's pins for communication, likely to create a user interface or visual output for a project.
Cirkit Designer LogoOpen Project in Cirkit Designer
Image of TFT LCD based interactive notice board: A project utilizing 3.5 TFT LCD Shield (320 x 480) in a practical application
Arduino UNO and HC-05 Bluetooth Controlled TFT LCD Display
This circuit integrates an Arduino UNO with an HC-05 Bluetooth module and a 3.5 TFT LCD Shield. The Arduino UNO serves as the central controller, receiving data via Bluetooth from the HC-05 module and displaying information on the TFT LCD screen.
Cirkit Designer LogoOpen Project in Cirkit Designer
Image of ESP32-C6sm-ST7735: A project utilizing 3.5 TFT LCD Shield (320 x 480) in a practical application
ESP32-C6 and ST7735S Display: Wi-Fi Controlled TFT Display Module
This circuit features an ESP32-C6 microcontroller interfaced with a China ST7735S 160x128 TFT display. The ESP32-C6 controls the display via SPI communication, providing power, ground, and control signals to render graphics and text on the screen.
Cirkit Designer LogoOpen Project in Cirkit Designer

Common Applications and Use Cases

  • DIY touchscreen control panels
  • Data monitoring systems
  • Portable gaming consoles
  • Educational electronics projects
  • Real-time sensor data visualization

Technical Specifications

Key Technical Details

  • Display Size: 3.5 inches
  • Resolution: 320 x 480 pixels
  • Interface: 8-bit parallel interface
  • Touch Screen: Resistive touch control
  • Onboard Controller: ILI9486/ILI9488 or equivalent
  • Operating Voltage: 3.3V to 5V

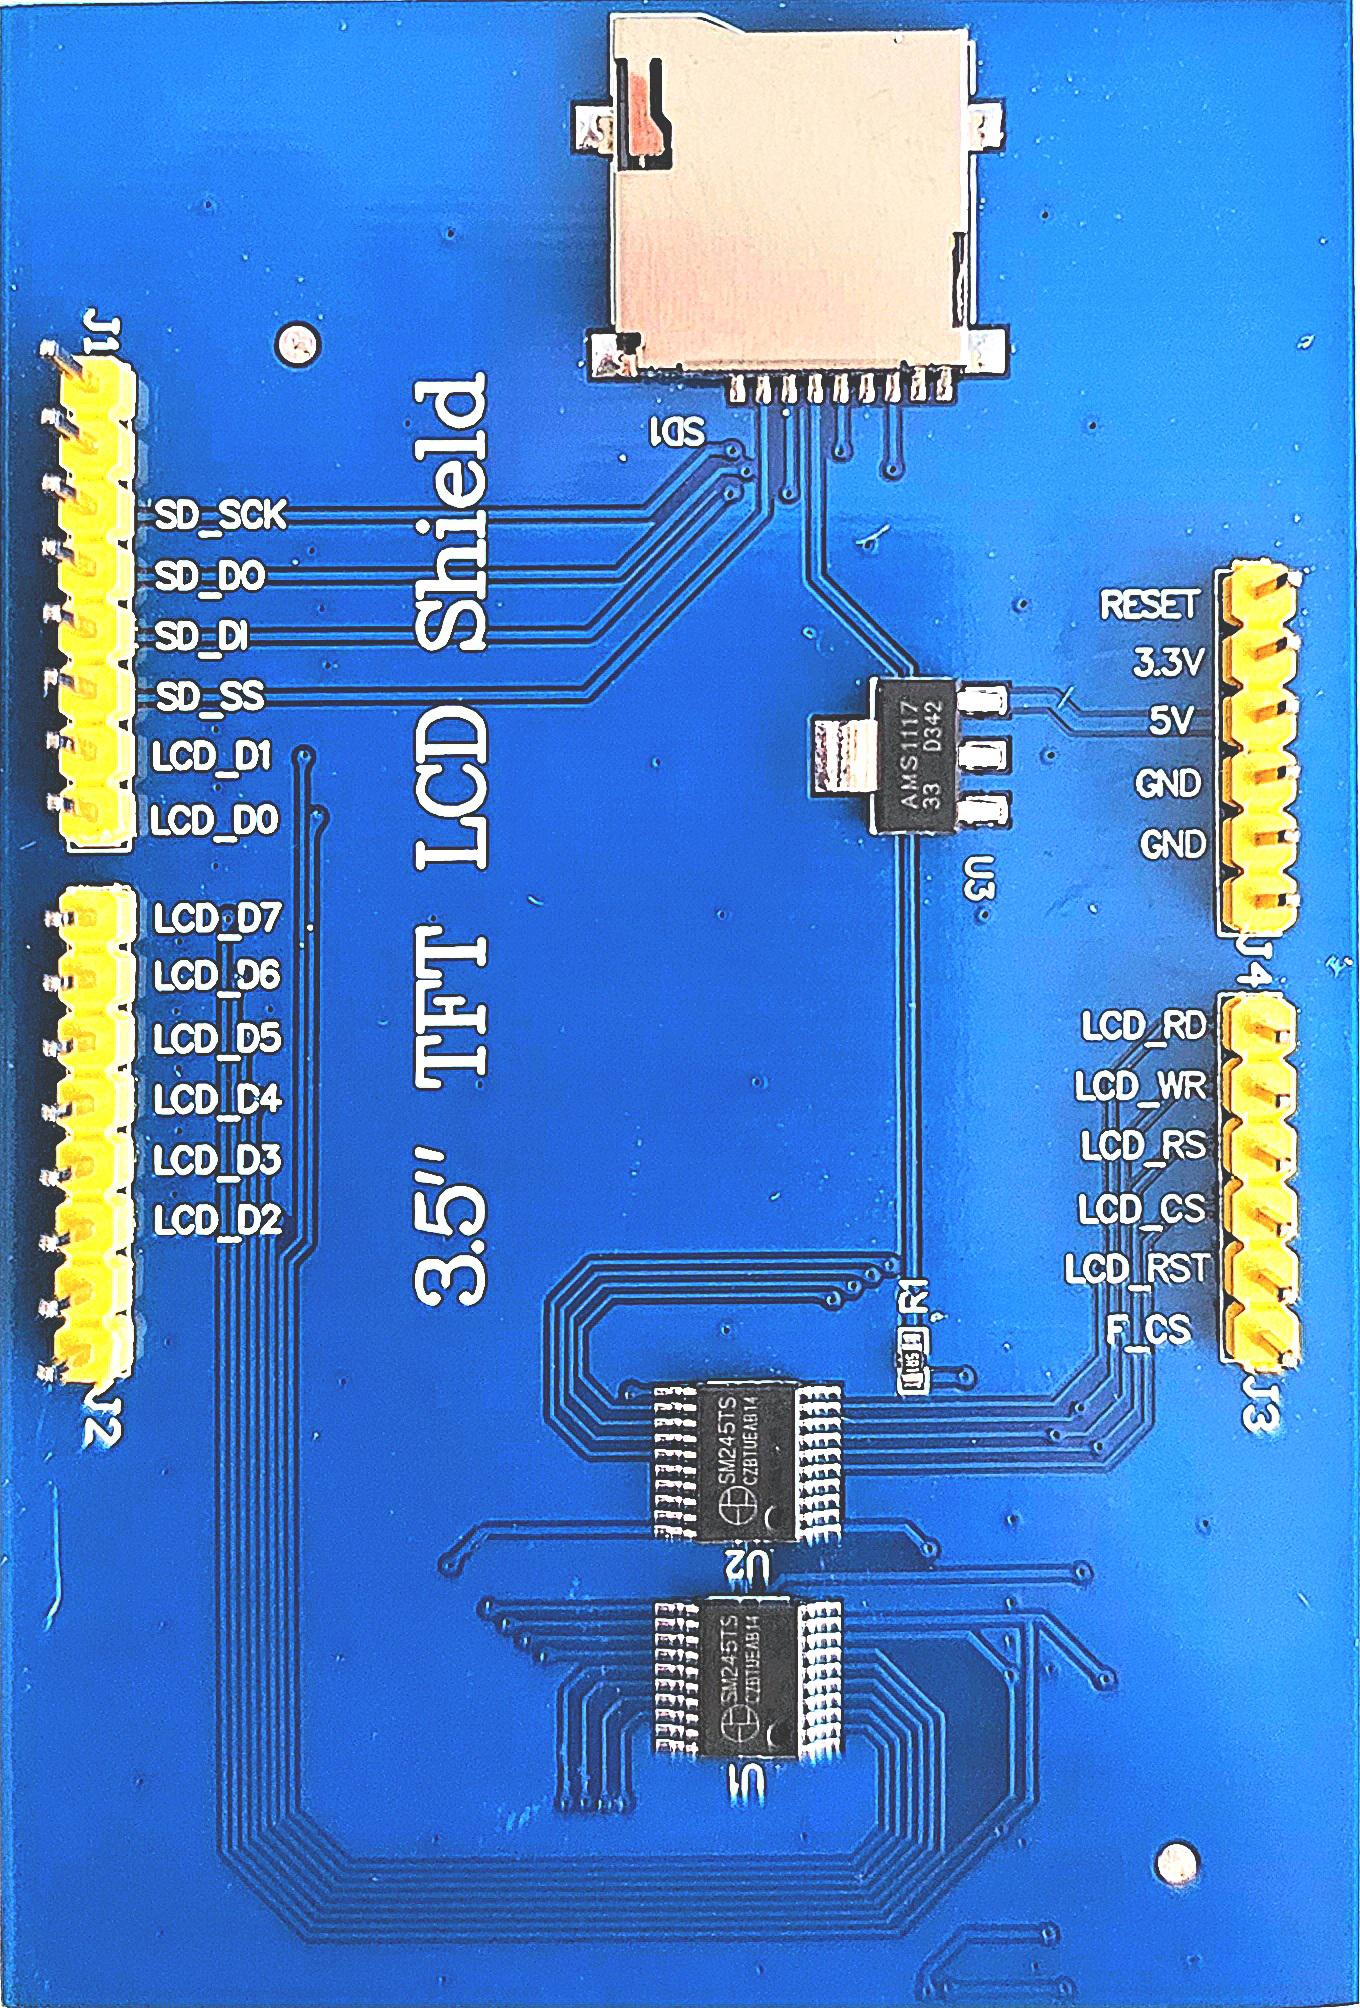
Pin Configuration and Descriptions

Pin Number Function Description
1 LCD_RST LCD reset signal, active low
2 LCD_CS LCD chip select signal, active low
3 LCD_RS/CD LCD command/data select signal
4 LCD_WR LCD write signal
5 LCD_RD LCD read signal
6-13 LCD_D0 - LCD_D7 8-bit data bus for pixel data and commands
A1 Y- Touch screen Y- axis
A2 X- Touch screen X- axis
A3 Y+ Touch screen Y+ axis
A4 X+ Touch screen X+ axis
5V VCC Power supply for the LCD (5V input)
GND GND Ground

Usage Instructions

How to Use the Component in a Circuit

  1. Mount the 3.5 TFT LCD Shield directly onto the Arduino UNO board.
  2. Ensure that the power supply to the Arduino is sufficient to drive the display.
  3. If using the touch functionality, calibrate the touch screen according to the library's instructions.

Important Considerations and Best Practices

  • Always handle the display with care to avoid damaging the screen or the onboard components.
  • When programming, make sure to use the correct library that matches the controller chip of your TFT LCD Shield.
  • Avoid exposing the display to direct sunlight for extended periods to prevent overheating and potential damage.

Example Code for Arduino UNO

#include <Adafruit_GFX.h>    // Core graphics library
#include <Adafruit_TFTLCD.h> // Hardware-specific library

#define LCD_CS A3 // Chip Select goes to Analog 3
#define LCD_CD A2 // Command/Data goes to Analog 2
#define LCD_WR A1 // LCD Write goes to Analog 1
#define LCD_RD A0 // LCD Read goes to Analog 0
#define LCD_RESET A4 // Can alternately just connect to Arduino's reset pin

Adafruit_TFTLCD tft(LCD_CS, LCD_CD, LCD_WR, LCD_RD, LCD_RESET);

void setup() {
  Serial.begin(9600);
  tft.reset();
  uint16_t identifier = tft.readID();
  if(identifier == 0x9486) {
    Serial.println("Found ILI9486 LCD driver");
  } else {
    Serial.print("Unknown LCD driver chip: ");
    Serial.println(identifier, HEX);
    return;
  }
  tft.begin(identifier);
  tft.setRotation(1); // Orient the screen as needed
  tft.fillScreen(BLACK); // Clear the screen to black
}

void loop() {
  // Example: Draw a red rectangle
  tft.fillRect(10, 10, 300, 460, RED);
  // More drawing functions can be used here
}

Troubleshooting and FAQs

Common Issues Users Might Face

  • Display not responding: Ensure that the shield is properly seated on the Arduino and that all pins are making good contact.
  • Inverted colors or strange patterns: This could be due to an incorrect driver or initialization sequence. Check the library and initialization code.
  • Touch not working: Verify the touch screen pins are correctly defined and that the touch screen is calibrated.

Solutions and Tips for Troubleshooting

  • Double-check the wiring and pin definitions in your code.
  • Make sure you are using the correct library for your display's controller chip.
  • If the display is not turning on, check the power supply and connections.
  • For touch issues, recalibrate the touch screen using the library's calibration sketch.

FAQs

Q: Can I use this shield with boards other than the Arduino UNO?

A: The shield is designed for the Arduino UNO form factor, but it may work with other boards that share the same pin layout and voltage specifications.

Q: How do I adjust the brightness of the display?

A: The brightness can typically be adjusted through PWM control of the backlight or through software if supported by the library.

Q: What should I do if I see white screen or no display?

A: A white screen can indicate a communication issue between the Arduino and the TFT. Check your code for correct initialization and library use. Also, ensure that the power supply is stable and sufficient.