The SW-420 Vibration Sensor is a compact and reliable electronic component designed to detect vibrations and movements. It is commonly used in security systems, industrial automation, and DIY electronics projects. When vibrations exceed a predefined threshold, the sensor outputs a signal, making it ideal for triggering alarms, activating devices, or logging events.
Explore Projects Built with SW-420 Vibration Sensor
Use Cirkit Designer to design, explore, and prototype these projects online. Some projects support real-time simulation. Click "Open Project" to start designing instantly!
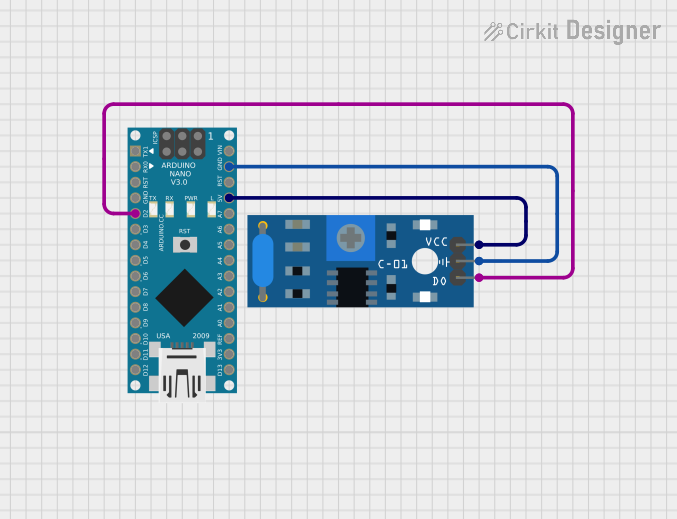
This circuit connects an SW-420 Vibration Sensor to an Arduino Nano. The vibration sensor's digital output is linked to the Arduino's D2 pin, allowing the microcontroller to detect vibrations. The sensor is powered by the Arduino's 5V output, and both devices share a common ground.
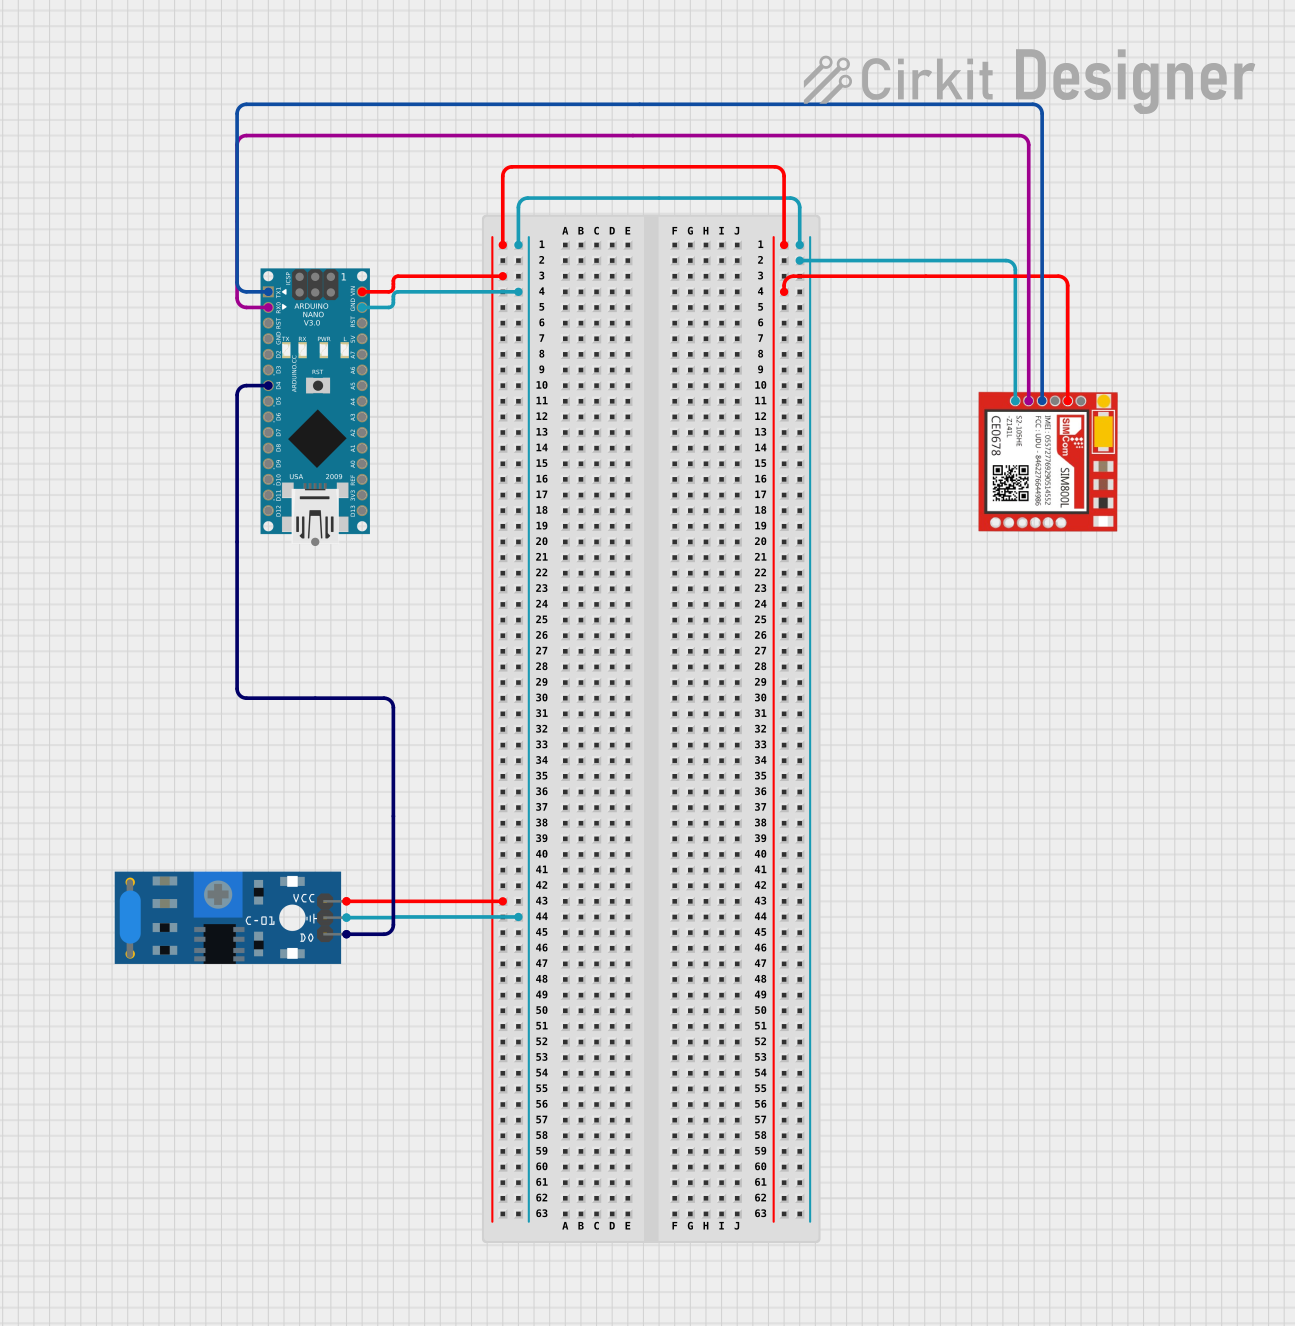
This circuit is designed to detect vibrations using the SW-420 Vibration Sensor and communicate the detection events via the Sim800l GSM module. The Arduino Nano serves as the central controller, interfacing with the vibration sensor on its digital pin D4 and with the Sim800l module through serial communication using pins D0/RX and D1/TX. The circuit is likely intended for remote monitoring of vibrations, potentially for security or machinery fault detection applications.
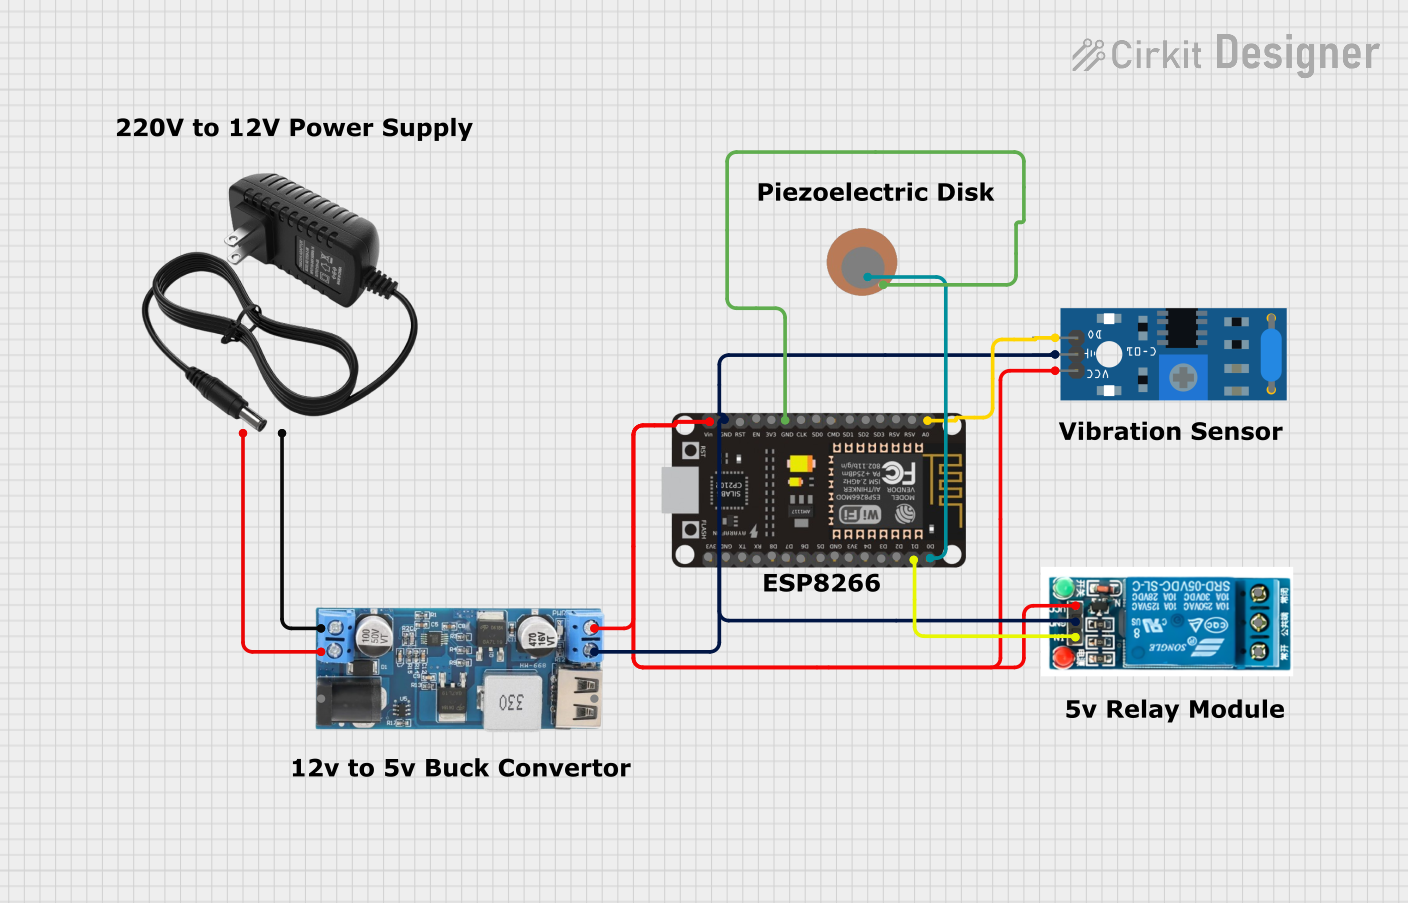
This circuit is a vibration detection system that uses an SW-420 vibration sensor and a piezo sensor to detect vibrations and trigger a 5V relay. The system is controlled by an ESP8266 NodeMCU, which processes the sensor inputs and controls the relay. A 12V power supply is stepped down to 5V to power the components.
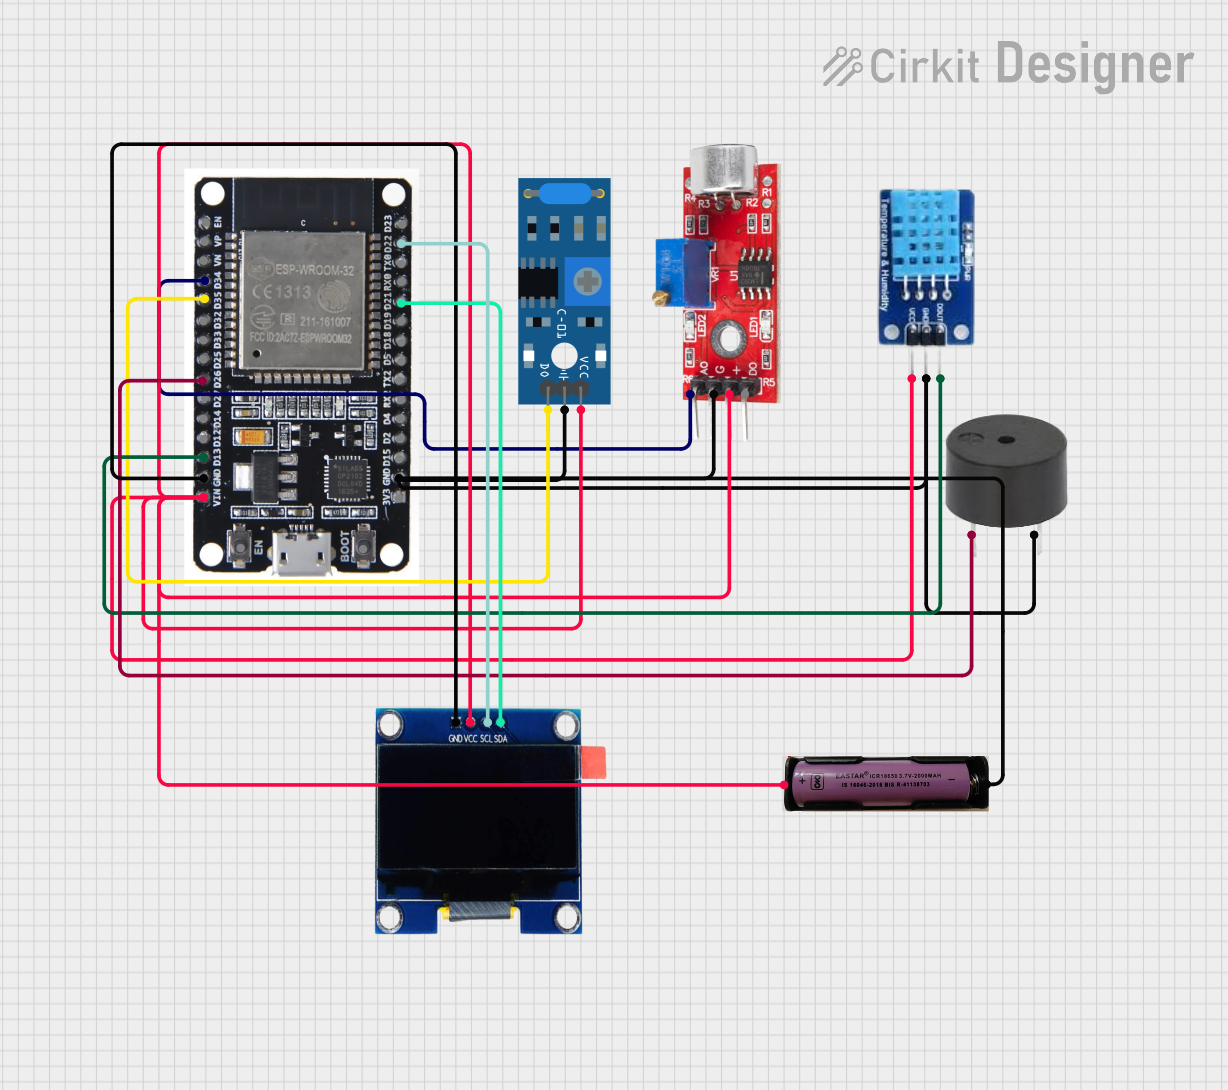
This circuit features an ESP32 microcontroller connected to various sensors and output devices. A sound sensor and a SW-420 vibration sensor provide analog and digital inputs, respectively, to the ESP32 for environmental monitoring. The circuit also includes a DHT11 sensor for temperature and humidity readings, a buzzer for audible alerts, and an OLED display for visual feedback, all interfaced with the ESP32. Power is supplied by a 3.7V source connected to all components requiring VCC.
Security systems to detect unauthorized access or tampering
Earthquake detection and monitoring systems
Industrial machinery vibration monitoring
DIY projects for motion-triggered responses
Smart home automation systems
Technical Specifications
The SW-420 Vibration Sensor is built for ease of use and integration into various electronic systems. Below are its key technical details:
General Specifications
Parameter
Value
Operating Voltage
3.3V to 5V
Output Type
Digital (High/Low)
Sensitivity Adjustment
Adjustable via onboard potentiometer
Output Signal
High (no vibration) / Low (vibration detected)
Dimensions
32mm x 14mm x 8mm
Operating Temperature
-40°C to +85°C
Pin Configuration
The SW-420 Vibration Sensor has three pins for easy interfacing with microcontrollers and other devices. Below is the pinout:
Pin Name
Description
VCC
Power supply input (3.3V to 5V)
GND
Ground connection
DO
Digital output signal (High/Low)
Usage Instructions
The SW-420 Vibration Sensor is straightforward to use in a circuit. Follow the steps below to integrate it into your project:
Connecting the Sensor
Power the Sensor: Connect the VCC pin to a 3.3V or 5V power source and the GND pin to ground.
Read the Output: Connect the DO pin to a digital input pin on your microcontroller or logic circuit.
Adjust Sensitivity: Use the onboard potentiometer to set the vibration sensitivity. Turning it clockwise increases sensitivity, while turning it counterclockwise decreases it.
Example Circuit with Arduino UNO
Below is an example of how to connect the SW-420 Vibration Sensor to an Arduino UNO:
Circuit Connections
VCC → Arduino 5V
GND → Arduino GND
DO → Arduino digital pin 2
Example Code
// SW-420 Vibration Sensor Example Code
// This code reads the sensor's digital output and prints the status to the Serial Monitor.

const int sensorPin = 2; // Digital pin connected to the sensor's DO pin
int sensorState = 0;     // Variable to store the sensor's state

void setup() {
  pinMode(sensorPin, INPUT); // Set the sensor pin as input
  Serial.begin(9600);        // Initialize serial communication at 9600 baud
}

void loop() {
  sensorState = digitalRead(sensorPin); // Read the sensor's state

  if (sensorState == LOW) {
    // LOW indicates vibration detected
    Serial.println("Vibration detected!");
  } else {
    // HIGH indicates no vibration
    Serial.println("No vibration.");
  }

  delay(500); // Wait for 500ms before reading again
}
Important Considerations
Power Supply: Ensure the sensor is powered within its operating voltage range (3.3V to 5V).
Mounting: Secure the sensor firmly to avoid false triggers caused by loose connections or unintended movements.
Sensitivity Adjustment: Fine-tune the potentiometer to match the desired vibration threshold for your application.
Debouncing: If the sensor output fluctuates rapidly, consider adding software debouncing in your code.
Troubleshooting and FAQs
Common Issues and Solutions
No Output Signal
Cause: Incorrect wiring or insufficient power supply.
Solution: Double-check the connections and ensure the power supply is within the specified range.
False Triggers
Cause: Sensitivity set too high or external noise interference.
Solution: Adjust the potentiometer to reduce sensitivity and ensure the sensor is mounted securely.
Output Always HIGH
Cause: No vibrations detected or faulty sensor.
Solution: Verify the sensor is exposed to sufficient vibrations. If the issue persists, test with a replacement sensor.
Output Always LOW
Cause: Excessive vibrations or damaged sensor.
Solution: Reduce vibrations or replace the sensor if necessary.
FAQs
Q: Can the SW-420 detect small vibrations?
A: Yes, the sensitivity can be adjusted using the onboard potentiometer to detect even small vibrations.
Q: Is the sensor waterproof?
A: No, the SW-420 is not waterproof. Avoid exposing it to moisture or liquids.
Q: Can I use the SW-420 with a 3.3V microcontroller?
A: Yes, the sensor operates within a voltage range of 3.3V to 5V, making it compatible with 3.3V systems.
Q: How do I know if the sensor is working?
A: The DO pin will output a LOW signal when vibrations are detected. You can monitor this using an LED, multimeter, or microcontroller.
By following this documentation, you can effectively integrate the SW-420 Vibration Sensor into your projects and troubleshoot any issues that arise.


 Open Project in Cirkit Designer