Cirkit Designer Logo
Cirkit Designer
Your all-in-one circuit design IDE
Home / 
Component Documentation

How to Use SparkFun LiPo Charger Plus: Examples, Pinouts, and Specs

Image of SparkFun LiPo Charger Plus
Cirkit Designer LogoDesign with SparkFun LiPo Charger Plus in Cirkit Designer

Introduction

The SparkFun LiPo Charger Plus is a compact charging solution designed for lithium polymer (LiPo) batteries, which are commonly used in portable electronics, drones, and DIY projects. This board simplifies the process of charging LiPo batteries by providing a micro USB port for power input and a JST connector for the battery. It also includes status LEDs that provide visual feedback on the charging state. The charger is designed to be user-friendly and is suitable for hobbyists and professionals alike.

Explore Projects Built with SparkFun LiPo Charger Plus

Use Cirkit Designer to design, explore, and prototype these projects online. Some projects support real-time simulation. Click "Open Project" to start designing instantly!
ESP32-Based Battery-Powered Multi-Sensor System
Image of Dive sense: A project utilizing SparkFun LiPo Charger Plus in a practical application
This circuit consists of a TP4056 module connected to a 3.7V LiPo battery, providing a charging interface for the battery. The TP4056 manages the charging process by connecting its B+ and B- pins to the battery's positive and ground terminals, respectively.
Cirkit Designer LogoOpen Project in Cirkit Designer
Battery-Powered 18650 Li-ion Charger with USB Output and Adjustable Voltage Regulator
Image of Breadboard: A project utilizing SparkFun LiPo Charger Plus in a practical application
This circuit is a battery management and power supply system that uses three 3.7V batteries connected to a 3S 10A Li-ion 18650 Charger Protection Board Module for balanced charging and protection. The system includes a TP4056 Battery Charging Protection Module for additional charging safety, a Step Up Boost Power Converter to regulate and boost the voltage, and a USB regulator to provide a stable 5V output, controlled by a push switch.
Cirkit Designer LogoOpen Project in Cirkit Designer
Battery-Powered Raspberry Pi 3B+ with TP4056 and DC/DC Booster
Image of raspberry power supply: A project utilizing SparkFun LiPo Charger Plus in a practical application
This circuit is a portable power supply system that charges a 18650 Li-ion battery using a TP4056 charging module and boosts the voltage to power a Raspberry Pi 3b+ via a DC/DC booster. The TP4056 module manages the charging of the battery, while the DC/DC booster converts the battery voltage to a stable 5V output for the Raspberry Pi.
Cirkit Designer LogoOpen Project in Cirkit Designer
Battery-Powered Li-ion Charger with Digital Volt/Ammeter and Buzzer Alert
Image of multimeter: A project utilizing SparkFun LiPo Charger Plus in a practical application
This circuit is a battery charging and monitoring system for a Li-ion battery using a TP4056 charger module. It includes a digital volt/ammeter to display the battery voltage and current, and features LEDs and a piezo buzzer for status indication. The circuit also incorporates switches for controlling the power and monitoring functions.
Cirkit Designer LogoOpen Project in Cirkit Designer

Explore Projects Built with SparkFun LiPo Charger Plus

Use Cirkit Designer to design, explore, and prototype these projects online. Some projects support real-time simulation. Click "Open Project" to start designing instantly!
Image of Dive sense: A project utilizing SparkFun LiPo Charger Plus in a practical application
ESP32-Based Battery-Powered Multi-Sensor System
This circuit consists of a TP4056 module connected to a 3.7V LiPo battery, providing a charging interface for the battery. The TP4056 manages the charging process by connecting its B+ and B- pins to the battery's positive and ground terminals, respectively.
Cirkit Designer LogoOpen Project in Cirkit Designer
Image of Breadboard: A project utilizing SparkFun LiPo Charger Plus in a practical application
Battery-Powered 18650 Li-ion Charger with USB Output and Adjustable Voltage Regulator
This circuit is a battery management and power supply system that uses three 3.7V batteries connected to a 3S 10A Li-ion 18650 Charger Protection Board Module for balanced charging and protection. The system includes a TP4056 Battery Charging Protection Module for additional charging safety, a Step Up Boost Power Converter to regulate and boost the voltage, and a USB regulator to provide a stable 5V output, controlled by a push switch.
Cirkit Designer LogoOpen Project in Cirkit Designer
Image of raspberry power supply: A project utilizing SparkFun LiPo Charger Plus in a practical application
Battery-Powered Raspberry Pi 3B+ with TP4056 and DC/DC Booster
This circuit is a portable power supply system that charges a 18650 Li-ion battery using a TP4056 charging module and boosts the voltage to power a Raspberry Pi 3b+ via a DC/DC booster. The TP4056 module manages the charging of the battery, while the DC/DC booster converts the battery voltage to a stable 5V output for the Raspberry Pi.
Cirkit Designer LogoOpen Project in Cirkit Designer
Image of multimeter: A project utilizing SparkFun LiPo Charger Plus in a practical application
Battery-Powered Li-ion Charger with Digital Volt/Ammeter and Buzzer Alert
This circuit is a battery charging and monitoring system for a Li-ion battery using a TP4056 charger module. It includes a digital volt/ammeter to display the battery voltage and current, and features LEDs and a piezo buzzer for status indication. The circuit also incorporates switches for controlling the power and monitoring functions.
Cirkit Designer LogoOpen Project in Cirkit Designer

Common Applications and Use Cases

  • Portable electronic devices
  • DIY electronics projects
  • Remote control vehicles and drones
  • Wearable technology
  • Robotics

Technical Specifications

Key Technical Details

  • Input Voltage (via micro USB): 5V
  • Charge Current: Adjustable, 100mA to 500mA
  • Battery Voltage: 3.7V (single cell)
  • Charge Cutoff Voltage: 4.2V ± 1%
  • Operating Temperature: -10°C to +85°C

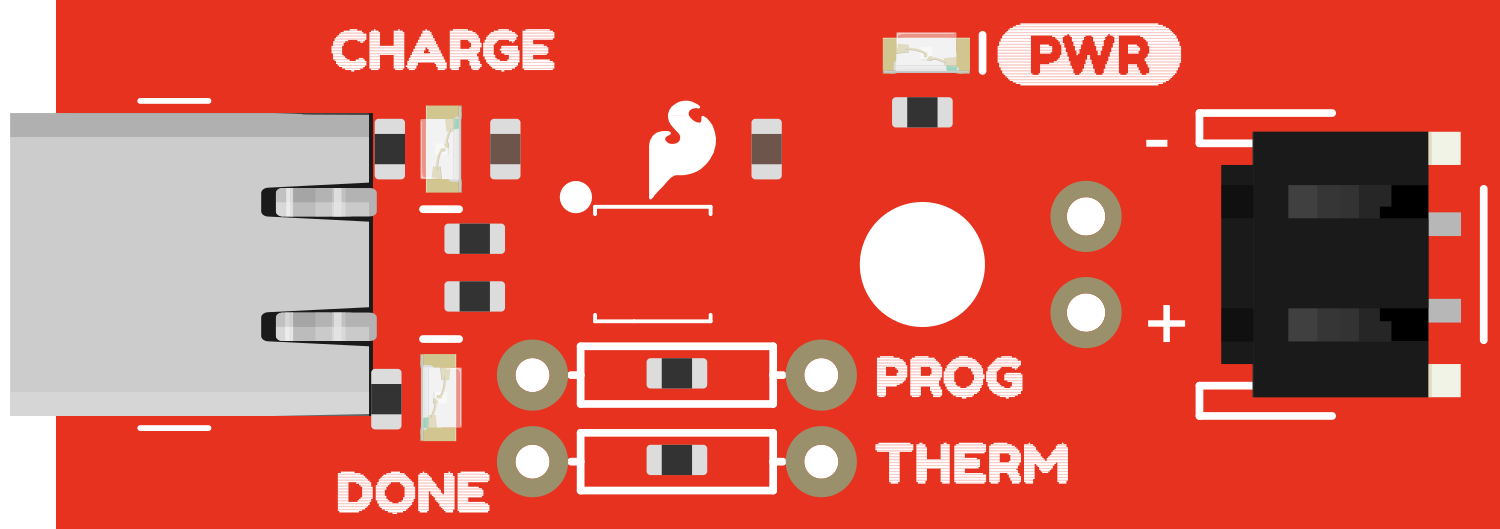
Pin Configuration and Descriptions

Pin Description
BAT Battery positive connection to LiPo battery
GND Ground connection
USB Micro USB port for power input
STAT Status LED indicator (Charging: Red, Charged: Green)

Usage Instructions

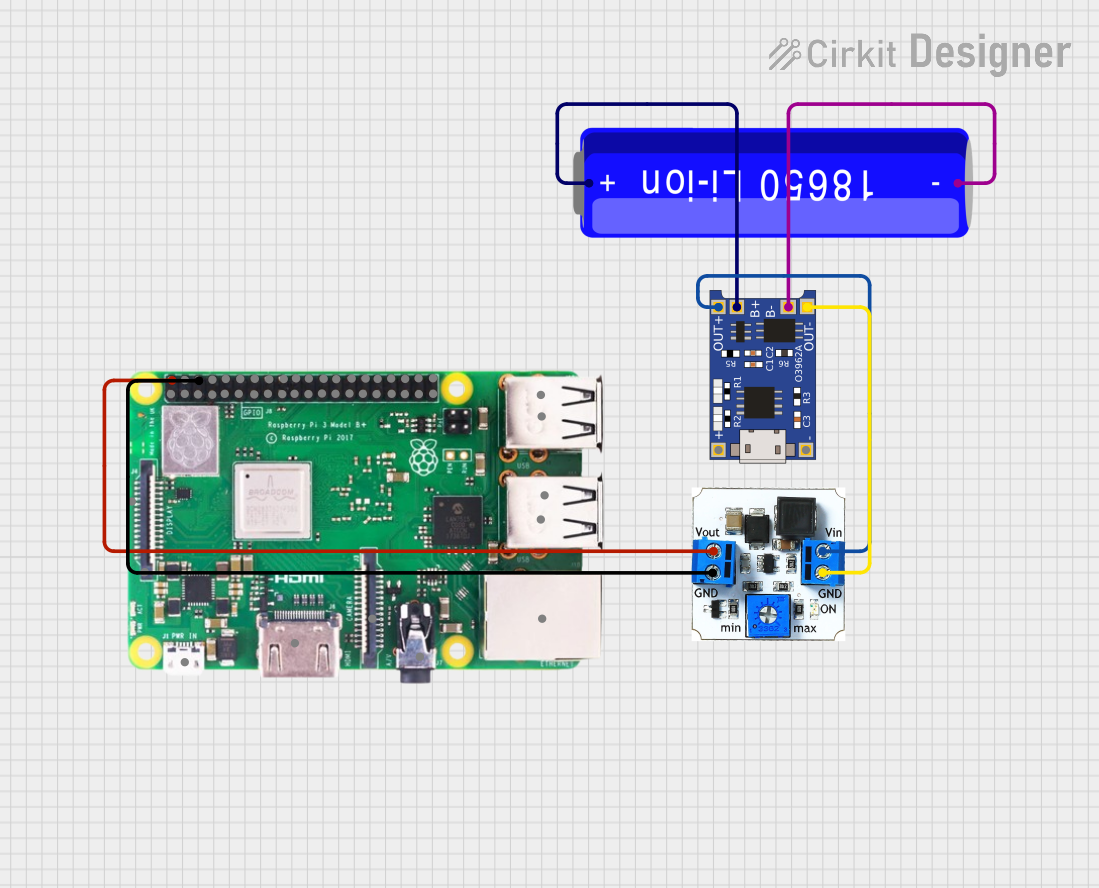
How to Use the Component in a Circuit

  1. Connect the LiPo battery to the JST connector on the board, ensuring correct polarity.
  2. Plug a micro USB cable into the USB port and connect it to a power source (e.g., USB wall adapter or computer USB port).
  3. Observe the status LEDs to monitor the charging process.

Important Considerations and Best Practices

  • Always verify the polarity of the battery before connecting it to the charger.
  • Do not exceed the recommended input voltage as it may damage the charger.
  • Adjust the charge current according to the battery's specifications.
  • Ensure the charger is placed on a non-conductive surface to prevent short circuits.
  • Do not leave the battery unattended while charging.
  • Use the charger in a well-ventilated area to prevent overheating.

Troubleshooting and FAQs

Common Issues

  • Battery not charging: Ensure the battery is properly connected and the micro USB cable is plugged into a power source.
  • LEDs not indicating status: Check the micro USB cable and power source for proper operation.

Solutions and Tips for Troubleshooting

  • If the battery is not charging, double-check the connections and try a different power source or USB cable.
  • If the LEDs are not functioning, inspect the board for any signs of damage or loose components.
  • In case of overheating, immediately disconnect the charger and allow it to cool before inspecting.

FAQs

Q: Can I charge multiple batteries at once? A: No, the SparkFun LiPo Charger Plus is designed to charge a single LiPo battery at a time.

Q: What should I do if the battery starts to swell during charging? A: Immediately disconnect the battery from the charger and place it in a safe area away from flammable materials. Swelling can indicate a damaged or faulty battery.

Q: Is it possible to power a project while charging the battery? A: Yes, the SparkFun LiPo Charger Plus allows for pass-through charging, enabling you to power your project while the battery is being charged.

Example Code for Arduino UNO

// There is no direct interaction code required for the SparkFun LiPo Charger Plus
// when using it with an Arduino UNO, as the charging process is standalone and
// does not require microcontroller communication.

// However, if you wish to monitor the charging status via the Arduino, you can
// connect the STAT pin to an Arduino digital pin and read its status.

const int statusPin = 2; // Connect STAT pin to digital pin 2 on Arduino

void setup() {
  pinMode(statusPin, INPUT);
  Serial.begin(9600);
}

void loop() {
  // Read the status of the charging process
  int chargingStatus = digitalRead(statusPin);

  // Output the charging status to the Serial Monitor
  if (chargingStatus == HIGH) {
    // When the STAT pin is HIGH, the battery is not charging
    Serial.println("Battery is fully charged or not present.");
  } else {
    // When the STAT pin is LOW, the battery is charging
    Serial.println("Battery is currently charging.");
  }

  // Wait for a second before reading the status again
  delay(1000);
}

Remember to limit the line length of code comments to 80 characters for readability. The example code provided demonstrates how to monitor the charging status using an Arduino UNO. The SparkFun LiPo Charger Plus itself does not require any code to operate as a standalone charger.