Cirkit Designer Logo
Cirkit Designer
Your all-in-one circuit design IDE
Home / 
Component Documentation

How to Use Adafruit HTU21D-F Temperature & Humidity Sensor: Examples, Pinouts, and Specs

Image of Adafruit HTU21D-F Temperature & Humidity Sensor
Cirkit Designer LogoDesign with Adafruit HTU21D-F Temperature & Humidity Sensor in Cirkit Designer

Introduction

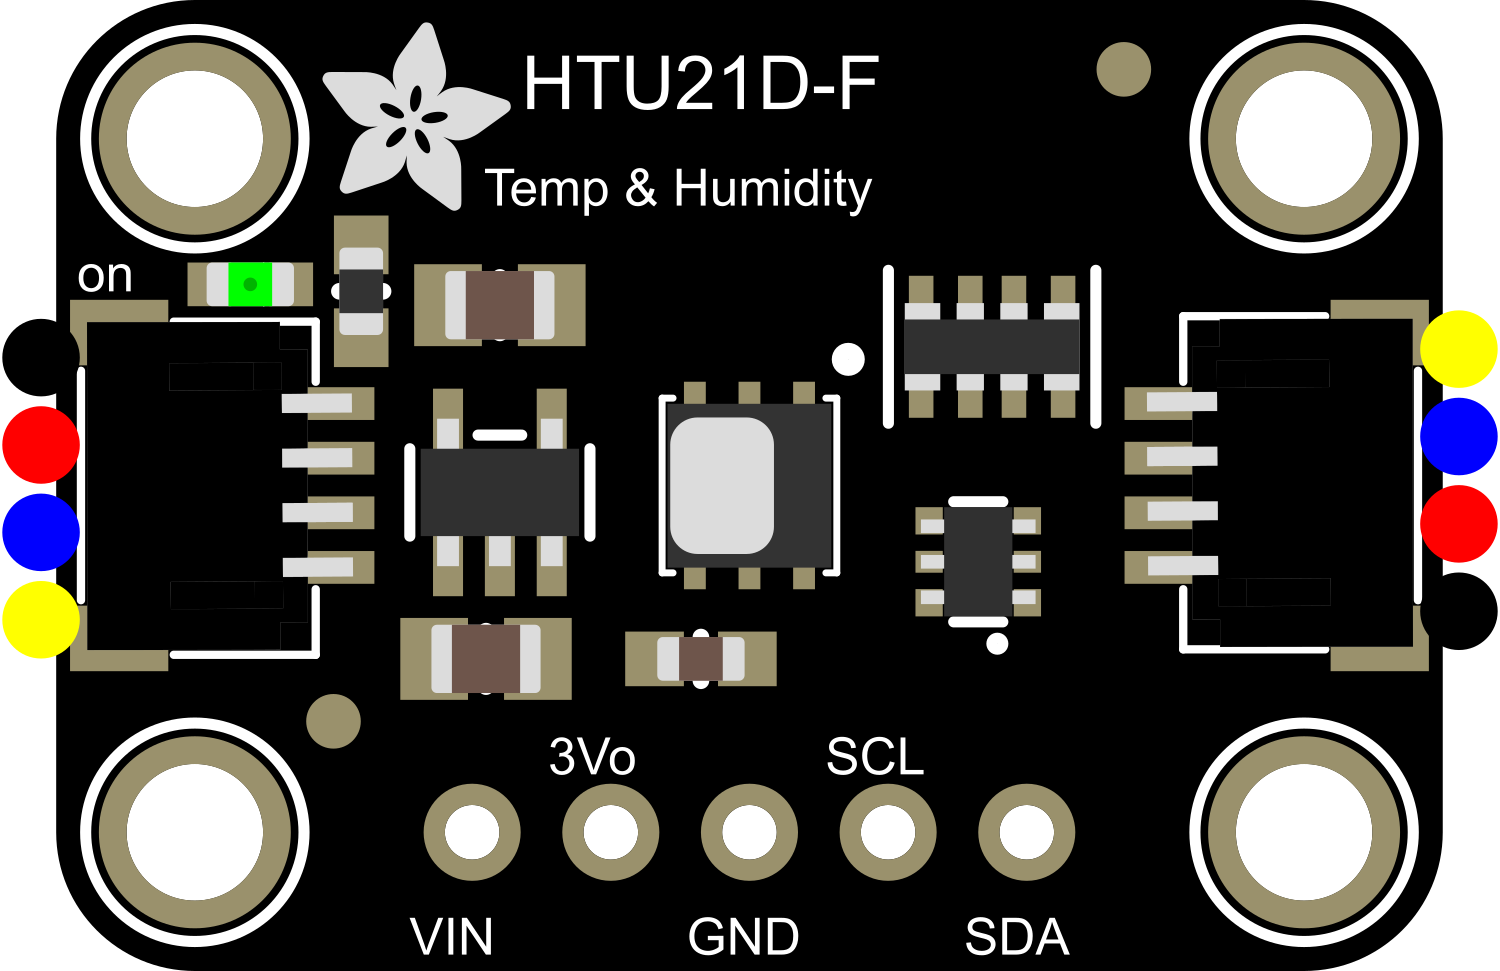
The Adafruit HTU21D-F is a high-precision digital temperature and humidity sensor module that provides reliable and accurate readings. It is based on the HTU21D sensor by TE Connectivity. This sensor is ideal for a wide range of applications including weather stations, climate control systems, and environmental monitoring projects. Its small form factor and low power consumption make it suitable for portable and battery-powered applications.

Explore Projects Built with Adafruit HTU21D-F Temperature & Humidity Sensor

Use Cirkit Designer to design, explore, and prototype these projects online. Some projects support real-time simulation. Click "Open Project" to start designing instantly!
Arduino UNO with HTU21D-F Sensor for Temperature and Humidity Monitoring
Image of Interfacing HTU21D Temperature and Humidity Sensor with Arduino UNO: A project utilizing Adafruit HTU21D-F Temperature & Humidity Sensor in a practical application
This circuit connects an Arduino UNO microcontroller to an Adafruit HTU21D-F Temperature & Humidity Sensor. The Arduino is programmed to read temperature and humidity data from the sensor and output the readings to the Serial Monitor at half-second intervals. The sensor is powered by the Arduino's 5V output and communicates with the microcontroller via the I2C protocol using the SCL and SDA lines.
Cirkit Designer LogoOpen Project in Cirkit Designer
Arduino UNO with Adafruit HTU21D-F Sensor for Temperature and Humidity Monitoring
Image of Interfacing HTU21D Temperature and Humidity Sensor with Arduino UNO: A project utilizing Adafruit HTU21D-F Temperature & Humidity Sensor in a practical application
This circuit connects an Arduino UNO to an Adafruit HTU21D-F Temperature & Humidity Sensor via I2C communication protocol. The Arduino provides power to the sensor and reads temperature and humidity data, which it then outputs to the Serial Monitor every 500 milliseconds. The purpose of this circuit is to monitor environmental conditions.
Cirkit Designer LogoOpen Project in Cirkit Designer
Arduino-Based Temperature and Humidity Monitor with DHT11 and I2C LCD
Image of  I2C LCD and DHT Sim Test - I2C on analog pins: A project utilizing Adafruit HTU21D-F Temperature & Humidity Sensor in a practical application
This circuit uses an Arduino UNO to read temperature data from a DHT11 sensor and display it on a 16x2 I2C LCD. The Arduino is programmed to periodically read the temperature and update the LCD display, providing real-time temperature monitoring.
Cirkit Designer LogoOpen Project in Cirkit Designer
Arduino Mega 2560-Based Multi-Sensor Weather Station with TFT Display and IR Control
Image of aqua2: A project utilizing Adafruit HTU21D-F Temperature & Humidity Sensor in a practical application
This circuit uses an Arduino Mega 2560 to read temperature data from multiple DS18B20 sensors, display the data on an ILI9341 TFT display, and maintain time using an Adafruit DS1307 RTC module. It also receives IR signals using a VS1838B IR receiver and includes an Adafruit MS8607 PHT sensor for additional environmental monitoring.
Cirkit Designer LogoOpen Project in Cirkit Designer

Explore Projects Built with Adafruit HTU21D-F Temperature & Humidity Sensor

Use Cirkit Designer to design, explore, and prototype these projects online. Some projects support real-time simulation. Click "Open Project" to start designing instantly!
Image of Interfacing HTU21D Temperature and Humidity Sensor with Arduino UNO: A project utilizing Adafruit HTU21D-F Temperature & Humidity Sensor in a practical application
Arduino UNO with HTU21D-F Sensor for Temperature and Humidity Monitoring
This circuit connects an Arduino UNO microcontroller to an Adafruit HTU21D-F Temperature & Humidity Sensor. The Arduino is programmed to read temperature and humidity data from the sensor and output the readings to the Serial Monitor at half-second intervals. The sensor is powered by the Arduino's 5V output and communicates with the microcontroller via the I2C protocol using the SCL and SDA lines.
Cirkit Designer LogoOpen Project in Cirkit Designer
Image of Interfacing HTU21D Temperature and Humidity Sensor with Arduino UNO: A project utilizing Adafruit HTU21D-F Temperature & Humidity Sensor in a practical application
Arduino UNO with Adafruit HTU21D-F Sensor for Temperature and Humidity Monitoring
This circuit connects an Arduino UNO to an Adafruit HTU21D-F Temperature & Humidity Sensor via I2C communication protocol. The Arduino provides power to the sensor and reads temperature and humidity data, which it then outputs to the Serial Monitor every 500 milliseconds. The purpose of this circuit is to monitor environmental conditions.
Cirkit Designer LogoOpen Project in Cirkit Designer
Image of  I2C LCD and DHT Sim Test - I2C on analog pins: A project utilizing Adafruit HTU21D-F Temperature & Humidity Sensor in a practical application
Arduino-Based Temperature and Humidity Monitor with DHT11 and I2C LCD
This circuit uses an Arduino UNO to read temperature data from a DHT11 sensor and display it on a 16x2 I2C LCD. The Arduino is programmed to periodically read the temperature and update the LCD display, providing real-time temperature monitoring.
Cirkit Designer LogoOpen Project in Cirkit Designer
Image of aqua2: A project utilizing Adafruit HTU21D-F Temperature & Humidity Sensor in a practical application
Arduino Mega 2560-Based Multi-Sensor Weather Station with TFT Display and IR Control
This circuit uses an Arduino Mega 2560 to read temperature data from multiple DS18B20 sensors, display the data on an ILI9341 TFT display, and maintain time using an Adafruit DS1307 RTC module. It also receives IR signals using a VS1838B IR receiver and includes an Adafruit MS8607 PHT sensor for additional environmental monitoring.
Cirkit Designer LogoOpen Project in Cirkit Designer

Technical Specifications

Key Features

  • Temperature Range: -40°C to +125°C
  • Humidity Range: 0-100% RH
  • Temperature Accuracy: ±0.3°C (max)
  • Humidity Accuracy: ±2% RH (max)
  • Operating Voltage: 3.3V to 5V
  • Interface: I2C
  • I2C Address: 0x40 (default)

Pin Configuration

Pin Number Name Description
1 VDD Power supply (3.3V to 5V)
2 GND Ground
3 SDA I2C Data
4 SCL I2C Clock

Usage Instructions

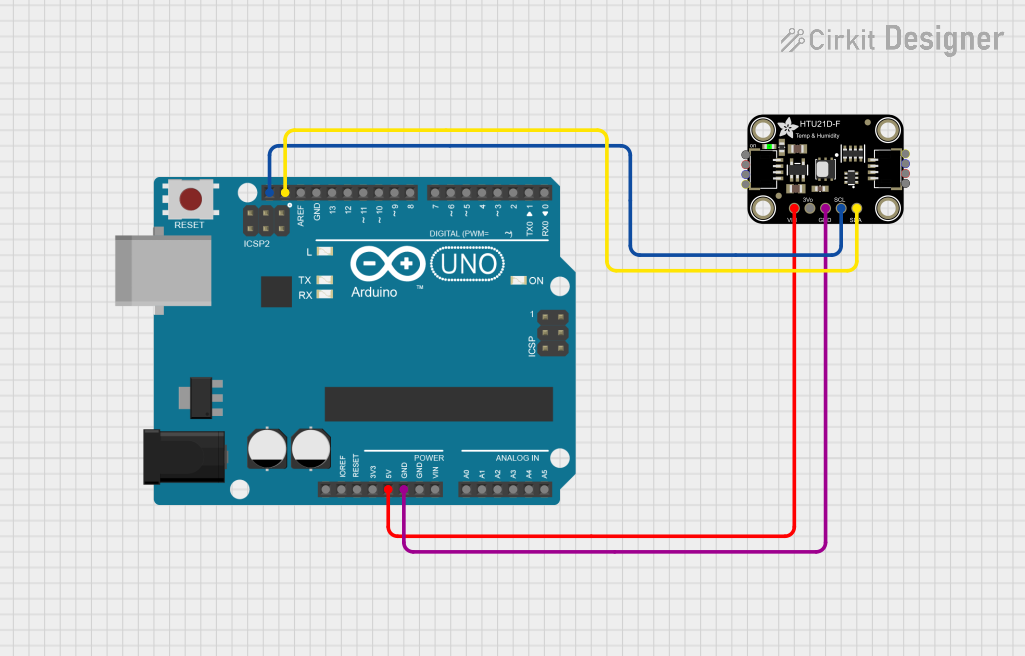
Connecting to an Arduino UNO

  1. Connect the VDD pin to the 3.3V output on the Arduino UNO.
  2. Connect the GND pin to one of the GND pins on the Arduino UNO.
  3. Connect the SDA pin to the A4 pin (SDA) on the Arduino UNO.
  4. Connect the SCL pin to the A5 pin (SCL) on the Arduino UNO.

Arduino Library and Code Example

Before you can use the HTU21D-F with an Arduino, you need to install the Adafruit HTU21DF library. You can install it using the Arduino Library Manager by searching for "Adafruit HTU21DF."

Here is a simple example code to get you started:

#include <Wire.h>
#include <Adafruit_HTU21DF.h>

// Create an instance of the Adafruit_HTU21DF class
Adafruit_HTU21DF htu = Adafruit_HTU21DF();

void setup() {
  Serial.begin(9600);
  Serial.println("HTU21D-F test");

  if (!htu.begin()) {
    Serial.println("Couldn't find sensor!");
    while (1);
  }
}

void loop() {
  Serial.print("Temp: "); Serial.print(htu.readTemperature());
  Serial.print(" C\tHumidity: "); Serial.print(htu.readHumidity());
  Serial.println(" %");

  delay(500);
}

Important Considerations and Best Practices

  • Ensure that the power supply is within the specified range (3.3V to 5V).
  • The sensor should not be subjected to condensing environments.
  • Long wires can affect the I2C communication; keep the wires as short as possible.
  • Use pull-up resistors on the SDA and SCL lines if multiple I2C devices are connected to the same bus.

Troubleshooting and FAQs

Common Issues

  • Sensor not detected: Ensure that the wiring is correct and that the sensor is properly powered.
  • Inaccurate readings: Check for any sources of heat or moisture that could be affecting the sensor. Ensure that the sensor has had sufficient time to acclimate to the environment.

FAQs

Q: Can the HTU21D-F sensor be used with a 5V system? A: Yes, the sensor can be directly connected to a 5V system.

Q: How can I calibrate the sensor? A: The HTU21D-F comes factory-calibrated. However, for critical applications, you may need to perform field calibration. Refer to the sensor's datasheet for detailed calibration procedures.

Q: Is the sensor waterproof? A: No, the HTU21D-F is not waterproof and should be protected from condensation and water exposure.

For further assistance, consult the Adafruit HTU21D-F datasheet and the Adafruit support forums.