Cirkit Designer Logo
Cirkit Designer
Your all-in-one circuit design IDE
Home / 
Component Documentation

How to Use Thermal PRinter: Examples, Pinouts, and Specs

Image of Thermal PRinter
Cirkit Designer LogoDesign with Thermal PRinter in Cirkit Designer

Introduction

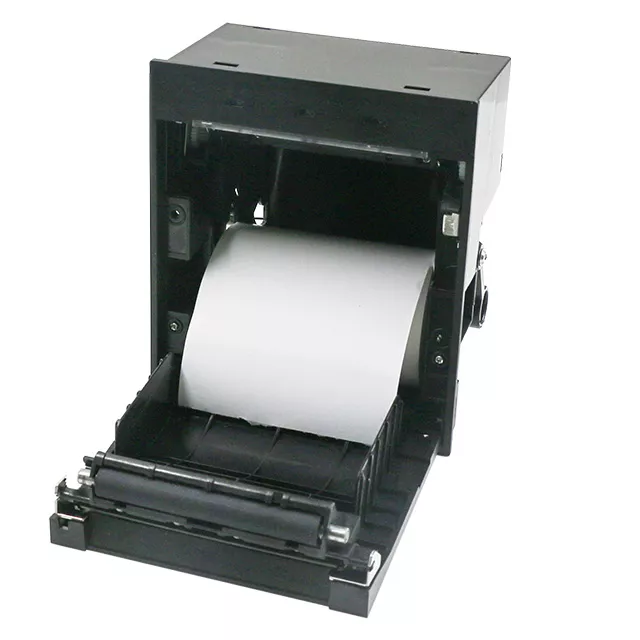
A Thermal Printer is an electronic device that utilizes heat to transfer an impression onto thermal paper, resulting in a printed image or text. Unlike traditional inkjet or laser printers, thermal printers do not require ink cartridges or toners, making them cost-effective and low-maintenance options for businesses and individuals. They are widely used in retail for printing receipts, in shipping for labels, and in various industries for printing tickets and other time-sensitive documents.

Explore Projects Built with Thermal PRinter

Use Cirkit Designer to design, explore, and prototype these projects online. Some projects support real-time simulation. Click "Open Project" to start designing instantly!
Arduino UNO-Based Smart Robotic System with Thermal Printer and Multiple Sensors
Image of scince exhibition 2024: A project utilizing Thermal PRinter in a practical application
This circuit is an Arduino-based control system that interfaces with various sensors and actuators, including a thermal printer, multiple micro servos, an inductive sensor, an IR sensor, an RGB LED, and an I2C LCD display. The Arduino UNO reads inputs from the sensors and pushbutton, processes the data, and controls the servos, LED, and printer accordingly, with power supplied by an external power source.
Cirkit Designer LogoOpen Project in Cirkit Designer
ESP32-Based Barcode Reader and Thermal Printer System
Image of negeshoca: A project utilizing Thermal PRinter in a practical application
This circuit features an ESP32 microcontroller interfaced with a thermal printer and a GM67 barcode reader module. The ESP32 handles communication with the printer and barcode reader via its GPIO pins, enabling barcode data to be read and printed. Power is supplied to all components through the ESP32's Vin and GND pins.
Cirkit Designer LogoOpen Project in Cirkit Designer
ESP32C3-Based Thermal Imaging Camera with TFT Display
Image of MLX90640-XIAO-ESP32-1.3: A project utilizing Thermal PRinter in a practical application
This circuit connects a 1.3 inch TFT Module 240×240 ST7789 display, a GY-MCU90640 thermal camera module, and a XIAO ESP32C3 microcontroller to create a thermal imaging system. The ESP32C3 microcontroller is programmed to read temperature data from the thermal camera, process it, and display a visual representation of the temperature distribution on the TFT screen. The circuit is designed for applications requiring thermal monitoring, such as detecting heat sources or monitoring temperature variations in an environment.
Cirkit Designer LogoOpen Project in Cirkit Designer
Arduino UNO R4 WiFi-Controlled Thermal Imaging Camera with TFT Display
Image of MLX90640 Thermography Camera by Arduino UNO R4: A project utilizing Thermal PRinter in a practical application
This circuit features an Arduino UNO R4 WiFi microcontroller interfaced with a GY-MCU90640 thermal camera and a 1.3 inch TFT display module. The Arduino processes thermal images from the camera and displays the results on the TFT screen. Level shifters are used to match voltage levels between the microcontroller and peripherals, and resistors are likely used for signal conditioning or pull-up/pull-down purposes.
Cirkit Designer LogoOpen Project in Cirkit Designer

Explore Projects Built with Thermal PRinter

Use Cirkit Designer to design, explore, and prototype these projects online. Some projects support real-time simulation. Click "Open Project" to start designing instantly!
Image of scince exhibition 2024: A project utilizing Thermal PRinter in a practical application
Arduino UNO-Based Smart Robotic System with Thermal Printer and Multiple Sensors
This circuit is an Arduino-based control system that interfaces with various sensors and actuators, including a thermal printer, multiple micro servos, an inductive sensor, an IR sensor, an RGB LED, and an I2C LCD display. The Arduino UNO reads inputs from the sensors and pushbutton, processes the data, and controls the servos, LED, and printer accordingly, with power supplied by an external power source.
Cirkit Designer LogoOpen Project in Cirkit Designer
Image of negeshoca: A project utilizing Thermal PRinter in a practical application
ESP32-Based Barcode Reader and Thermal Printer System
This circuit features an ESP32 microcontroller interfaced with a thermal printer and a GM67 barcode reader module. The ESP32 handles communication with the printer and barcode reader via its GPIO pins, enabling barcode data to be read and printed. Power is supplied to all components through the ESP32's Vin and GND pins.
Cirkit Designer LogoOpen Project in Cirkit Designer
Image of MLX90640-XIAO-ESP32-1.3: A project utilizing Thermal PRinter in a practical application
ESP32C3-Based Thermal Imaging Camera with TFT Display
This circuit connects a 1.3 inch TFT Module 240×240 ST7789 display, a GY-MCU90640 thermal camera module, and a XIAO ESP32C3 microcontroller to create a thermal imaging system. The ESP32C3 microcontroller is programmed to read temperature data from the thermal camera, process it, and display a visual representation of the temperature distribution on the TFT screen. The circuit is designed for applications requiring thermal monitoring, such as detecting heat sources or monitoring temperature variations in an environment.
Cirkit Designer LogoOpen Project in Cirkit Designer
Image of MLX90640 Thermography Camera by Arduino UNO R4: A project utilizing Thermal PRinter in a practical application
Arduino UNO R4 WiFi-Controlled Thermal Imaging Camera with TFT Display
This circuit features an Arduino UNO R4 WiFi microcontroller interfaced with a GY-MCU90640 thermal camera and a 1.3 inch TFT display module. The Arduino processes thermal images from the camera and displays the results on the TFT screen. Level shifters are used to match voltage levels between the microcontroller and peripherals, and resistors are likely used for signal conditioning or pull-up/pull-down purposes.
Cirkit Designer LogoOpen Project in Cirkit Designer

Technical Specifications

General Specifications

  • Printing Method: Direct Thermal
  • Resolution: Typically 203 DPI (dots per inch) for standard models, higher for specialized printers
  • Print Speed: Varies by model, commonly 50-250 mm/s
  • Paper Type: Thermal paper rolls, specific width depending on the printer model
  • Interface: USB, Serial, Ethernet, Bluetooth (varies by model)
  • Power Supply: Often 5V to 9V DC, provided by an AC adapter or battery

Pin Configuration and Descriptions

Pin Number Name Description
1 VCC Power supply input, typically 5V to 9V DC
2 GND Ground connection
3 TX Transmit pin for serial communication
4 RX Receive pin for serial communication
5 DTR Data Terminal Ready, control pin for handshaking
6 CTS Clear To Send, control pin for handshaking

Note: The pin configuration may vary depending on the model and manufacturer of the thermal printer. Always refer to the manufacturer's datasheet for exact details.

Usage Instructions

Integrating with a Circuit

  1. Power Connection: Connect the VCC pin to a suitable power supply, ensuring it matches the printer's voltage requirements. Connect the GND pin to the common ground in your circuit.

  2. Data Connection: For serial communication, connect the TX and RX pins to the corresponding RX and TX pins of your microcontroller or interface circuit. For USB models, use a USB cable to connect to the host device.

  3. Paper Loading: Ensure the thermal paper roll is loaded correctly according to the printer's instructions. The paper should feed from the bottom of the roll and come out of the printer smoothly.

  4. Test Print: Before integrating into your final design, perform a test print to ensure the printer is functioning correctly.

Best Practices

  • Use high-quality thermal paper to prevent damage to the print head and ensure print longevity.
  • Avoid exposing thermal paper to direct sunlight, high temperatures, and humidity.
  • Ensure proper ventilation around the printer to prevent overheating.
  • Regularly clean the print head with isopropyl alcohol to maintain print quality.

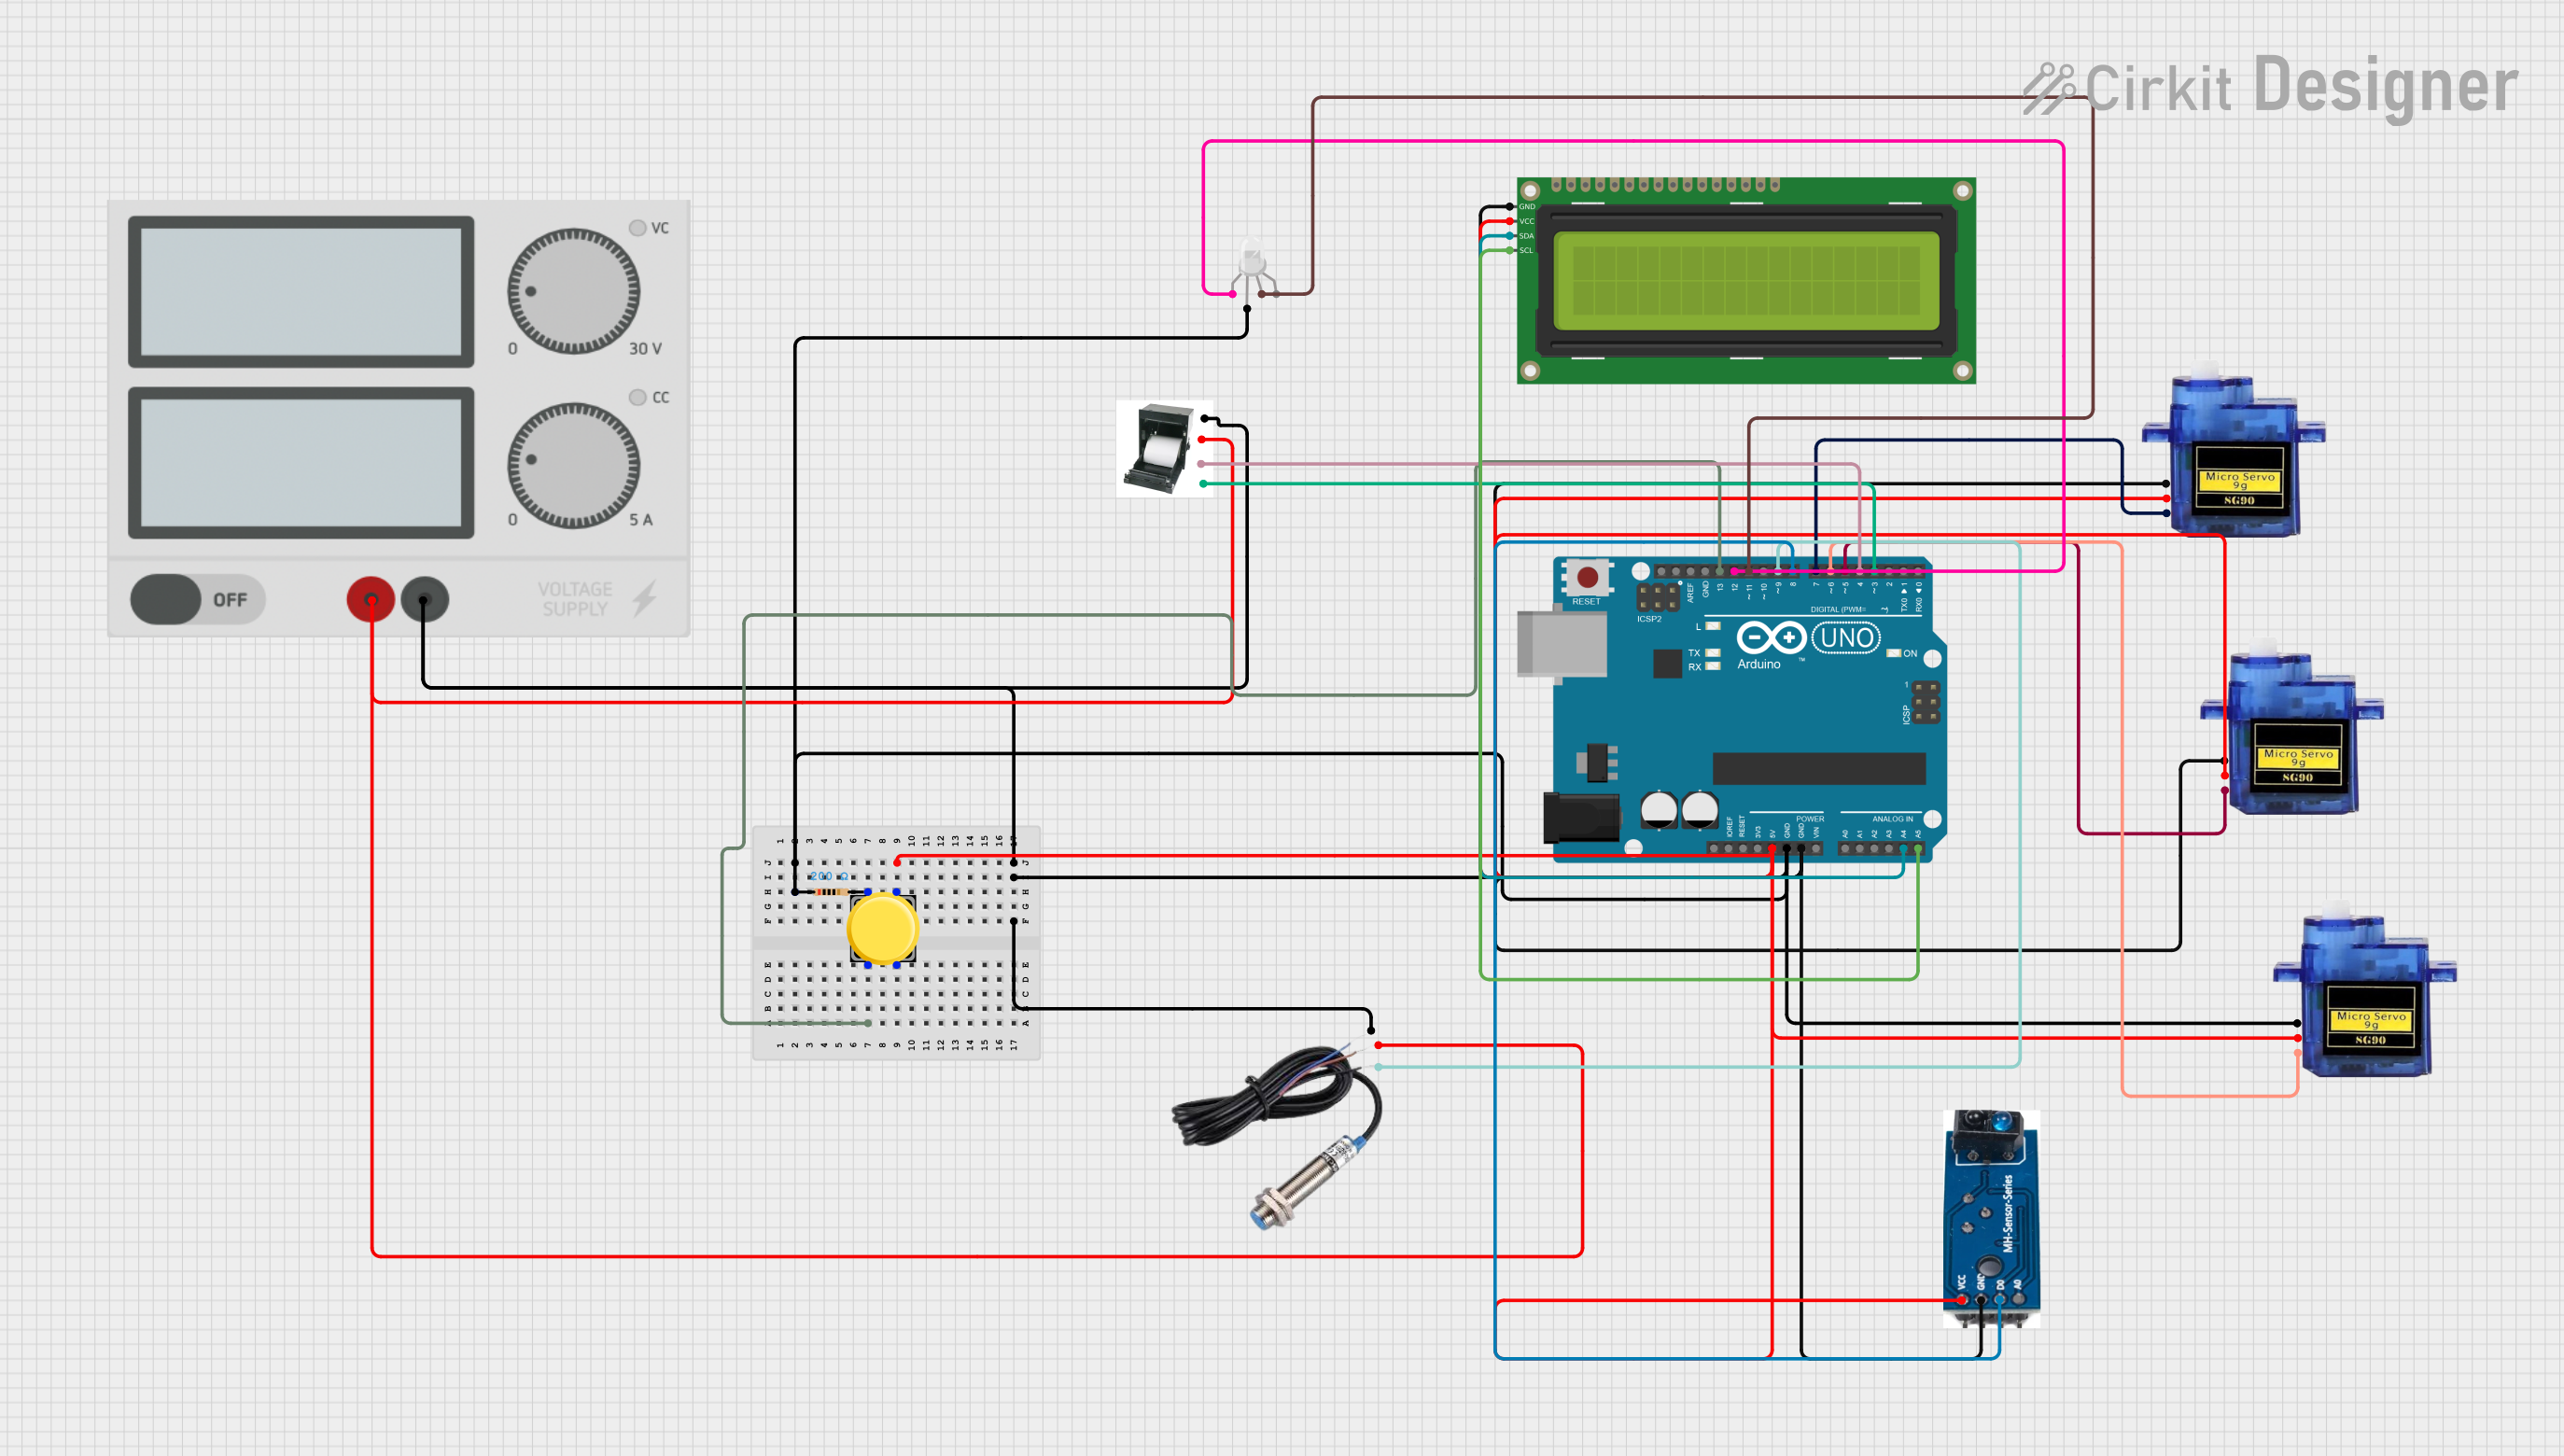
Connecting to an Arduino UNO

To connect a thermal printer to an Arduino UNO for basic printing tasks, follow these steps:

  1. Connect the printer's TX pin to the Arduino's RX pin (Pin 0).
  2. Connect the printer's RX pin to the Arduino's TX pin (Pin 1).
  3. Connect the VCC and GND pins to the Arduino's 5V and GND pins, respectively.
#include <SoftwareSerial.h>

// RX and TX connected to the Arduino pins 2 and 3 respectively
SoftwareSerial thermalPrinter(2, 3);

void setup() {
  // Set the data rate for the SoftwareSerial port
  thermalPrinter.begin(9600);
  // Test print
  thermalPrinter.println("Hello, Thermal Printer!");
}

void loop() {
  // Your code to generate print content goes here
}

Note: The above code uses SoftwareSerial to communicate with the printer. For more advanced features or higher baud rates, consider using the hardware serial ports.

Troubleshooting and FAQs

Common Issues

  • Blank Prints: Ensure the thermal paper is loaded correctly with the thermal side facing the print head.
  • Poor Print Quality: Clean the print head, check for low-quality paper, or adjust the print density settings.
  • No Response from Printer: Verify power supply, check connections, and ensure correct baud rate in software.

FAQs

Q: Can I use regular paper with a thermal printer? A: No, thermal printers require thermal paper, which is coated with a heat-sensitive layer that changes color when heated.

Q: How long do thermal prints last? A: Thermal prints can fade over time, especially when exposed to heat, light, and environmental factors. High-quality thermal paper and proper storage can extend the lifespan to several years.

Q: Can I print in color with a thermal printer? A: Standard thermal printers only print in black. However, there are specialized thermal printers that can print in two colors, typically black and red, by applying different temperatures.

Q: Is it possible to connect a thermal printer to a mobile device? A: Yes, many modern thermal printers offer Bluetooth or Wi-Fi connectivity for use with smartphones and tablets.

For more detailed troubleshooting, refer to the manufacturer's manual or contact their technical support team.