Cirkit Designer Logo
Cirkit Designer
Your all-in-one circuit design IDE
Home / 
Component Documentation

How to Use Adafruit Crickit FeatherWing: Examples, Pinouts, and Specs

Image of Adafruit Crickit FeatherWing
Cirkit Designer LogoDesign with Adafruit Crickit FeatherWing in Cirkit Designer

Introduction

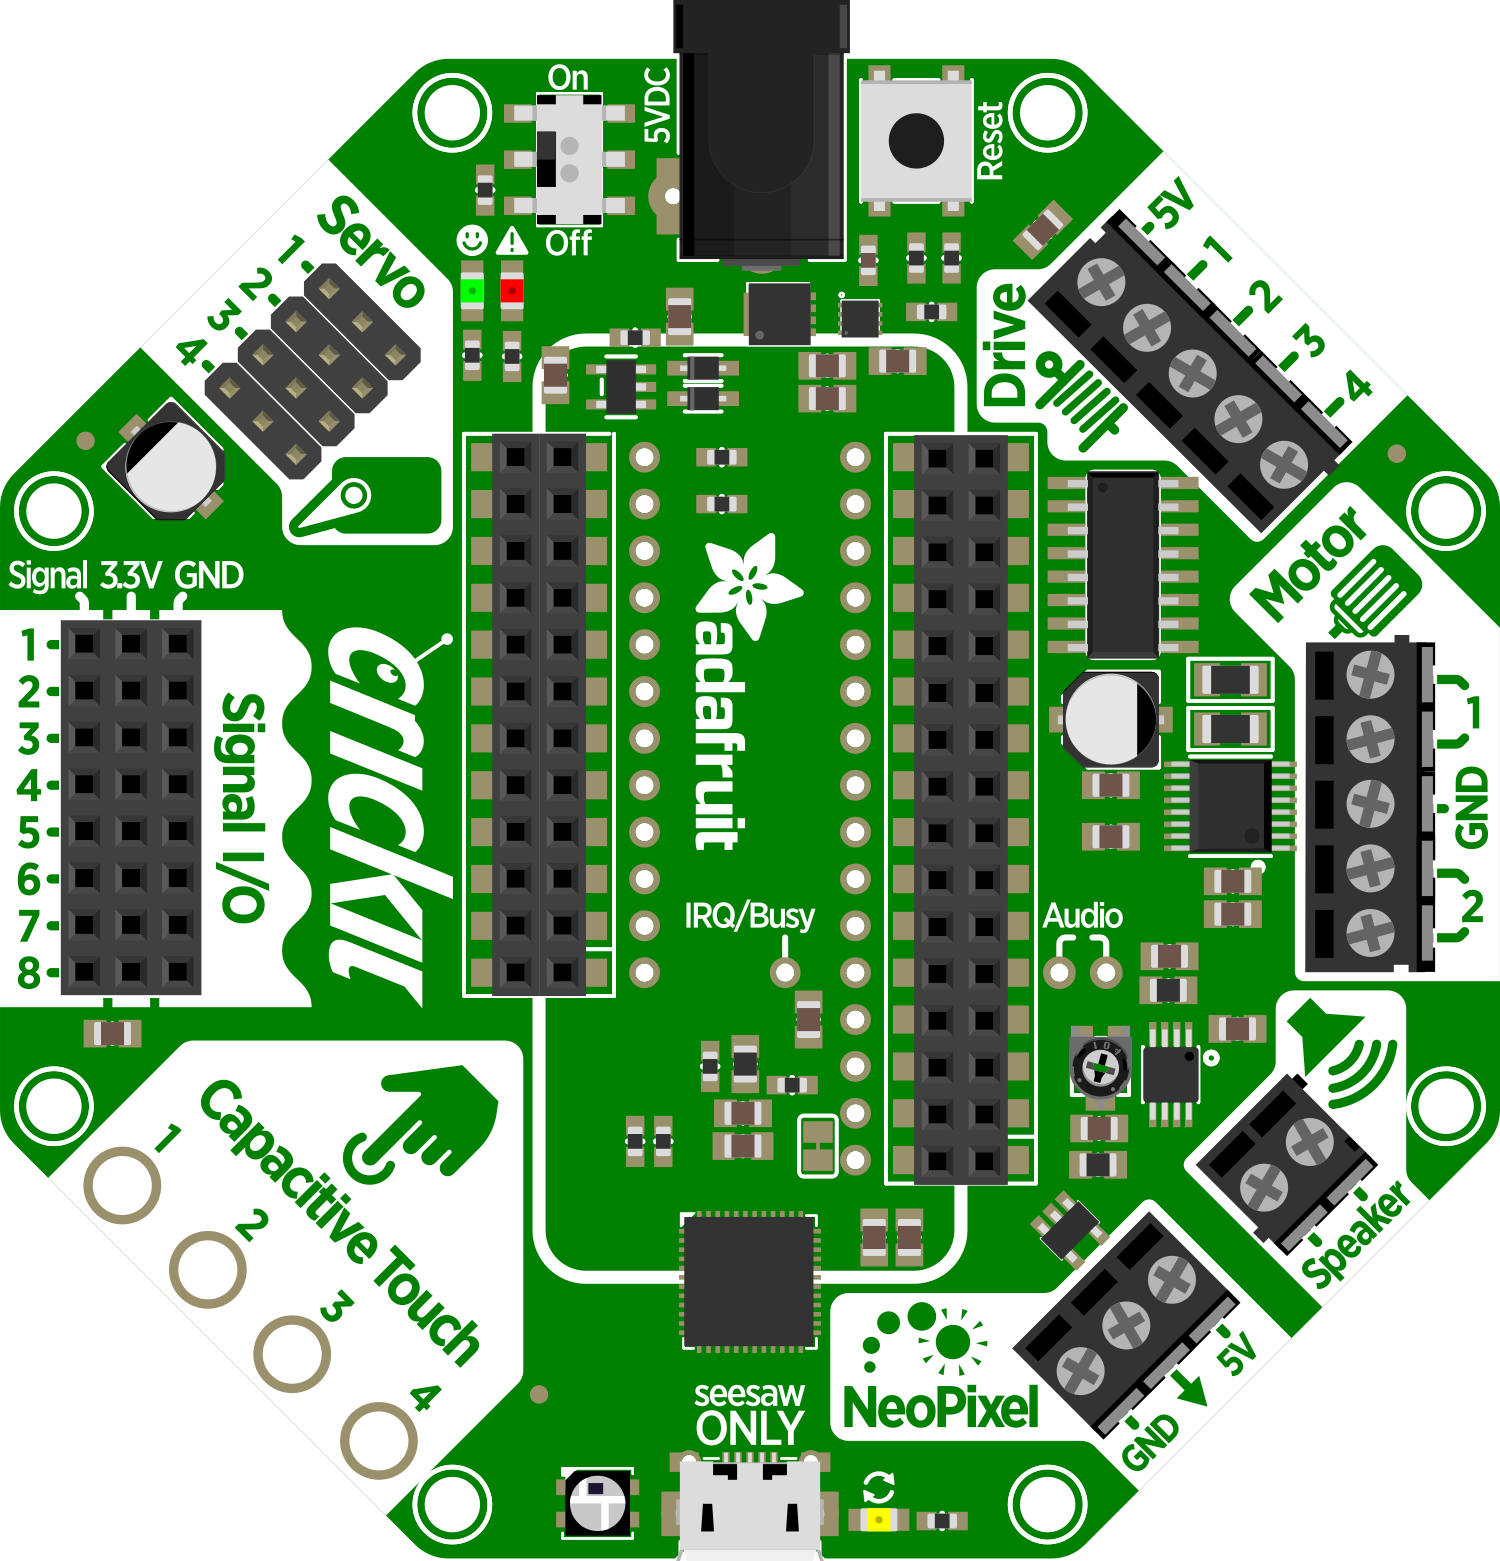
The Adafruit Crickit FeatherWing is a versatile add-on board designed for use with the Feather ecosystem. It is specifically tailored for robotics and automation projects, enabling users to control a wide array of actuators, sensors, and other electronic components. The Crickit FeatherWing simplifies the process of connecting complex circuits to a Feather board, making it an ideal choice for hobbyists, educators, and prototyping professionals.

Explore Projects Built with Adafruit Crickit FeatherWing

Use Cirkit Designer to design, explore, and prototype these projects online. Some projects support real-time simulation. Click "Open Project" to start designing instantly!
Arduino UNO and OLED FeatherWing Display: Battery-Powered Hello World Project
Image of ARDUINO_SSD1306: A project utilizing Adafruit Crickit FeatherWing in a practical application
This circuit consists of an Arduino UNO connected to an Adafruit OLED FeatherWing display via I2C communication (SDA and SCL lines). The Arduino is powered through a Vcc source and provides 3.3V and GND connections to the OLED display. The Arduino runs a program to display 'Hello, World!' on the OLED screen.
Cirkit Designer LogoOpen Project in Cirkit Designer
ESP32-Based Vibration Feedback System with Quad Alphanumeric Display and ADXL343 Accelerometer
Image of EC444 - Quest 3: A project utilizing Adafruit Crickit FeatherWing in a practical application
This circuit features an Adafruit HUZZAH32 ESP32 Feather board as the central microcontroller, which is connected to an Adafruit Quad AlphaNumeric Featherwing display and an Adafruit ADXL343 accelerometer via I2C communication (SCL and SDA lines). The ESP32 controls a vibration motor connected to one of its GPIO pins (A5_IO4) and shares a common power supply (3.3V) and ground (GND) with the other components. The purpose of this circuit is likely to read acceleration data, display information on the alphanumeric display, and provide haptic feedback through the vibration motor.
Cirkit Designer LogoOpen Project in Cirkit Designer
Touch-Sensitive Interface with Adafruit MPR121 and Feather 32u4 Bluefruit
Image of MPR121: A project utilizing Adafruit Crickit FeatherWing in a practical application
This circuit integrates an Adafruit MPR121 capacitive touch sensor with an Adafruit Feather 32u4 Bluefruit microcontroller. The MPR121 is powered by the Feather and communicates via I2C (SCL and SDA) to detect touch inputs, which can be processed or transmitted wirelessly by the Feather.
Cirkit Designer LogoOpen Project in Cirkit Designer
Solar-Powered Environmental Data Logger with Adafruit Feather M0 Express
Image of Lake Thoreau Monitoring Station: A project utilizing Adafruit Crickit FeatherWing in a practical application
This circuit is designed for environmental data collection and logging, utilizing an Adafruit Feather M0 Express microcontroller as the central processing unit. It interfaces with a BME280 sensor for atmospheric temperature, humidity, and pressure measurements, an SGP30 sensor for monitoring air quality (eCO2 and TVOC), and a STEMMA soil sensor for detecting soil moisture and temperature. The system is powered by a solar panel and a 3.7v LiPo battery, managed by an Adafruit BQ24074 Solar-DC-USB Lipo Charger, and provides easy access to the microcontroller's connections through an Adafruit Terminal Breakout FeatherWing.
Cirkit Designer LogoOpen Project in Cirkit Designer

Explore Projects Built with Adafruit Crickit FeatherWing

Use Cirkit Designer to design, explore, and prototype these projects online. Some projects support real-time simulation. Click "Open Project" to start designing instantly!
Image of ARDUINO_SSD1306: A project utilizing Adafruit Crickit FeatherWing in a practical application
Arduino UNO and OLED FeatherWing Display: Battery-Powered Hello World Project
This circuit consists of an Arduino UNO connected to an Adafruit OLED FeatherWing display via I2C communication (SDA and SCL lines). The Arduino is powered through a Vcc source and provides 3.3V and GND connections to the OLED display. The Arduino runs a program to display 'Hello, World!' on the OLED screen.
Cirkit Designer LogoOpen Project in Cirkit Designer
Image of EC444 - Quest 3: A project utilizing Adafruit Crickit FeatherWing in a practical application
ESP32-Based Vibration Feedback System with Quad Alphanumeric Display and ADXL343 Accelerometer
This circuit features an Adafruit HUZZAH32 ESP32 Feather board as the central microcontroller, which is connected to an Adafruit Quad AlphaNumeric Featherwing display and an Adafruit ADXL343 accelerometer via I2C communication (SCL and SDA lines). The ESP32 controls a vibration motor connected to one of its GPIO pins (A5_IO4) and shares a common power supply (3.3V) and ground (GND) with the other components. The purpose of this circuit is likely to read acceleration data, display information on the alphanumeric display, and provide haptic feedback through the vibration motor.
Cirkit Designer LogoOpen Project in Cirkit Designer
Image of MPR121: A project utilizing Adafruit Crickit FeatherWing in a practical application
Touch-Sensitive Interface with Adafruit MPR121 and Feather 32u4 Bluefruit
This circuit integrates an Adafruit MPR121 capacitive touch sensor with an Adafruit Feather 32u4 Bluefruit microcontroller. The MPR121 is powered by the Feather and communicates via I2C (SCL and SDA) to detect touch inputs, which can be processed or transmitted wirelessly by the Feather.
Cirkit Designer LogoOpen Project in Cirkit Designer
Image of Lake Thoreau Monitoring Station: A project utilizing Adafruit Crickit FeatherWing in a practical application
Solar-Powered Environmental Data Logger with Adafruit Feather M0 Express
This circuit is designed for environmental data collection and logging, utilizing an Adafruit Feather M0 Express microcontroller as the central processing unit. It interfaces with a BME280 sensor for atmospheric temperature, humidity, and pressure measurements, an SGP30 sensor for monitoring air quality (eCO2 and TVOC), and a STEMMA soil sensor for detecting soil moisture and temperature. The system is powered by a solar panel and a 3.7v LiPo battery, managed by an Adafruit BQ24074 Solar-DC-USB Lipo Charger, and provides easy access to the microcontroller's connections through an Adafruit Terminal Breakout FeatherWing.
Cirkit Designer LogoOpen Project in Cirkit Designer

Common Applications and Use Cases

  • Educational robotics
  • DIY home automation
  • Interactive art installations
  • Prototyping for industrial automation
  • Custom remote-controlled vehicles

Technical Specifications

Key Technical Details

  • Operating Voltage: 3.3V to 5V
  • Logic Voltage: 3.3V (compatible with all Feather boards)
  • Motor Drivers: 4 full H-Bridges with 1.2A per bridge (peak 3A) at 4.5V to 13.5V
  • Servo Control: 8 channels for hobby servos
  • PWM Outputs: 4 for LEDs or other PWM-controllable devices
  • Analog Inputs: 4 for sensors
  • Capacitive Touch Inputs: 8 with no additional components required
  • Signal Connectors: Grove connectors for I2C and UART devices

Pin Configuration and Descriptions

Pin Function Description
GND Ground Common ground for all circuits
3V3 3.3V Power Regulated 3.3V power output
VIN Voltage Input Input voltage for the board (4.5V to 13.5V)
A1-A4 Analog Inputs Analog sensor inputs
D5-D12 Digital I/O Digital input/output for sensors and actuators
SDA/SCL I2C Data/Clock I2C communication pins
RX/TX UART Receive/Transmit Serial communication pins
Motor 1-4 Motor Outputs Outputs for connecting DC motors
Servo 1-8 Servo Outputs Outputs for connecting hobby servos

Usage Instructions

How to Use the Component in a Circuit

  1. Powering the Crickit: Connect a power supply to the VIN and GND pins, ensuring the voltage is within the specified range (4.5V to 13.5V).
  2. Connecting a Feather Board: Attach a compatible Feather board to the Crickit FeatherWing using the provided headers.
  3. Attaching Actuators and Sensors: Connect motors to the motor outputs, servos to the servo outputs, and sensors to the analog or digital I/O pins as required for your project.
  4. Programming the Feather Board: Write and upload code to the Feather board to control the connected components through the Crickit FeatherWing.

Important Considerations and Best Practices

  • Always disconnect power before making or altering connections.
  • Double-check wiring, especially for motors, to prevent damage to the board.
  • Use external power when driving multiple servos or motors to avoid overloading the Feather board's power supply.
  • Ensure that the total current draw does not exceed the maximum ratings for the Crickit FeatherWing.

Troubleshooting and FAQs

Common Issues

  • Motors not running: Check power supply and wiring. Ensure that the code is correctly controlling the motor pins.
  • Servos jittering: This can be due to an insufficient power supply. Use a separate power source for servos.
  • Unresponsive board: Verify that the Feather board is properly seated and that the Crickit FeatherWing is receiving power.

Solutions and Tips for Troubleshooting

  • Always start with a simple test code to ensure basic functionality before moving on to more complex projects.
  • If a component is not working, try isolating it and testing it separately.
  • Consult the Adafruit forums and guides for additional support and community advice.

Example Code for Arduino UNO

#include <Adafruit_Crickit.h>

// Initialize the Crickit Shield
Adafruit_Crickit crickit;

void setup() {
  // Start the Crickit Shield
  crickit.begin();
}

void loop() {
  // Example: Control a servo on channel 1
  crickit.servo1.write(90); // Set servo to 90-degree position
  delay(1000); // Wait for 1 second
  crickit.servo1.write(0); // Set servo to 0-degree position
  delay(1000); // Wait for 1 second
}

Note: This example assumes that you have installed the Adafruit_Crickit library. The code comments are kept under 80 characters per line to maintain readability.

For more detailed information and advanced usage, please refer to the official Adafruit Crickit FeatherWing guide and the Adafruit Learning System.