How to Use 16x2 I2C LCD: Examples, Pinouts, and Specs
Introduction
The 16x2 I2C LCD is a liquid crystal display module capable of displaying 16 characters per line across 2 lines. Unlike traditional parallel LCDs, this module uses I2C (Inter-Integrated Circuit) communication, significantly reducing the number of pins required for interfacing. This makes it an ideal choice for projects where pin availability is limited, such as when working with microcontrollers like the Arduino UNO.
Explore Projects Built with 16x2 I2C LCD


Explore Projects Built with 16x2 I2C LCD
Common Applications
- DIY Electronics Projects: Displaying sensor data, system status, or user interfaces.
- Embedded Systems: Used in home automation, robotics, and industrial control systems.
- Prototyping: Quick and easy integration for testing and development.
- Educational Projects: Ideal for learning about I2C communication and LCD interfacing.
Technical Specifications
Key Technical Details
| Parameter | Value |
|---|---|
| Display Type | 16x2 Character LCD |
| Communication Protocol | I2C (Inter-Integrated Circuit) |
| Operating Voltage | 5V DC |
| Backlight | LED Backlight (controllable) |
| Contrast Adjustment | Via onboard potentiometer |
| I2C Address (Default) | 0x27 or 0x3F (varies by model) |
| Current Consumption | ~20mA (with backlight enabled) |
| Dimensions | 80mm x 36mm x 12mm |
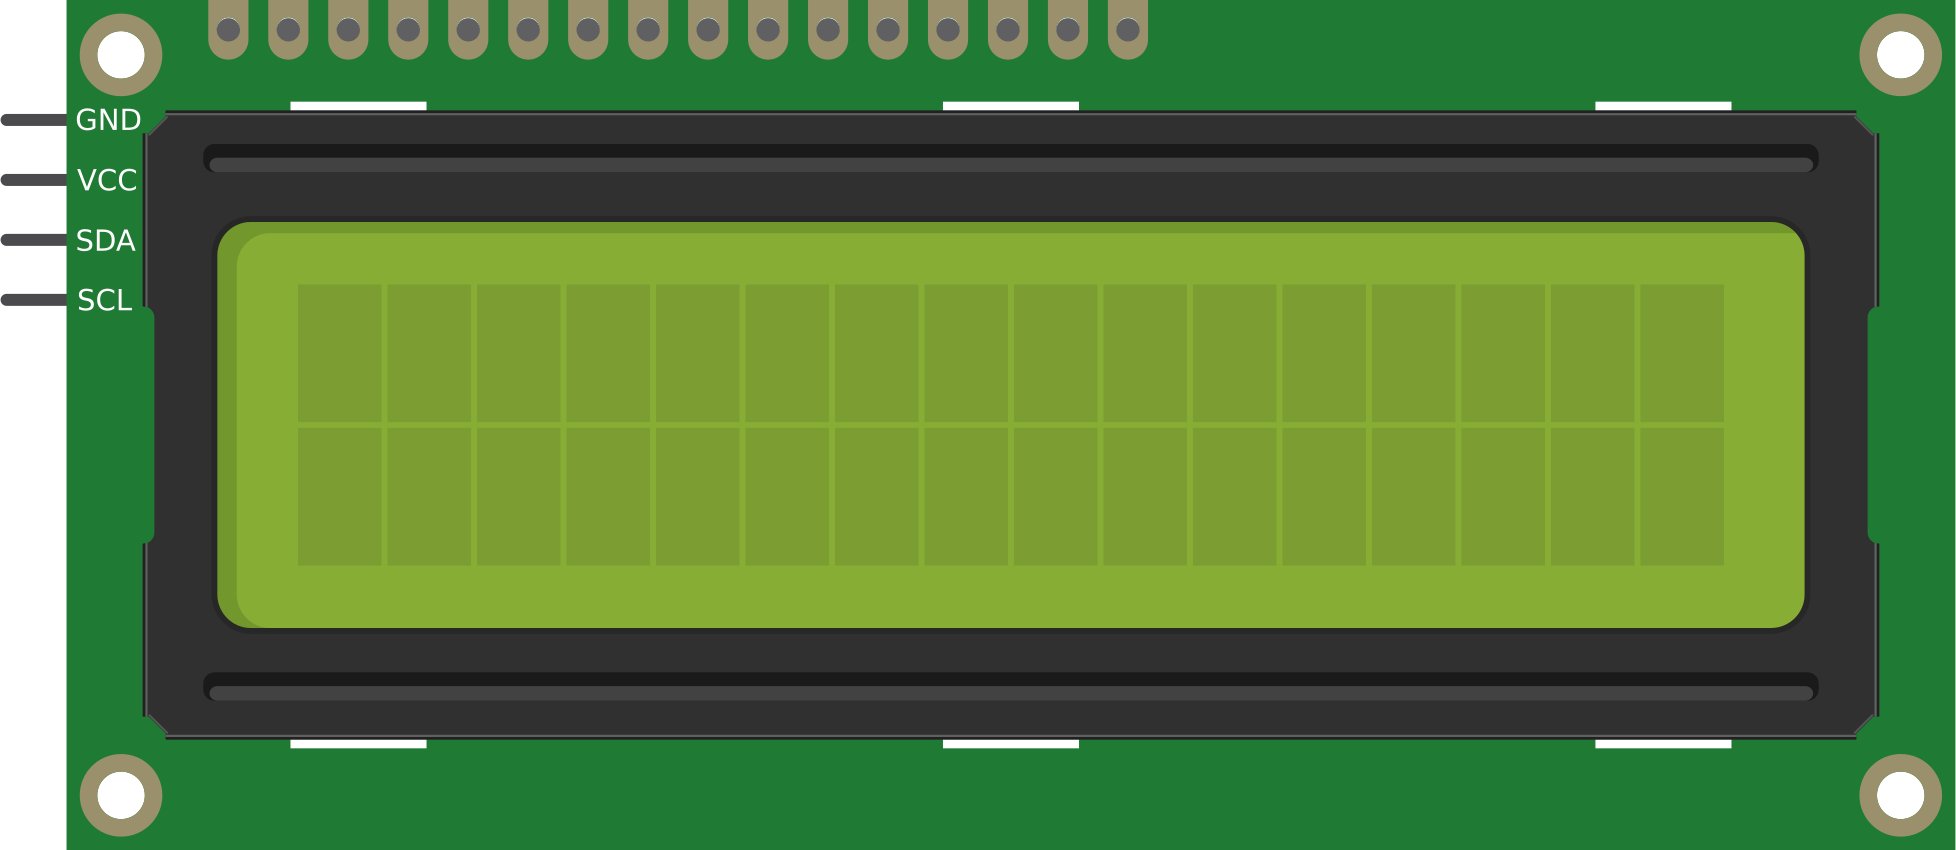
Pin Configuration
The 16x2 I2C LCD has a 4-pin interface for I2C communication. Below is the pinout:
| Pin | Name | Description |
|---|---|---|
| 1 | GND | Ground connection |
| 2 | VCC | Power supply (5V DC) |
| 3 | SDA | Serial Data Line for I2C communication |
| 4 | SCL | Serial Clock Line for I2C communication |
Usage Instructions
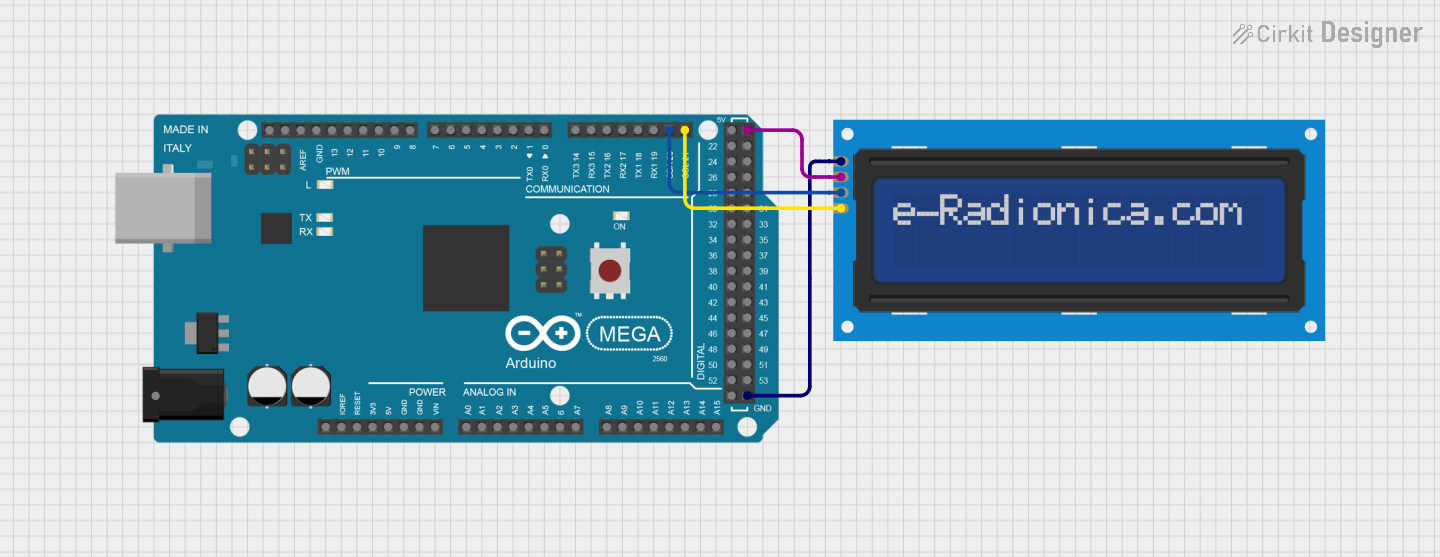
Connecting the 16x2 I2C LCD to an Arduino UNO
To use the 16x2 I2C LCD with an Arduino UNO, follow these steps:
Wiring:
- Connect the GND pin of the LCD to the GND pin on the Arduino.
- Connect the VCC pin of the LCD to the 5V pin on the Arduino.
- Connect the SDA pin of the LCD to the A4 pin on the Arduino (I2C data line).
- Connect the SCL pin of the LCD to the A5 pin on the Arduino (I2C clock line).
Install Required Library:
- Open the Arduino IDE.
- Go to Sketch > Include Library > Manage Libraries.
- Search for
LiquidCrystal_I2Cand install the library by Frank de Brabander.
Write and Upload Code:
- Use the example code below to test the LCD.
Example Code
#include <Wire.h>
#include <LiquidCrystal_I2C.h>

// Initialize the LCD with I2C address 0x27 and 16x2 dimensions
LiquidCrystal_I2C lcd(0x27, 16, 2);

void setup() {
  lcd.begin(); // Initialize the LCD
  lcd.backlight(); // Turn on the backlight

  // Display a message on the LCD
  lcd.setCursor(0, 0); // Set cursor to the first row, first column
  lcd.print("Hello, World!"); // Print text on the first row

  lcd.setCursor(0, 1); // Set cursor to the second row, first column
  lcd.print("I2C LCD Test"); // Print text on the second row
}

void loop() {
  // No actions in the loop for this example
}
Important Considerations
- I2C Address: The default I2C address is typically
0x27or0x3F. If the LCD does not respond, use an I2C scanner sketch to determine the correct address. - Contrast Adjustment: Use the onboard potentiometer to adjust the contrast of the display.
- Backlight Control: The backlight can be turned on or off using the
lcd.backlight()andlcd.noBacklight()functions.
Troubleshooting and FAQs
Common Issues and Solutions
| Issue | Possible Cause | Solution |
|---|---|---|
| LCD does not display anything | Incorrect wiring or power supply | Double-check connections and ensure 5V power is supplied. |
| Characters are not visible | Contrast is not set correctly | Adjust the contrast using the onboard potentiometer. |
| LCD displays random characters | Incorrect I2C address | Use an I2C scanner sketch to find the correct address and update the code. |
| Backlight does not turn on | Backlight control not enabled in code | Ensure lcd.backlight() is called in the setup function. |
| LCD not responding to commands | Missing or incorrect library installation | Install the LiquidCrystal_I2C library and ensure it is included in the code. |
Frequently Asked Questions
How do I find the I2C address of my LCD?
- Use an I2C scanner sketch to detect the address. Upload the following code to your Arduino:
#include <Wire.h>

void setup() {
  Wire.begin();
  Serial.begin(9600);
  Serial.println("Scanning for I2C devices...");
  for (byte address = 1; address < 127; address++) {
    Wire.beginTransmission(address);
    if (Wire.endTransmission() == 0) {
      Serial.print("I2C device found at address 0x");
      Serial.println(address, HEX);
    }
  }
}

void loop() {
  // No actions in the loop
}
Can I use the 16x2 I2C LCD with other microcontrollers?
- Yes, the LCD can be used with any microcontroller that supports I2C communication, such as ESP32, ESP8266, or Raspberry Pi.
What is the maximum cable length for I2C communication?
- The maximum length depends on the pull-up resistors and the speed of communication, but it is generally recommended to keep the cable length under 1 meter for reliable operation.
This documentation provides a comprehensive guide to using the 16x2 I2C LCD. Whether you're a beginner or an experienced user, this module is a versatile and easy-to-use display solution for your projects.