How to Use Teensy40FullDown: Examples, Pinouts, and Specs
Introduction
The Teensy 4.0 is a high-performance microcontroller board powered by the NXP i.MX RT1062 chip, featuring a 600 MHz ARM Cortex-M7 processor. It is designed for demanding embedded applications, offering exceptional processing power, a rich set of I/O options, and USB host capabilities. The Teensy 4.0 is compatible with the Arduino IDE, making it accessible to both beginners and experienced developers.
Explore Projects Built with Teensy40FullDown

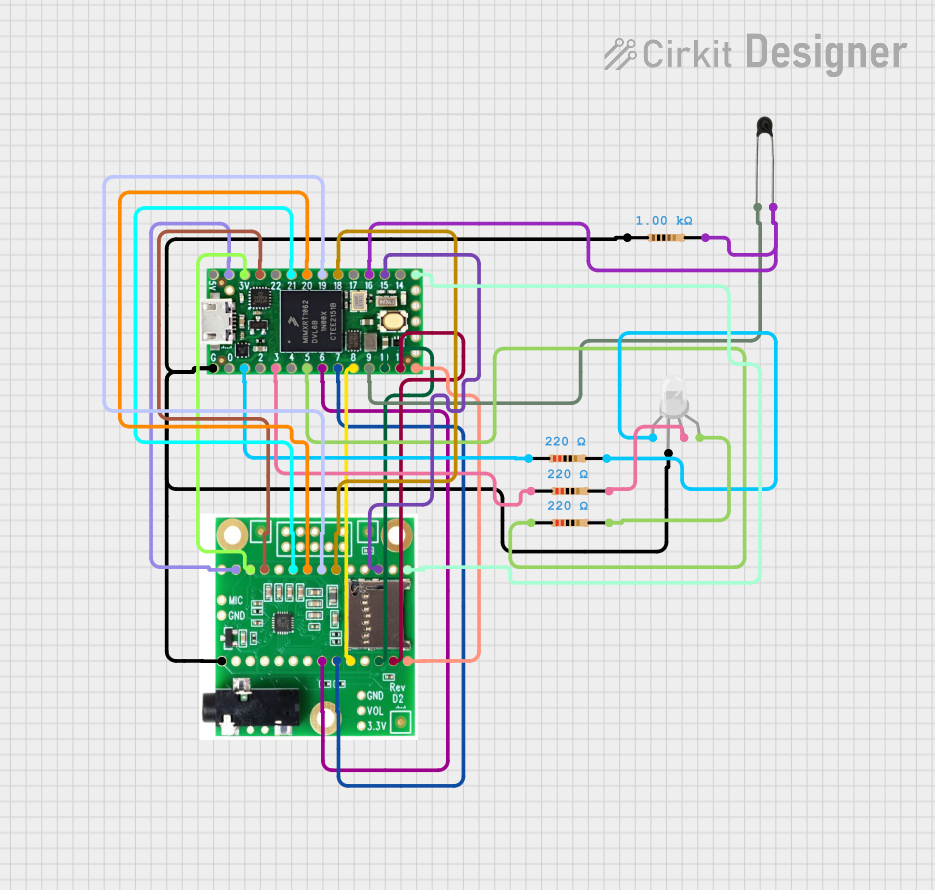

Explore Projects Built with Teensy40FullDown
Common Applications and Use Cases
- High-speed data processing and real-time control systems
- Audio processing and synthesis
- Robotics and automation
- IoT (Internet of Things) devices
- Signal processing and machine learning at the edge
- Advanced LED control and animations
Technical Specifications
Key Technical Details
- Processor: 600 MHz ARM Cortex-M7
- Flash Memory: 2 MB
- RAM: 1 MB
- Digital I/O Pins: 40 (35 usable for GPIO)
- Analog Input Pins: 14 (12-bit ADC resolution)
- PWM Pins: 31
- Communication Protocols: UART, SPI, I2C, CAN, I2S
- USB: USB 2.0 (Host and Device modes)
- Operating Voltage: 3.3V (5V tolerant inputs)
- Power Supply: 5V via USB or external power source
- Dimensions: 1.4 x 0.7 inches (35.56 x 17.78 mm)
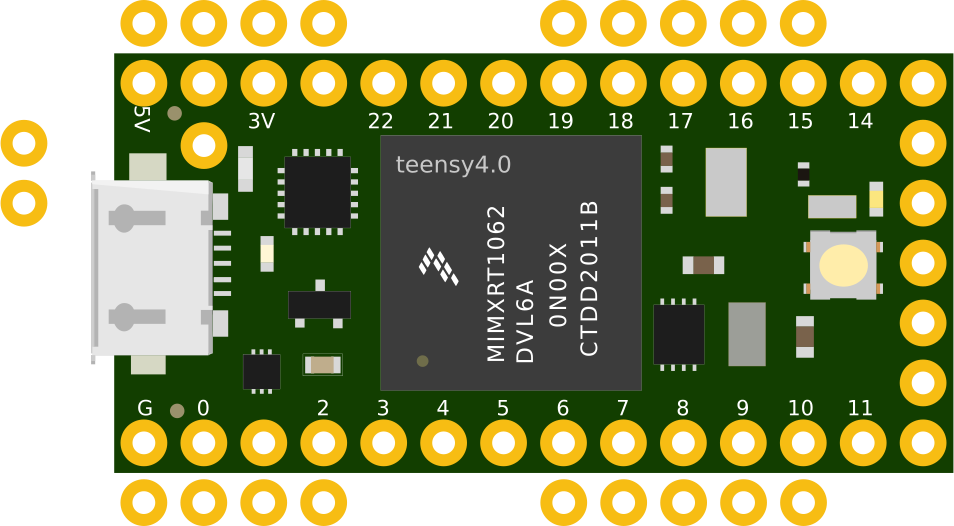
Pin Configuration and Descriptions
The Teensy 4.0 features a compact layout with 40 pins. Below is a summary of the pin configuration:
| Pin Number | Label | Function |
|---|---|---|
| 1 | VIN | Input voltage (5V) |
| 2 | GND | Ground |
| 3 | 3.3V | 3.3V output |
| 4-13 | Digital Pins | GPIO, PWM, UART, SPI, I2C |
| 14-27 | Analog Pins | GPIO, ADC (12-bit), PWM |
| 28-33 | Communication | UART, SPI, I2C, CAN |
| 34-40 | Special Pins | USB Host, Reset, Program, I2S, etc. |
For a detailed pinout diagram, refer to the official Teensy 4.0 documentation.
Usage Instructions
How to Use the Teensy 4.0 in a Circuit
Powering the Board:
- Connect the Teensy 4.0 to your computer via a USB cable for power and programming.
- Alternatively, supply 5V to the VIN pin for standalone operation.
Programming the Board:
- Install the Arduino IDE and the Teensyduino add-on.
- Select "Teensy 4.0" as the target board in the Arduino IDE.
- Write your code and upload it to the board via USB.
Connecting Peripherals:
- Use the GPIO pins for digital and analog inputs/outputs.
- Connect sensors, actuators, or communication modules to the appropriate pins.
- Ensure proper voltage levels (3.3V logic) to avoid damaging the board.
Important Considerations and Best Practices
- Voltage Levels: The Teensy 4.0 operates at 3.3V logic. While its inputs are 5V tolerant, outputs should not exceed 3.3V.
- Heat Management: The 600 MHz processor can generate heat during intensive tasks. Ensure adequate ventilation or consider adding a heatsink for prolonged high-performance use.
- USB Host Mode: To use the USB host functionality, connect a 5V power source to the VIN pin and use the USB host port for peripherals like keyboards or flash drives.
Example Code for Arduino IDE
The following example demonstrates how to blink an LED connected to pin 13:
// Blink an LED on Teensy 4.0
// This example toggles the LED on pin 13 every 500 milliseconds.

void setup() {
  pinMode(13, OUTPUT); // Set pin 13 as an output
}

void loop() {
  digitalWrite(13, HIGH); // Turn the LED on
  delay(500);             // Wait for 500 milliseconds
  digitalWrite(13, LOW);  // Turn the LED off
  delay(500);             // Wait for 500 milliseconds
}
Troubleshooting and FAQs
Common Issues and Solutions
The board is not recognized by the computer:
- Ensure the USB cable is functional and supports data transfer.
- Check that the Teensy 4.0 is properly connected and powered.
- Press the "Program" button on the board to force it into programming mode.
Code does not upload:
- Verify that "Teensy 4.0" is selected as the target board in the Arduino IDE.
- Ensure the Teensyduino add-on is installed correctly.
- Restart the Arduino IDE and try again.
Peripherals are not working as expected:
- Double-check the wiring and connections.
- Confirm that the peripherals are compatible with 3.3V logic.
- Use a multimeter to verify voltage levels and continuity.
FAQs
Can I use 5V sensors with the Teensy 4.0?
Yes, but you may need a voltage divider or level shifter to step down the signal to 3.3V.Does the Teensy 4.0 support Wi-Fi or Bluetooth?
No, the Teensy 4.0 does not have built-in wireless capabilities. However, you can connect external Wi-Fi or Bluetooth modules via UART, SPI, or I2C.What is the maximum current output of the 3.3V pin?
The 3.3V pin can supply up to 250 mA, depending on the input power source.
For additional support, refer to the official Teensy 4.0 documentation or community forums.