Cirkit Designer
Your all-in-one circuit design IDE
Home /
Component Documentation
How to Use Labjack U3-HV: Examples, Pinouts, and Specs
Introduction
The Labjack U3-HV is a versatile USB data acquisition device that offers both analog and digital I/O capabilities. It is designed for laboratory and industrial applications, providing high voltage analog inputs and flexible digital I/O options. This device is ideal for data logging, control systems, and automated testing environments.
Explore Projects Built with Labjack U3-HV
WiFi LoRa Environmental Monitoring System with INMP441 Mic and Multiple Sensors

This circuit is a solar-powered environmental monitoring system that uses a WiFi LoRa 32V3 microcontroller to collect data from various sensors, including a microphone, UV light sensor, air quality sensor, and temperature/humidity/pressure sensor. The collected data is processed and transmitted via LoRa communication, making it suitable for remote environmental data logging and monitoring applications.
Arduino-Controlled Bluetooth Robotic Vehicle with Ultrasonic Navigation

This circuit is designed to remotely control two DC gearmotors using an Arduino UNO and an L298N motor driver, with an HC-05 Bluetooth module for wireless communication. It includes a JSN-SR04T ultrasonic sensor for distance measurement and a TM1637 display for output. Power management is handled by an 18650 Li-Ion battery and rocker switches.
Arduino-Based Smart Water Level Monitoring and Control System
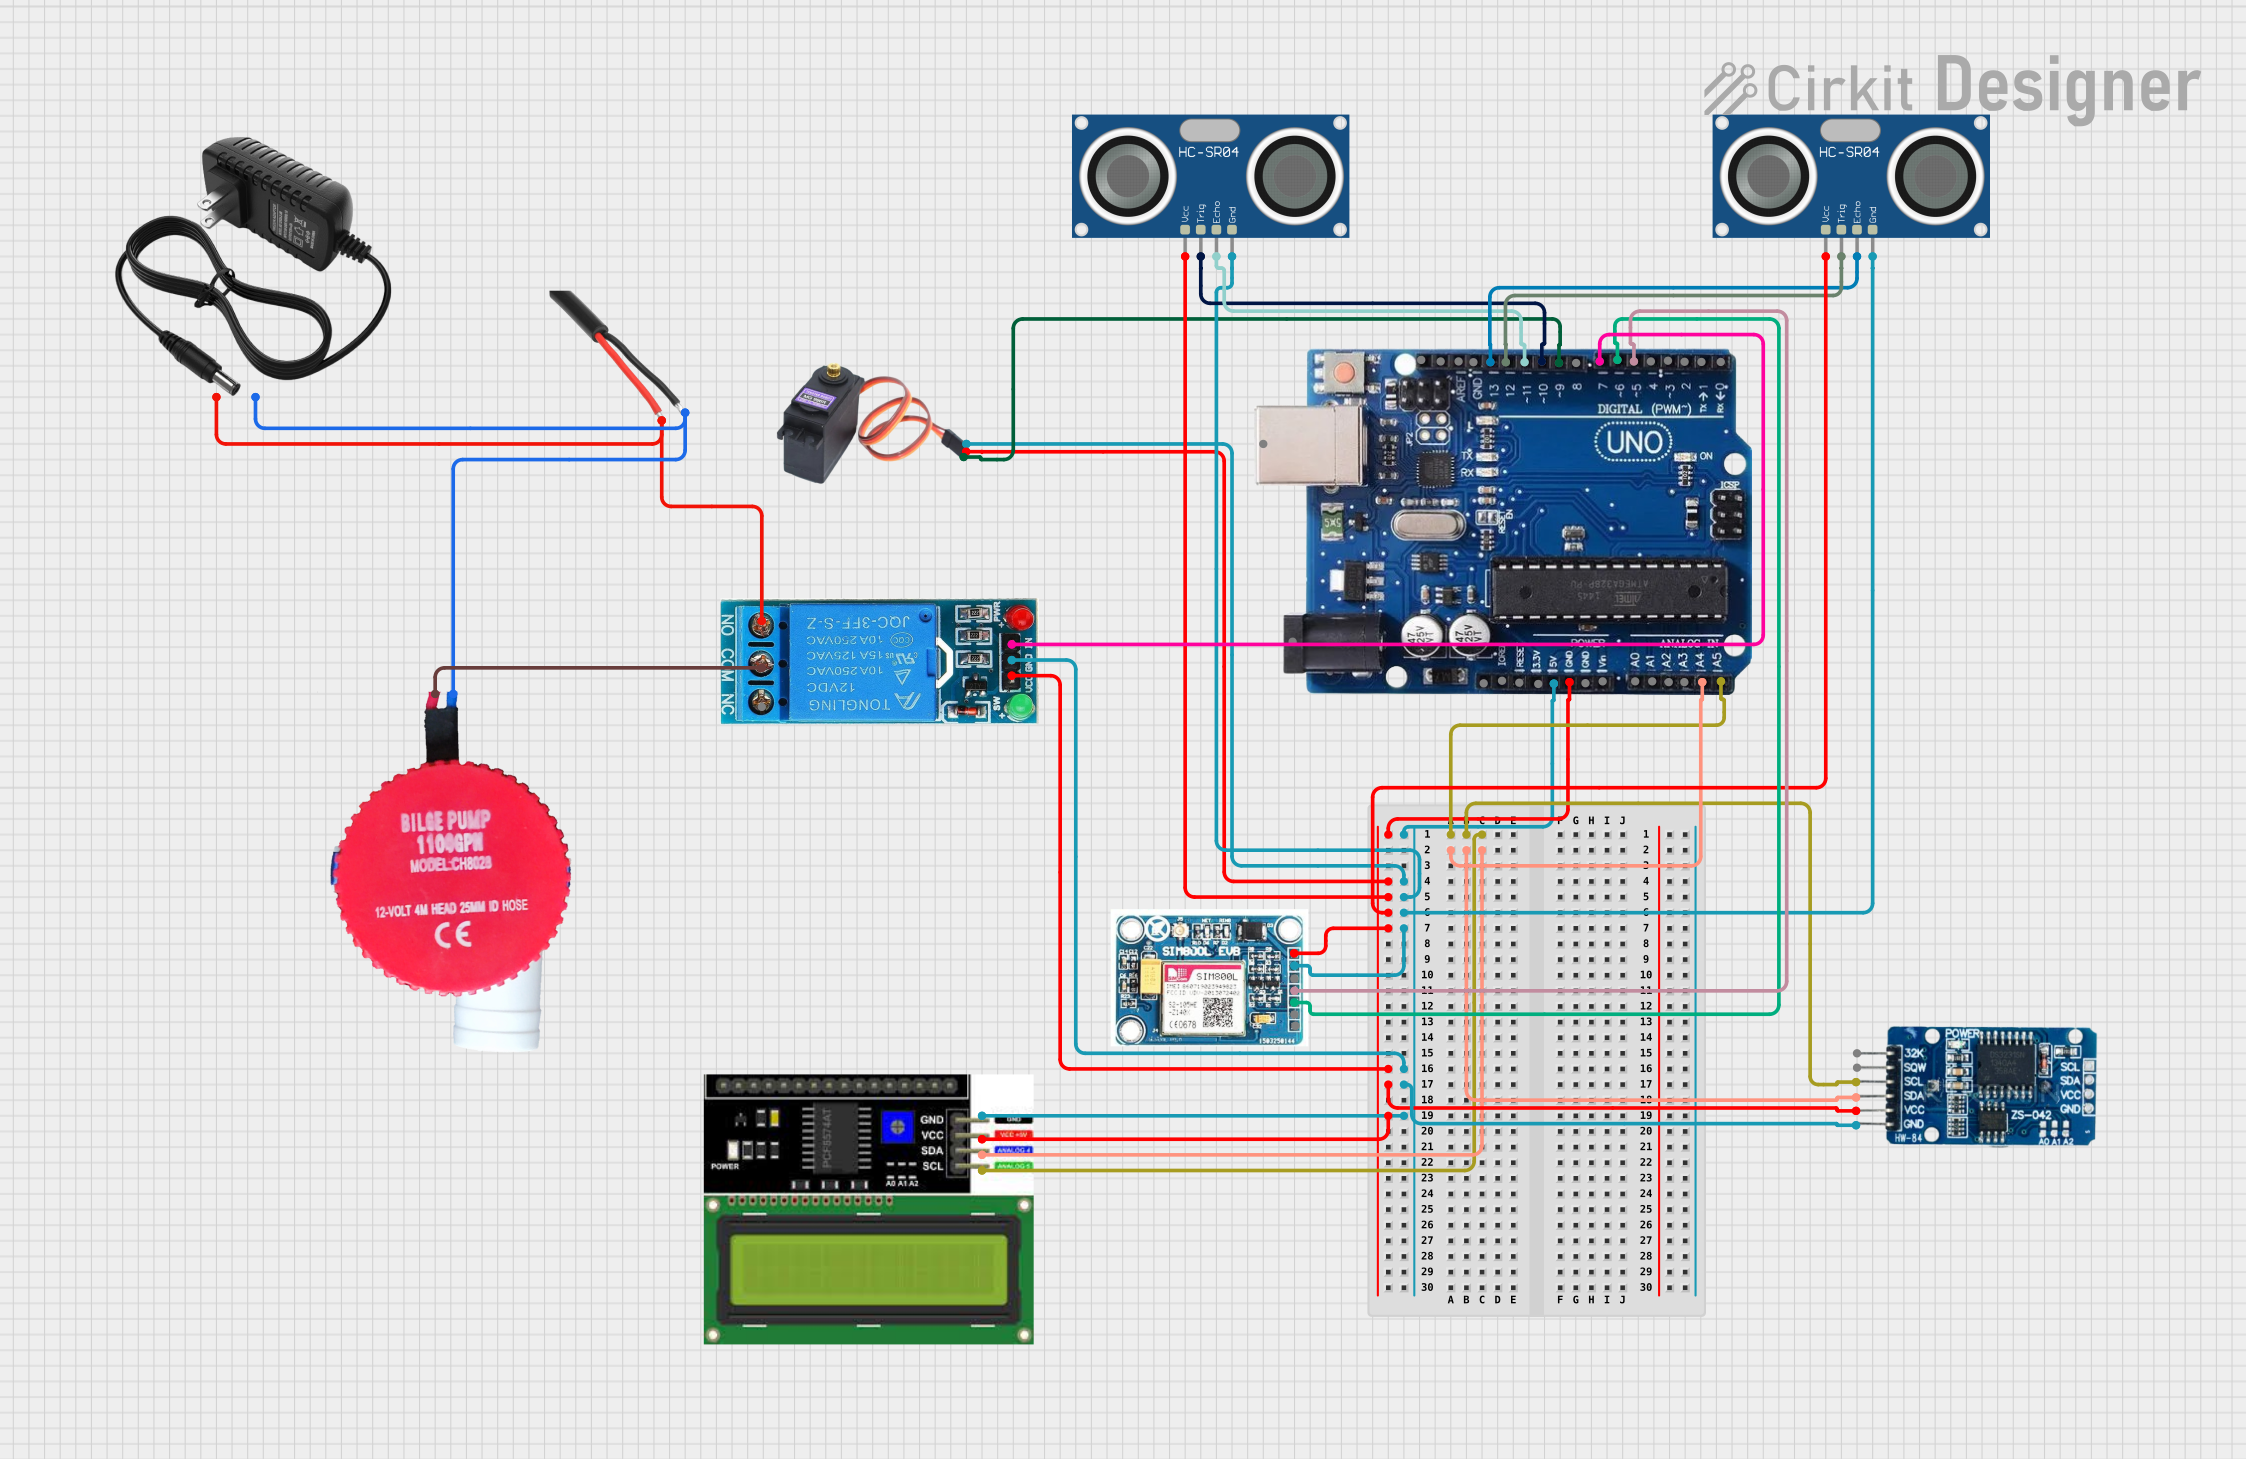
This circuit features multiple Arduino Uno R3 boards interfaced with various sensors, actuators, and modules. It includes ultrasonic sensors (HC-SR04) for distance measurement, a servo motor (MG996R) for actuation, a real-time clock (RTC DS3231), a GSM module (SIM 800L V2.0) for cellular communication, and an I2C LCD display for user interface. Additionally, the circuit controls a bilge pump via a 12V relay, powered by a 12V power supply, with AC mains integration for the pump.
Arduino-Powered Solar-Powered Bluetooth-Controlled Robotic Car with Ultrasonic Obstacle Detection
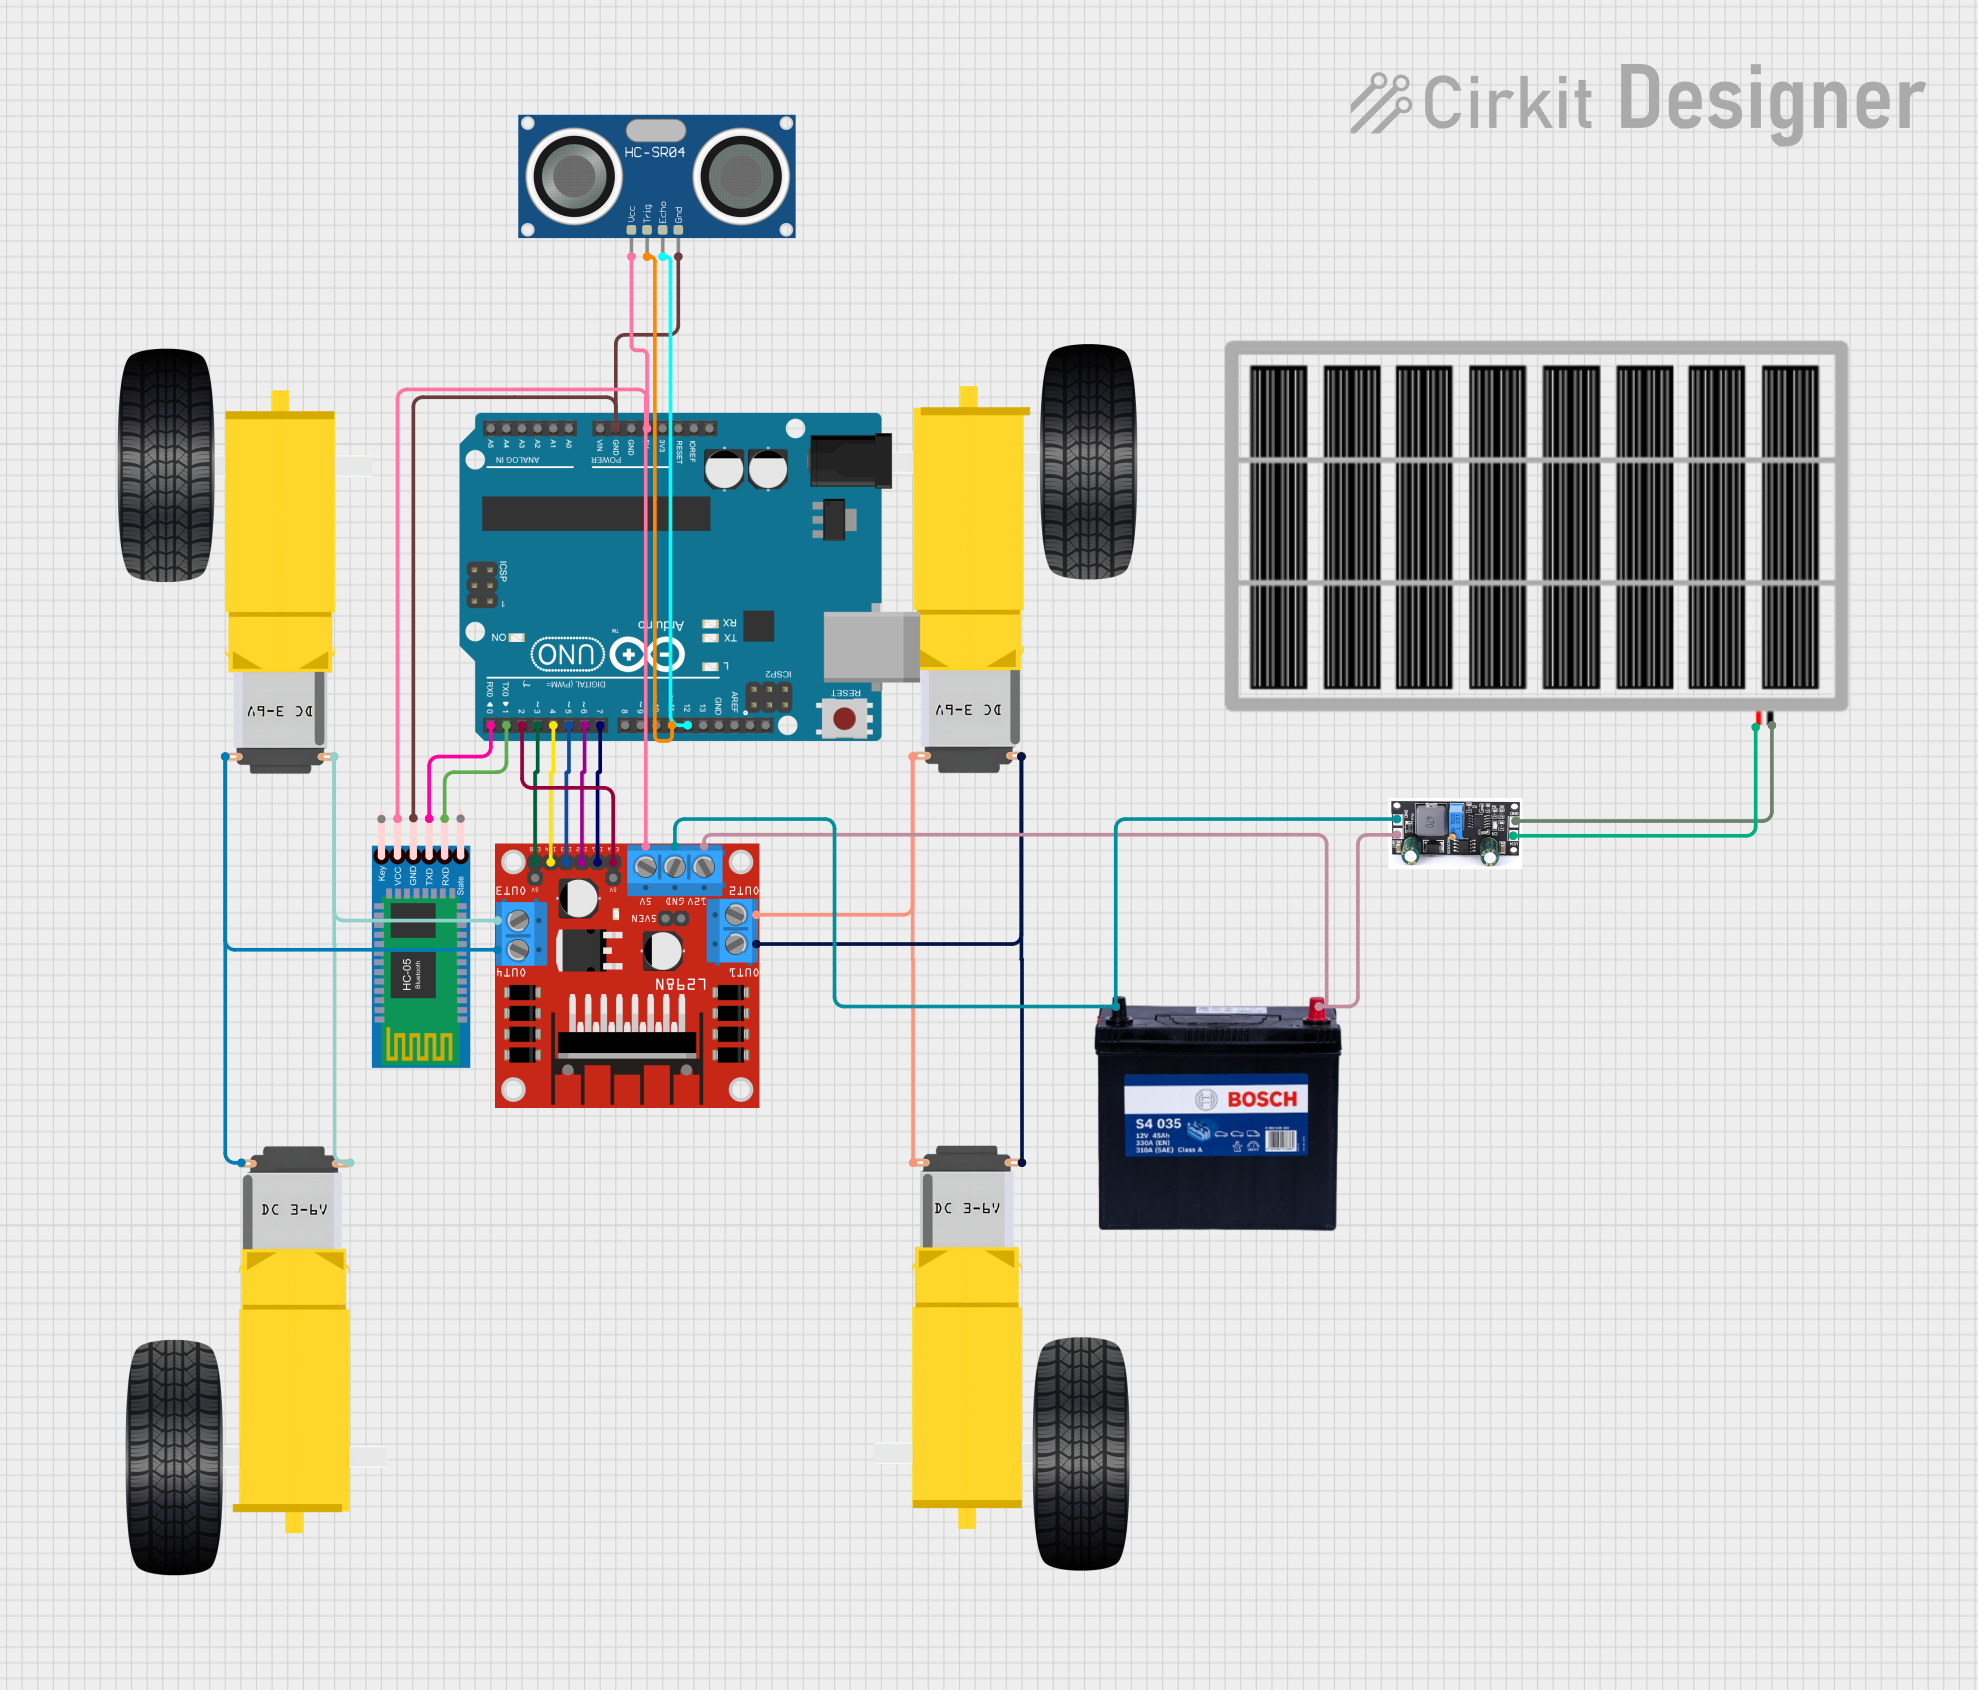
This circuit is a solar-powered, Arduino-controlled robotic vehicle with Bluetooth communication and obstacle detection. The Arduino UNO controls the L298N motor driver to drive four DC gear motors, while the HC-SR04 ultrasonic sensor provides obstacle detection, and the HC-05 Bluetooth module allows for remote control. The system is powered by a 12V battery charged via a solar panel and charge controller.
Explore Projects Built with Labjack U3-HV
WiFi LoRa Environmental Monitoring System with INMP441 Mic and Multiple Sensors
This circuit is a solar-powered environmental monitoring system that uses a WiFi LoRa 32V3 microcontroller to collect data from various sensors, including a microphone, UV light sensor, air quality sensor, and temperature/humidity/pressure sensor. The collected data is processed and transmitted via LoRa communication, making it suitable for remote environmental data logging and monitoring applications.
Arduino-Controlled Bluetooth Robotic Vehicle with Ultrasonic Navigation
This circuit is designed to remotely control two DC gearmotors using an Arduino UNO and an L298N motor driver, with an HC-05 Bluetooth module for wireless communication. It includes a JSN-SR04T ultrasonic sensor for distance measurement and a TM1637 display for output. Power management is handled by an 18650 Li-Ion battery and rocker switches.
Arduino-Based Smart Water Level Monitoring and Control System
This circuit features multiple Arduino Uno R3 boards interfaced with various sensors, actuators, and modules. It includes ultrasonic sensors (HC-SR04) for distance measurement, a servo motor (MG996R) for actuation, a real-time clock (RTC DS3231), a GSM module (SIM 800L V2.0) for cellular communication, and an I2C LCD display for user interface. Additionally, the circuit controls a bilge pump via a 12V relay, powered by a 12V power supply, with AC mains integration for the pump.
Arduino-Powered Solar-Powered Bluetooth-Controlled Robotic Car with Ultrasonic Obstacle Detection
This circuit is a solar-powered, Arduino-controlled robotic vehicle with Bluetooth communication and obstacle detection. The Arduino UNO controls the L298N motor driver to drive four DC gear motors, while the HC-SR04 ultrasonic sensor provides obstacle detection, and the HC-05 Bluetooth module allows for remote control. The system is powered by a 12V battery charged via a solar panel and charge controller.
Technical Specifications
Key Technical Details
| Parameter | Specification |
|---|---|
| USB Interface | USB 2.0 |
| Analog Inputs | 4 high voltage (±10V), 12 low voltage (0-2.4V) |
| Analog Resolution | 12-bit |
| Digital I/O | 20 channels |
| Counter/Timers | 2 |
| Power Supply | 5V via USB |
| Operating Temperature | -40°C to 85°C |
| Dimensions | 3.5" x 2.5" x 1" |
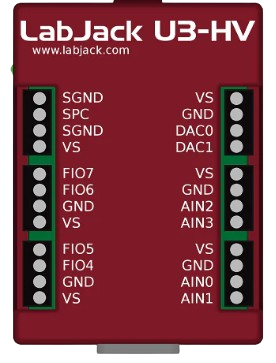
Pin Configuration and Descriptions
Analog Inputs
| Pin Number | Description | Voltage Range |
|---|---|---|
| AIN0 | High Voltage Analog Input | ±10V |
| AIN1 | High Voltage Analog Input | ±10V |
| AIN2 | High Voltage Analog Input | ±10V |
| AIN3 | High Voltage Analog Input | ±10V |
| AIN4 | Low Voltage Analog Input | 0-2.4V |
| AIN5 | Low Voltage Analog Input | 0-2.4V |
| AIN6 | Low Voltage Analog Input | 0-2.4V |
| AIN7 | Low Voltage Analog Input | 0-2.4V |
| AIN8 | Low Voltage Analog Input | 0-2.4V |
| AIN9 | Low Voltage Analog Input | 0-2.4V |
| AIN10 | Low Voltage Analog Input | 0-2.4V |
| AIN11 | Low Voltage Analog Input | 0-2.4V |
| AIN12 | Low Voltage Analog Input | 0-2.4V |
| AIN13 | Low Voltage Analog Input | 0-2.4V |
| AIN14 | Low Voltage Analog Input | 0-2.4V |
| AIN15 | Low Voltage Analog Input | 0-2.4V |
Digital I/O
| Pin Number | Description |
|---|---|
| FIO0 | Flexible Digital I/O |
| FIO1 | Flexible Digital I/O |
| FIO2 | Flexible Digital I/O |
| FIO3 | Flexible Digital I/O |
| FIO4 | Flexible Digital I/O |
| FIO5 | Flexible Digital I/O |
| FIO6 | Flexible Digital I/O |
| FIO7 | Flexible Digital I/O |
| EIO0 | Extended Digital I/O |
| EIO1 | Extended Digital I/O |
| EIO2 | Extended Digital I/O |
| EIO3 | Extended Digital I/O |
| EIO4 | Extended Digital I/O |
| EIO5 | Extended Digital I/O |
| EIO6 | Extended Digital I/O |
| EIO7 | Extended Digital I/O |
| CIO0 | Counter/Timer I/O |
| CIO1 | Counter/Timer I/O |
| CIO2 | Counter/Timer I/O |
| CIO3 | Counter/Timer I/O |
Usage Instructions
How to Use the Component in a Circuit
- Connect the Labjack U3-HV to your computer using a USB cable.
- Install the necessary drivers and software from the Labjack website.
- Connect your sensors or devices to the appropriate analog or digital I/O pins.
- Configure the device using the provided software or through custom code.
Important Considerations and Best Practices
- Ensure proper voltage levels: Do not exceed the specified voltage ranges for analog inputs.
- Use appropriate grounding: Connect the ground of your sensors and devices to the Labjack ground.
- Avoid noise interference: Use shielded cables and proper grounding techniques to minimize noise.
- Regularly update firmware: Check for firmware updates to ensure optimal performance and compatibility.
Example Code for Arduino UNO
#include <LabJackM.h> // Include the LabJackM library

void setup() {
  Serial.begin(9600); // Initialize serial communication
  LJUSB_OpenDevice(1, 0, U3); // Open the Labjack U3-HV device
}

void loop() {
  double voltage;
  // Read analog input from AIN0
  LJUSB_eAIN(1, 0, 0, &voltage, 0, 0, 0, 0, 0, 0, 0);
  Serial.print("Voltage: ");
  Serial.println(voltage); // Print the voltage to the serial monitor
  delay(1000); // Wait for 1 second
}
Troubleshooting and FAQs
Common Issues Users Might Face
Device not recognized by the computer:
- Ensure the USB cable is properly connected.
- Check if the drivers are correctly installed.
- Try using a different USB port or cable.
Incorrect voltage readings:
- Verify the connections and ensure proper grounding.
- Check if the input voltage is within the specified range.
- Calibrate the device if necessary.
Interference and noise in readings:
- Use shielded cables and proper grounding techniques.
- Keep analog and digital signals separate to avoid crosstalk.
Solutions and Tips for Troubleshooting
- Restart the device and computer: Sometimes, a simple restart can resolve connectivity issues.
- Update drivers and firmware: Ensure you have the latest drivers and firmware installed.
- Check connections: Verify all connections are secure and correct.
- Consult the Labjack support: If issues persist, refer to the Labjack support documentation or contact their support team.
By following this documentation, users can effectively utilize the Labjack U3-HV for their data acquisition needs, ensuring accurate and reliable performance in various applications.