How to Use SparkFun AS3935 Lightning Detector: Examples, Pinouts, and Specs
Introduction
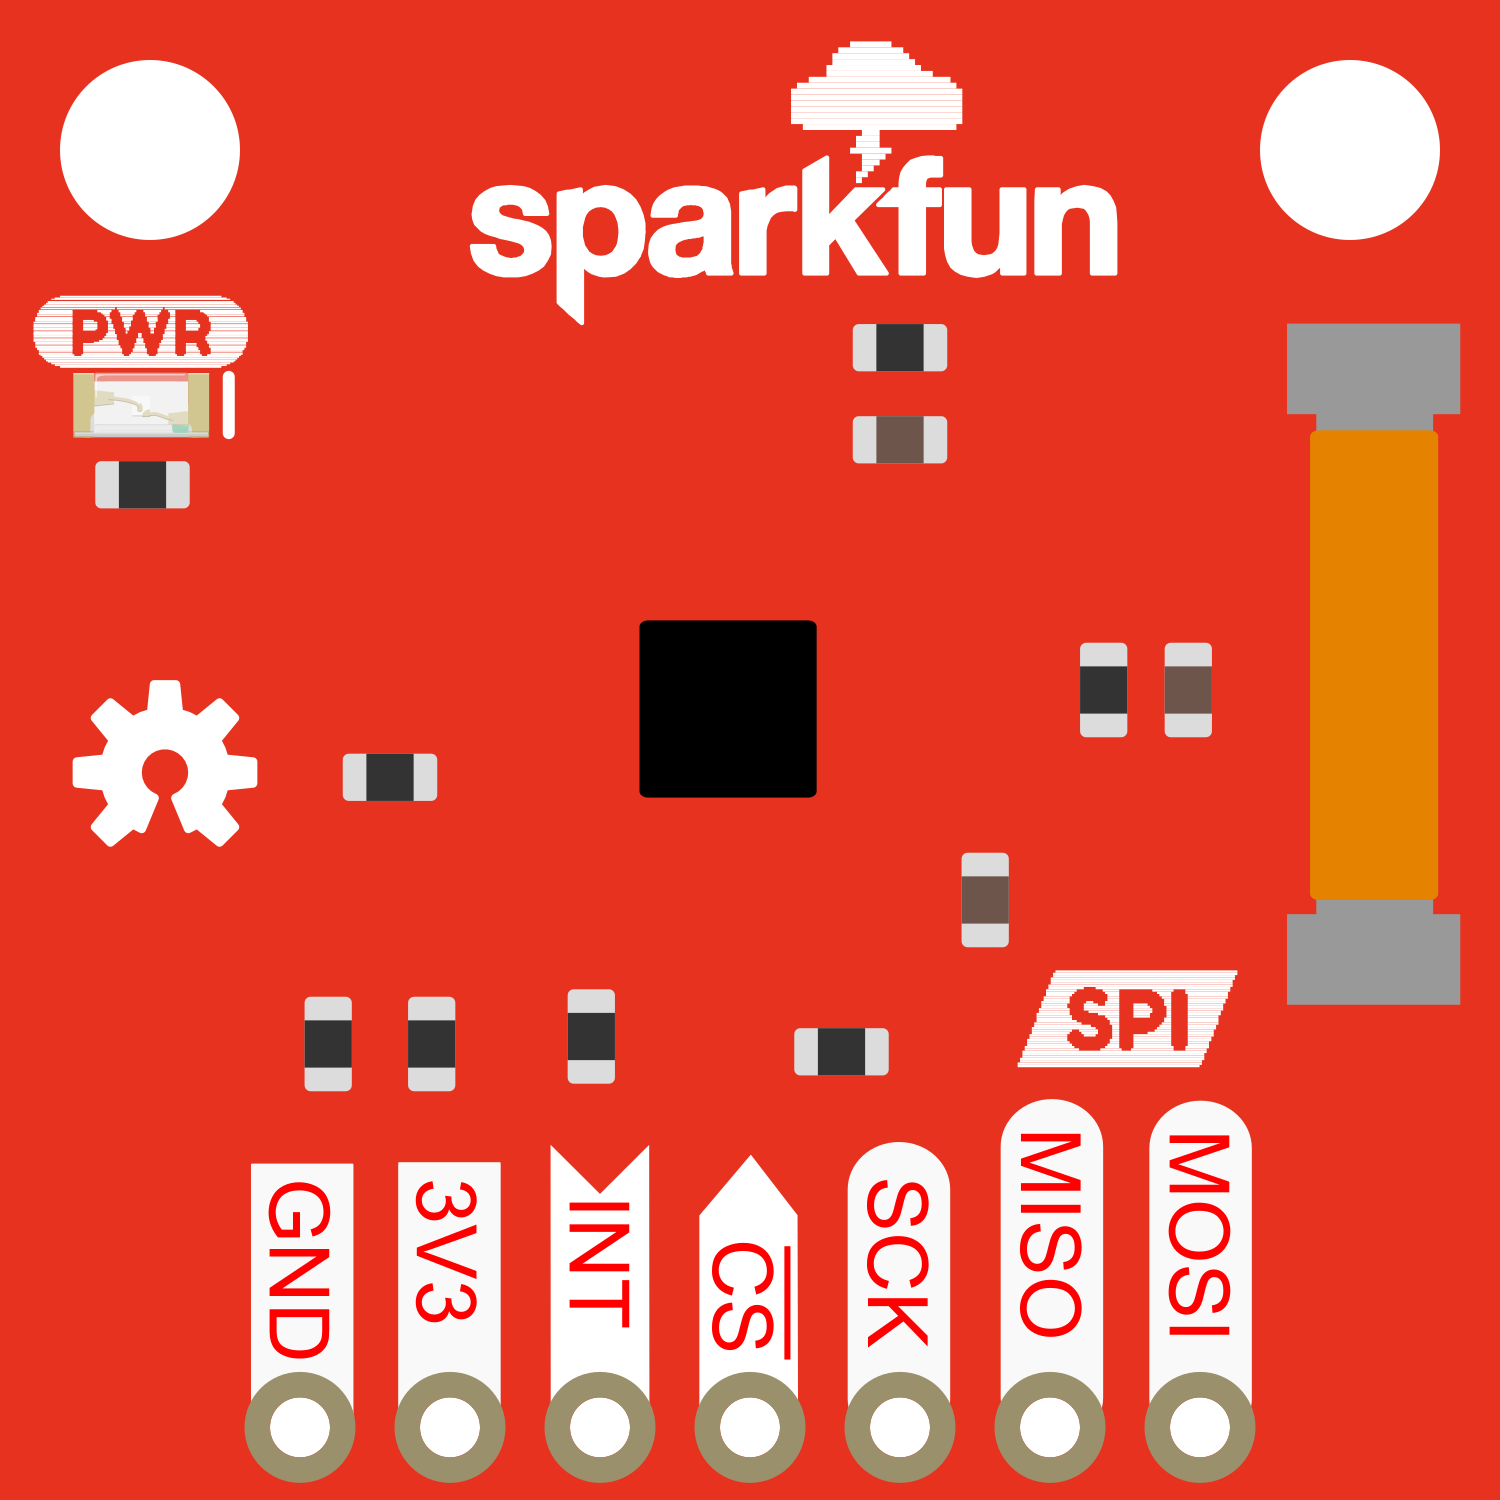
The SparkFun AS3935 Lightning Detector is a sophisticated integrated circuit (IC) designed to detect the presence of lightning activity within a specified range. This component is capable of distinguishing between distant and potential storm lightning strikes, providing an estimation of the distance to the head of the storm. It is commonly used in weather stations, golf carts, personal handheld devices, or any application where early detection of lightning strikes is beneficial.
Explore Projects Built with SparkFun AS3935 Lightning Detector

Explore Projects Built with SparkFun AS3935 Lightning Detector
Common Applications and Use Cases
- Personal weather stations
- Outdoor event monitoring
- Golf carts and outdoor sports equipment
- Hiking and camping safety gear
- Lightning detection and warning systems
Technical Specifications
Key Technical Details
- Supply Voltage: 2.4V to 5.5V
- Operating Frequency: 500kHz
- Detection Range: Up to 40km
- Lightning Sensing: 24-bit analog-to-digital converter (ADC)
- Communication Interface: SPI/I2C
- Interrupt-driven event reporting
Pin Configuration and Descriptions
| Pin Number | Name | Description |
|---|---|---|
| 1 | VDD | Power supply (2.4V to 5.5V) |
| 2 | GND | Ground connection |
| 3 | SI | SPI/I2C selection pin |
| 4 | IRQ | Interrupt request (active low) |
| 5 | SCL | SPI clock / I2C serial clock |
| 6 | SDA | SPI data / I2C data |
| 7 | CS | SPI chip select (active low) |
| 8 | A0 | I2C address selection pin |
Usage Instructions
How to Use the Component in a Circuit
- Power Supply: Connect the VDD pin to a power source between 2.4V and 5.5V, and connect the GND pin to the ground.
- Communication Interface: Choose between SPI or I2C for communication with a microcontroller. For SPI, connect SCL, SDA, and CS to the corresponding SPI pins on your microcontroller. For I2C, connect SCL and SDA to the I2C pins, and set the SI pin to high.
- Interrupts: Connect the IRQ pin to an interrupt-capable pin on your microcontroller to handle lightning detection events.
- I2C Addressing: If using I2C, set the A0 pin high or low to determine the device's address.
Important Considerations and Best Practices
- Ensure that the power supply is stable and within the specified voltage range.
- Use proper decoupling capacitors close to the power pins to minimize noise.
- Avoid running the sensor wires parallel to high-current carrying wires to prevent false detections.
- Place the sensor away from large metal objects to reduce interference.
- Implement proper lightning and ESD protection if the device is used in exposed environments.
Troubleshooting and FAQs
Common Issues Users Might Face
- False Positives: Ensure that the sensor is placed away from noise sources and that the SPI/I2C lines are properly shielded.
- No Lightning Detection: Verify that the IRQ pin is correctly connected and configured on the microcontroller. Also, check the power supply and communication interface.
- Inaccurate Distance Measurement: Calibrate the sensor as per the manufacturer's instructions and ensure that the environment is free from electromagnetic interference.
Solutions and Tips for Troubleshooting
- Double-check wiring and solder connections.
- Use an oscilloscope to verify communication signals on the SPI/I2C lines.
- Ensure that the microcontroller's interrupt service routine is correctly handling IRQ events.
- Consult the manufacturer's datasheet for detailed calibration procedures.
FAQs
Q: Can the AS3935 detect the direction of the storm? A: No, the AS3935 can only provide the estimated distance to the storm, not its direction.
Q: Is the AS3935 waterproof? A: The AS3935 IC itself is not waterproof. It requires proper casing or enclosure if used in outdoor applications.
Q: How can I adjust the sensitivity of the detector? A: Sensitivity settings can be adjusted through the registers of the AS3935. Refer to the datasheet for specific register settings.
Example Code for Arduino UNO
Below is an example code snippet for initializing the AS3935 Lightning Detector with an Arduino UNO using the I2C communication protocol. Ensure you have the appropriate library installed for the AS3935.
#include <Wire.h>
#include <SparkFun_AS3935.h>

// Create an instance of the AS3935 library
SparkFun_AS3935 lightning;

void setup() {
  Wire.begin(); // Initialize I2C
  Serial.begin(9600); // Start serial communication at 9600 baud

  // Initialize the lightning detector
  if (lightning.begin(Wire, 0x03) == false) {
    Serial.println("AS3935 not detected");
    while (1);
  }

  // Set the indoor/outdoor mode
  lightning.setIndoorOutdoor(INDOOR);

  // Set the noise floor level
  lightning.setNoiseFloor(2);

  // Enable disturber detection
  lightning.watchdogThreshold(2);
  lightning.spikeRejection(2);

  // Set the minimum number of lightning strikes before interrupt is triggered
  lightning.lightningThreshold(5);

  // Calibrate the internal oscillators
  lightning.calibrateOsc();
}

void loop() {
  // Check if the IRQ pin is low, indicating an event
  if (digitalRead(IRQ_PIN) == LOW) {
    // Read the interrupt register to determine the cause of the IRQ
    int intVal = lightning.readInterruptReg();
    if (intVal == NOISE_LEVEL_TOO_HIGH) {
      Serial.println("Noise level too high");
    } else if (intVal == DISTURBER_DETECTED) {
      Serial.println("Disturber detected");
    } else if (intVal == LIGHTNING_DETECTED) {
      Serial.println("Lightning detected");
      // Get the estimated distance to the head of the storm
      int distance = lightning.distanceToStorm();
      Serial.print("Distance to storm: ");
      Serial.println(distance);
    }
  }
}
Remember to define IRQ_PIN to the digital pin number connected to the IRQ pin of the AS3935. Adjust the settings such as indoor/outdoor mode, noise floor, and watchdog threshold according to your specific application needs.