The Ultrasonic Waterproof Sensor is a robust and versatile electronic component designed to measure distances or detect objects using ultrasonic waves. Its waterproof design makes it ideal for outdoor or wet environments, where exposure to water or moisture is a concern. This sensor emits ultrasonic waves and measures the time it takes for the waves to bounce back after hitting an object, allowing for precise distance measurement.
Explore Projects Built with Ultrasonic Waterproof
Use Cirkit Designer to design, explore, and prototype these projects online. Some projects support real-time simulation. Click "Open Project" to start designing instantly!
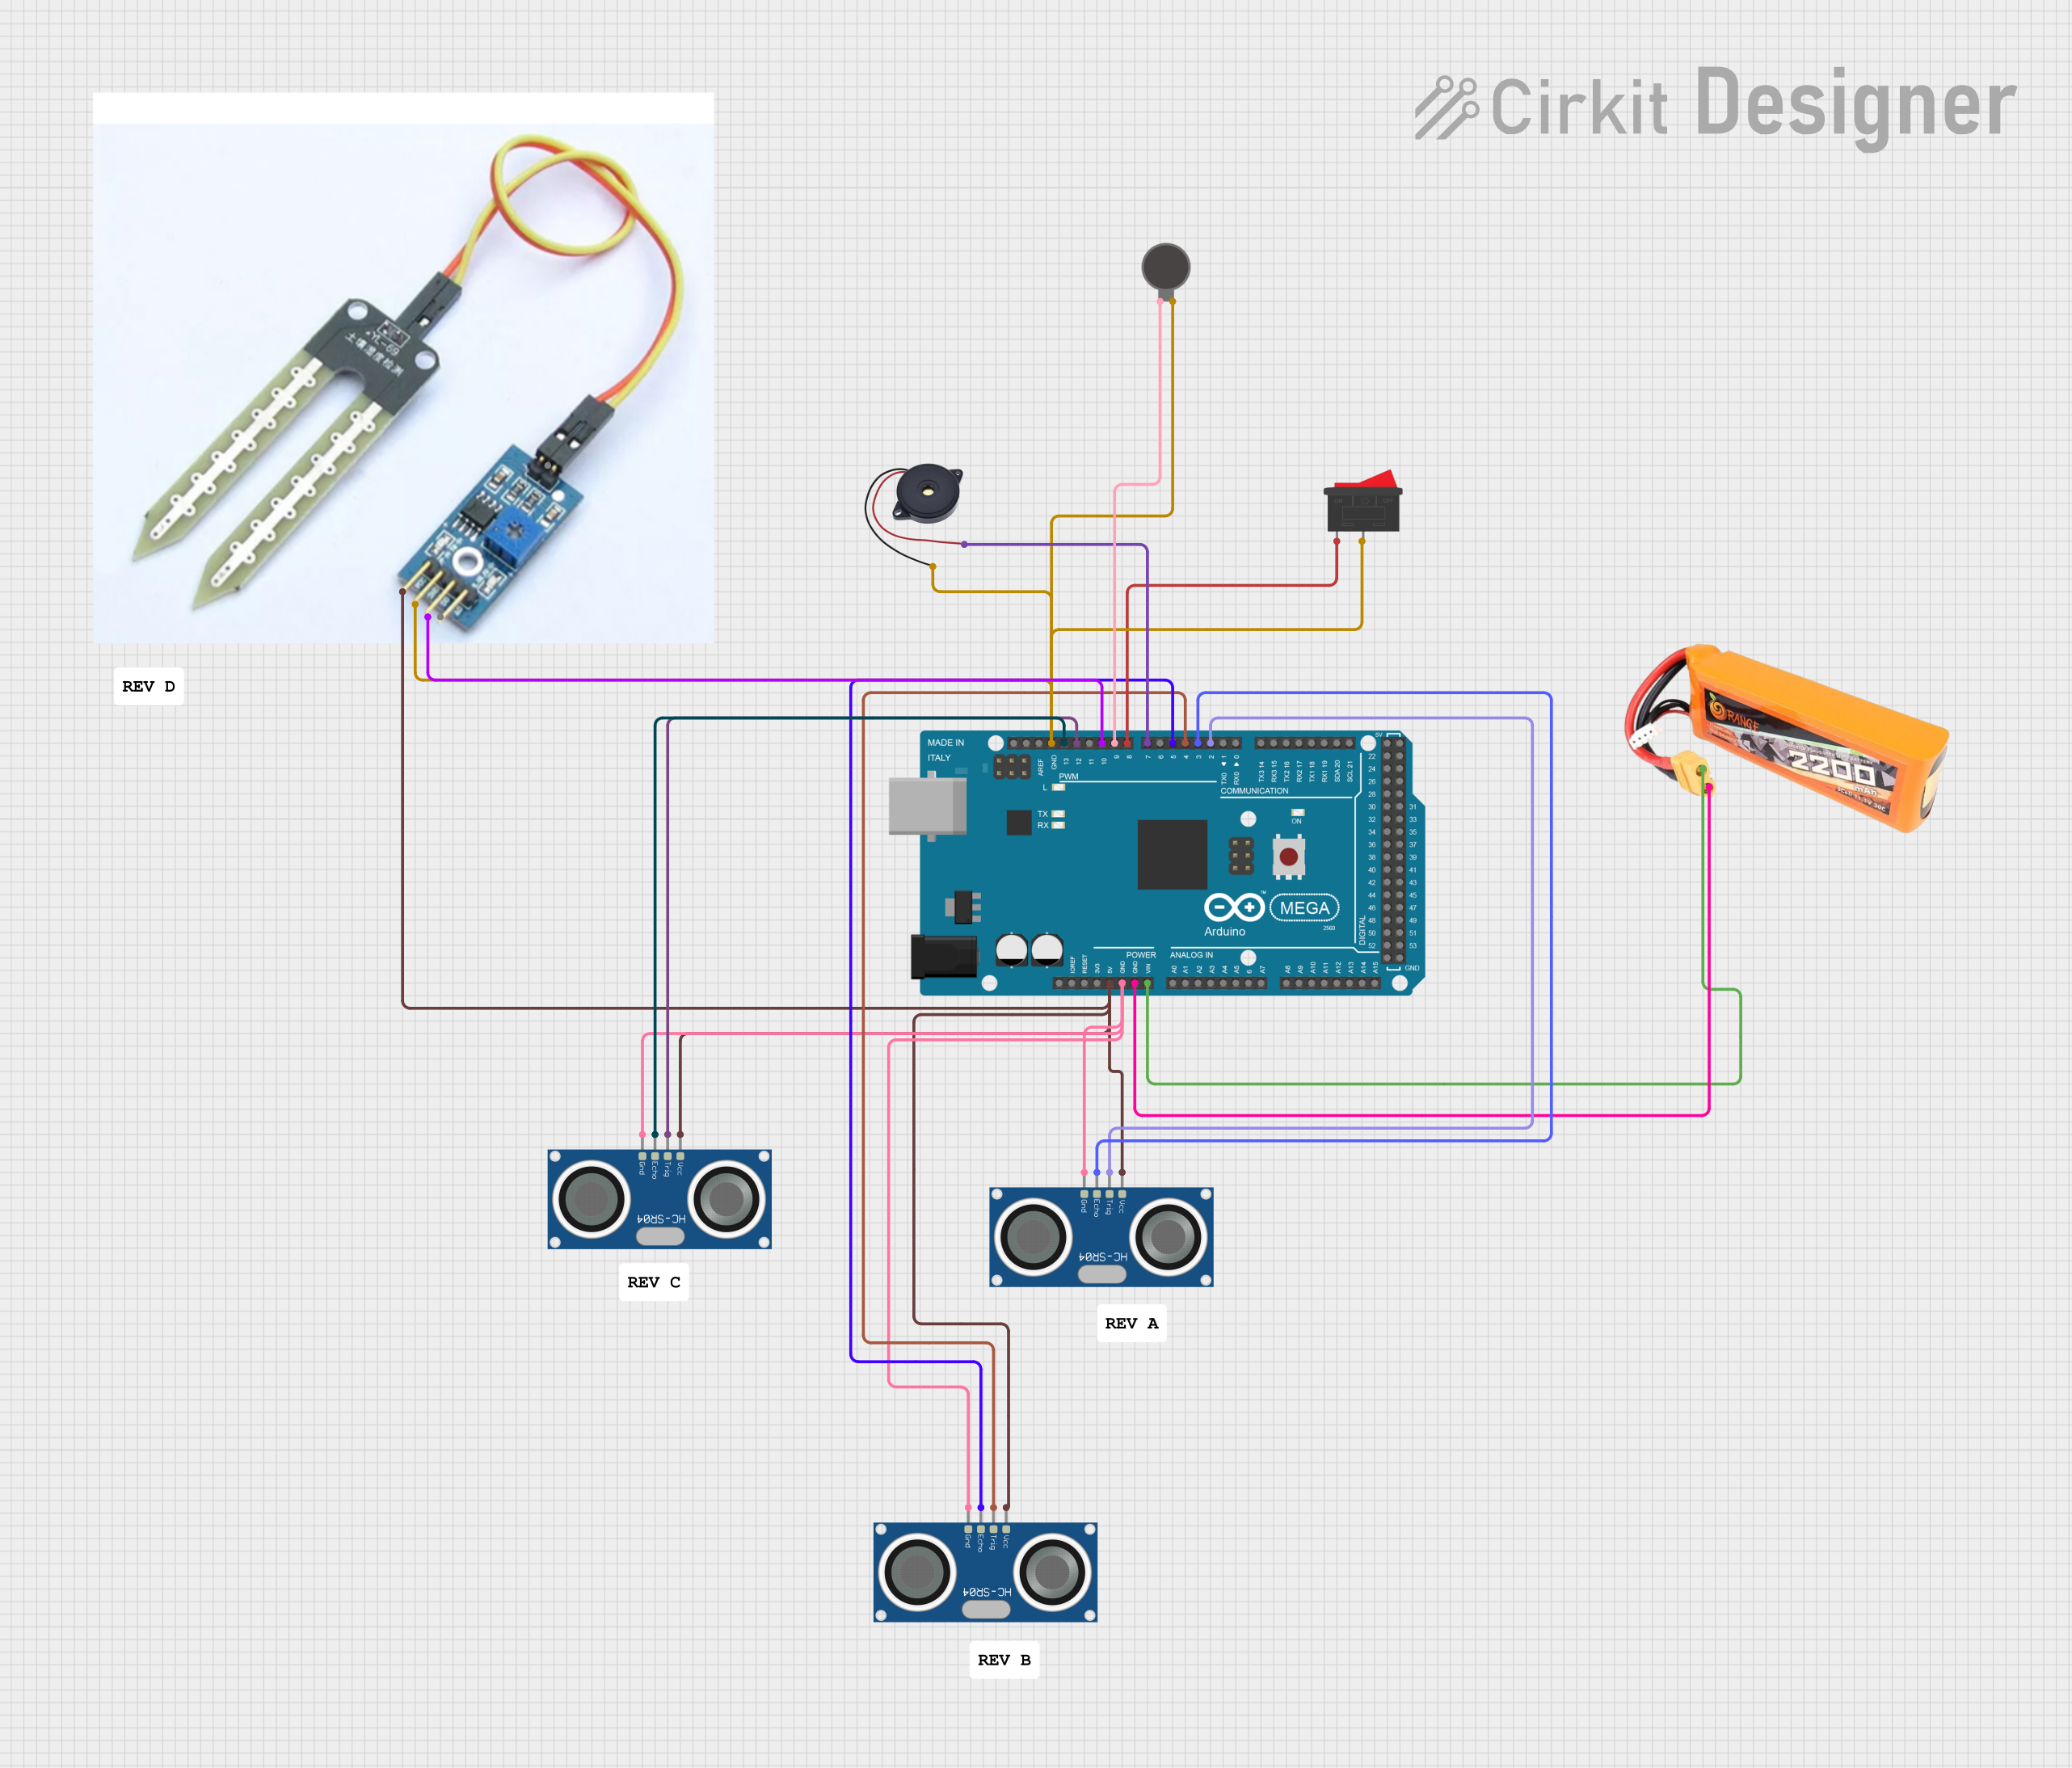
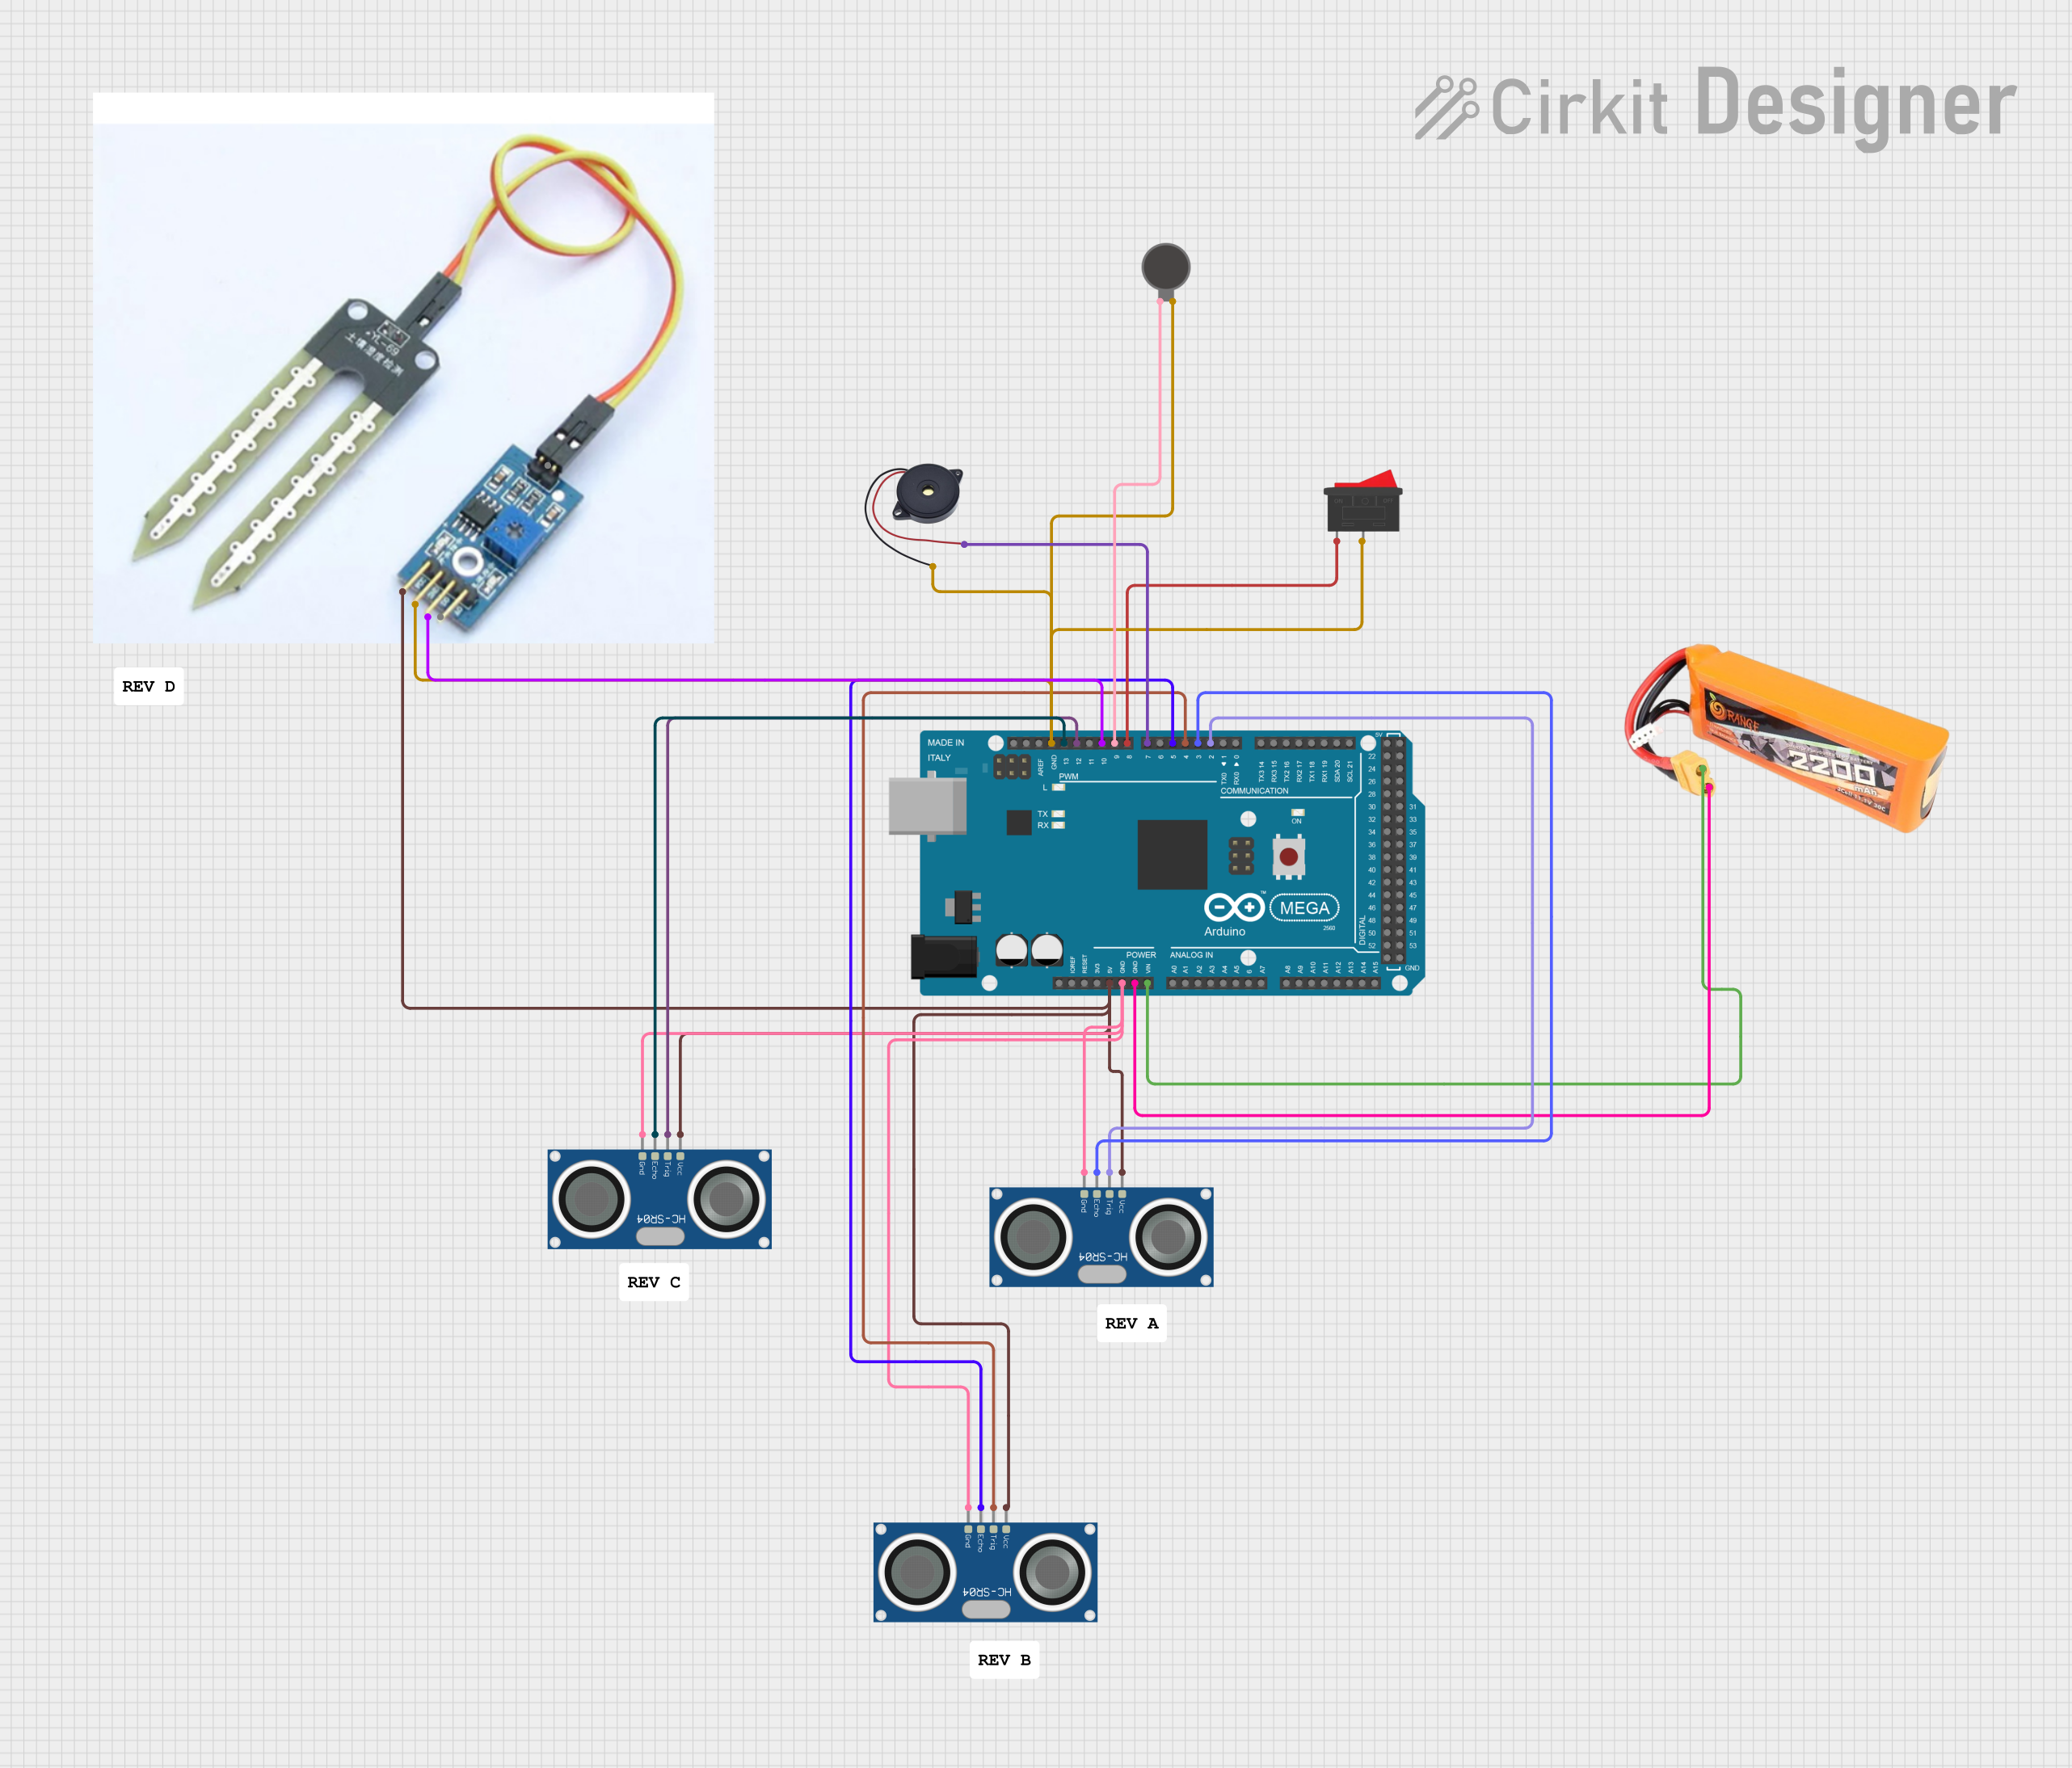
This circuit is an obstacle and water detection system using an Arduino Mega 2560, multiple HC-SR04 ultrasonic sensors, a soil sensor, a vibration motor, and a buzzer. The system detects obstacles at different heights and water presence, providing feedback through the vibration motor and buzzer, with an emergency rocker switch to activate an alert mode.
This circuit is an obstacle and water detection system using an Arduino Mega 2560, multiple HC-SR04 ultrasonic sensors, a soil sensor, a vibration motor, and a buzzer. The system detects obstacles at different heights and water presence, providing feedback through the vibration motor and buzzer, with an emergency rocker switch to activate an alert mode.
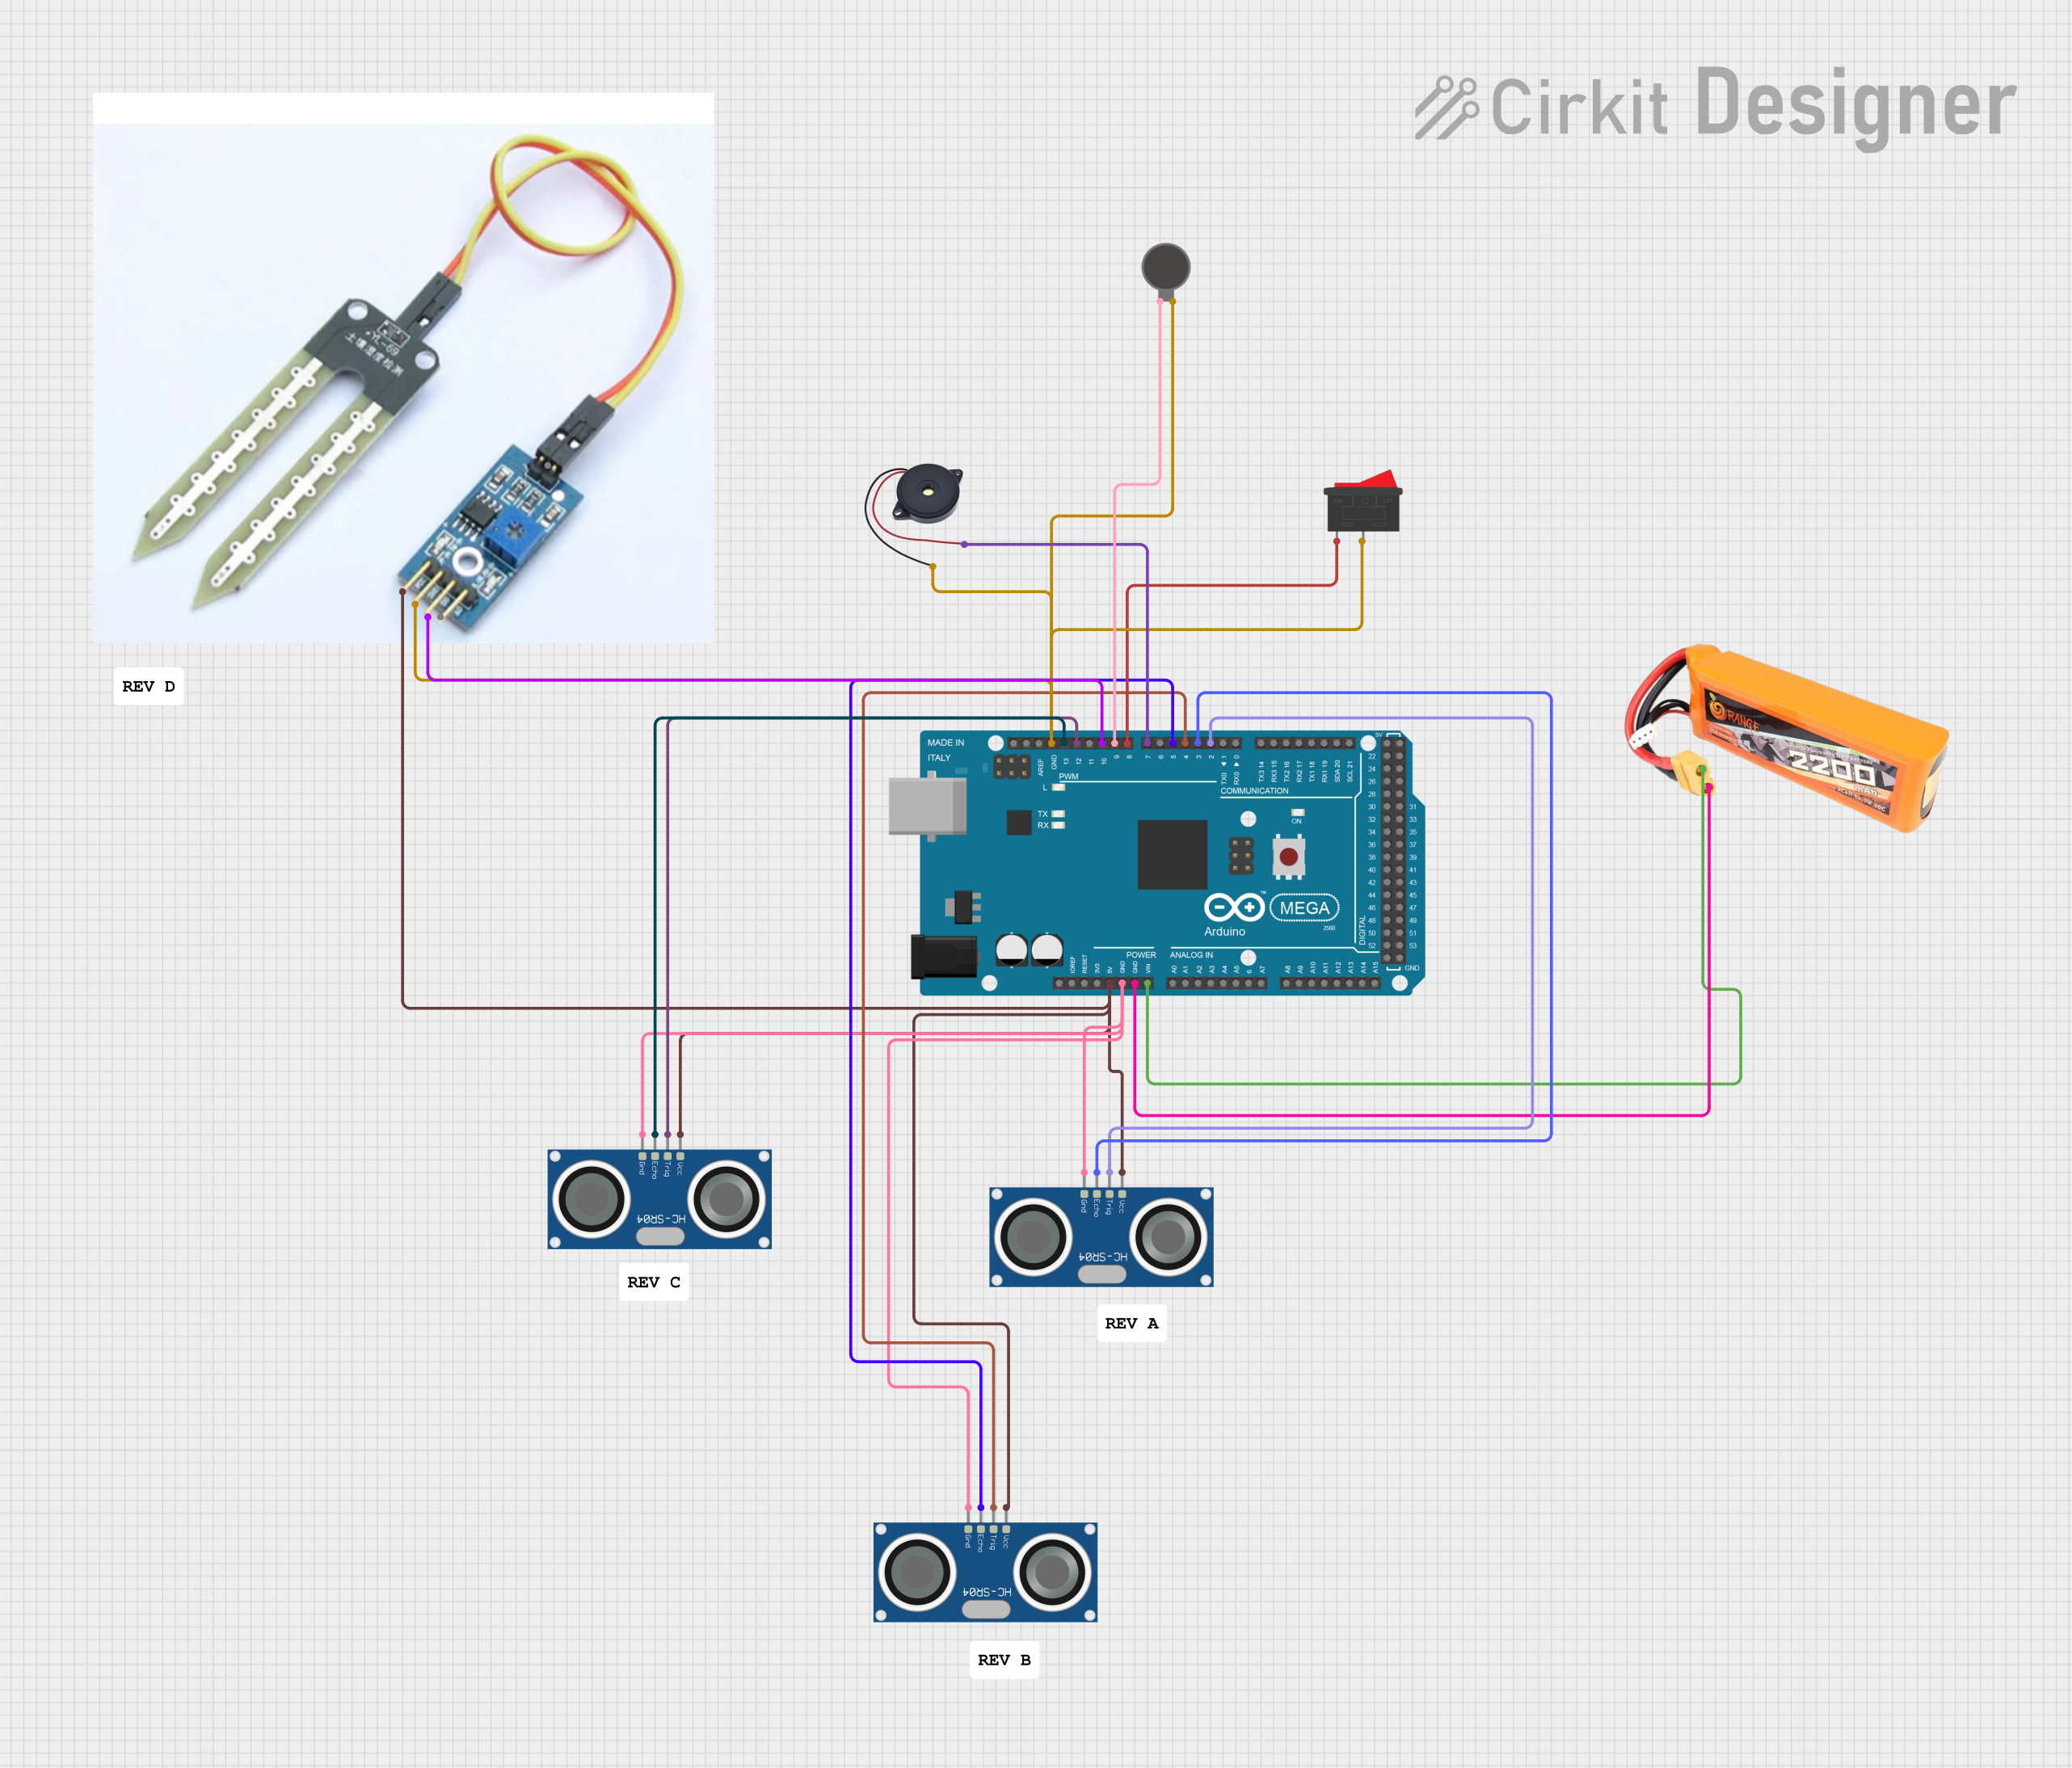
This circuit is a multi-sensor obstacle and water detection system controlled by an Arduino Mega 2560. It uses multiple HC-SR04 ultrasonic sensors to detect obstacles at different heights and a soil sensor for water detection, triggering a vibration motor and a buzzer for alerts. An emergency rocker switch is included to activate an emergency mode, overriding normal operations.
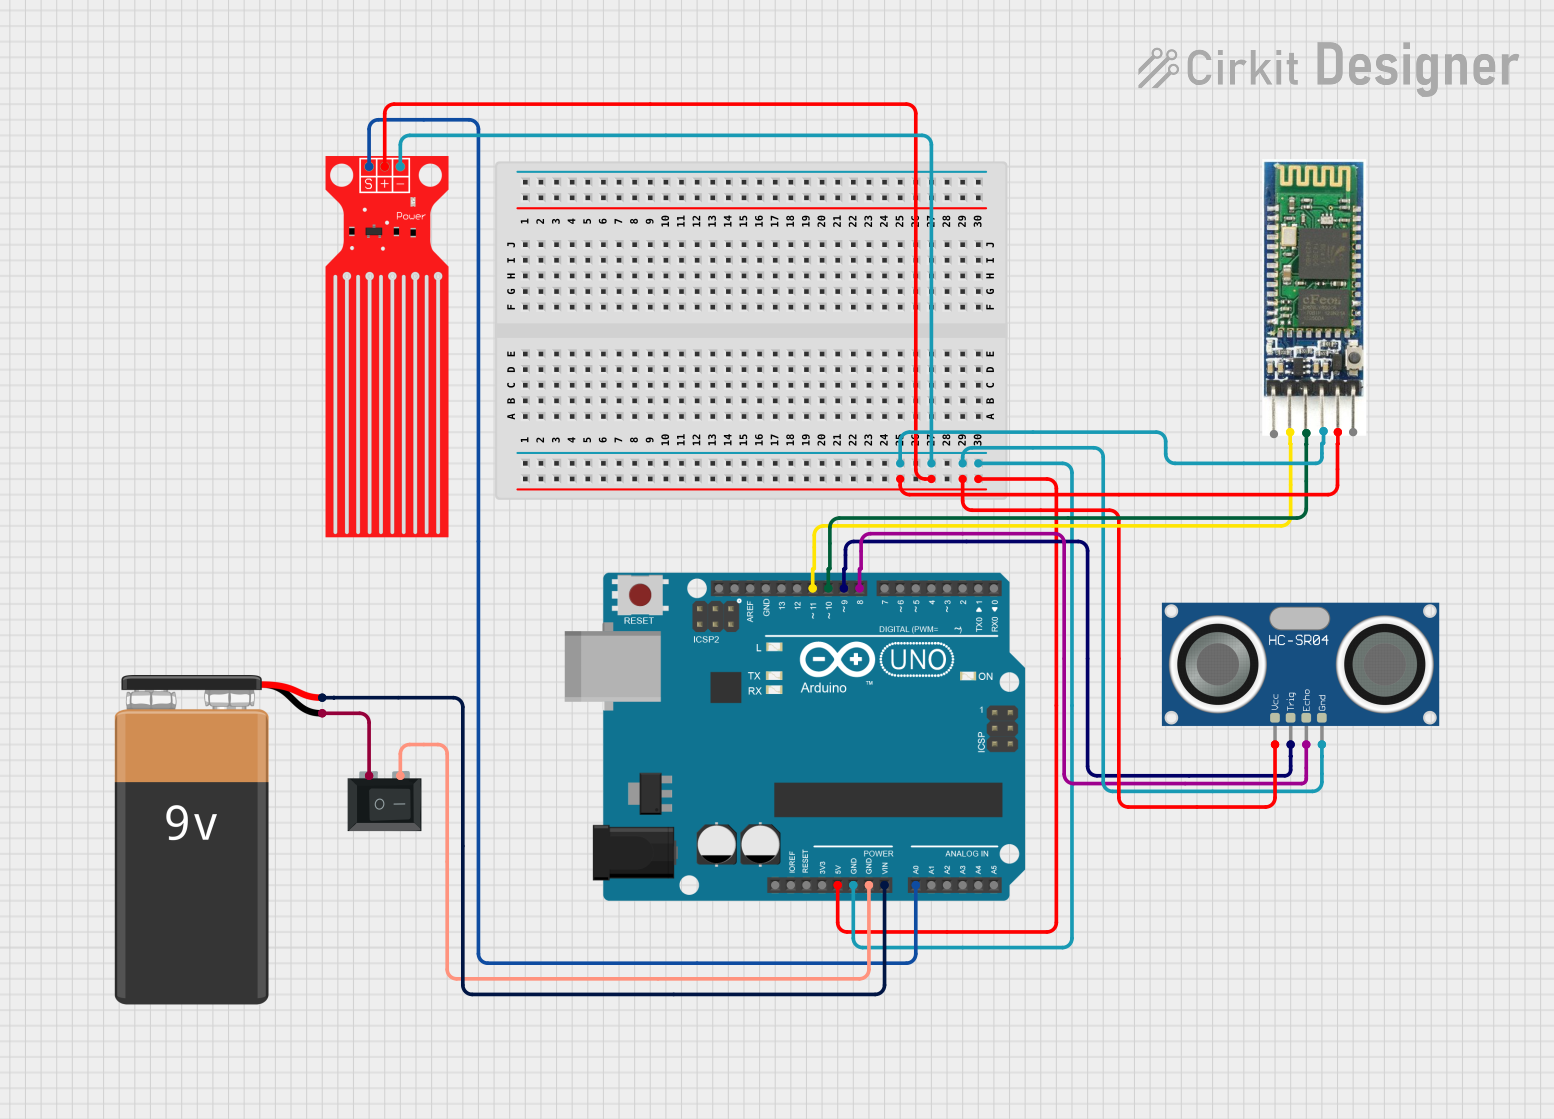
This circuit is designed to measure water levels and communicate the data wirelessly via Bluetooth. It uses an Arduino UNO as the main controller, interfaced with a water level sensor and an HC-SR04 ultrasonic sensor for level detection. The system is powered by a 9V battery through a rocker switch and can transmit sensor readings to a Bluetooth-connected device.
Industrial automation in wet or humid environments
Technical Specifications
Below are the key technical details of the Ultrasonic Waterproof Sensor:
Parameter
Value
Operating Voltage
3.3V to 5V
Operating Current
≤ 15mA
Detection Range
20cm to 450cm
Accuracy
±1cm
Operating Frequency
40kHz
Waterproof Rating
IP67
Operating Temperature
-15°C to +70°C
Output Signal
Digital (High/Low) or PWM
Pin Configuration and Descriptions
The Ultrasonic Waterproof Sensor typically has four pins. Below is the pinout and description:
Pin
Name
Description
1
VCC
Power supply pin. Connect to 3.3V or 5V.
2
TRIG
Trigger pin. Send a HIGH pulse to initiate ultrasonic wave transmission.
3
ECHO
Echo pin. Outputs a pulse width proportional to the distance of the detected object.
4
GND
Ground pin. Connect to the ground of the power supply.
Usage Instructions
How to Use the Component in a Circuit
Power the Sensor: Connect the VCC pin to a 3.3V or 5V power source and the GND pin to the ground.
Trigger the Sensor: Send a HIGH pulse of at least 10 microseconds to the TRIG pin to initiate ultrasonic wave transmission.
Read the Echo: Measure the duration of the HIGH pulse on the ECHO pin. This duration corresponds to the time taken for the ultrasonic waves to travel to the object and back.
Calculate Distance: Use the formula below to calculate the distance:
[
\text{Distance (cm)} = \frac{\text{Pulse Duration (µs)} \times 0.034}{2}
]
The factor 0.034 accounts for the speed of sound in air (340 m/s), and the division by 2 accounts for the round trip of the ultrasonic waves.
Important Considerations and Best Practices
Ensure the sensor is mounted securely to avoid inaccurate readings due to vibrations.
Avoid placing the sensor near reflective surfaces that could interfere with the ultrasonic waves.
Use a pull-down resistor on the ECHO pin if the signal is unstable.
For outdoor applications, ensure the sensor is not obstructed by debris or dirt.
Example Code for Arduino UNO
Below is an example code to interface the Ultrasonic Waterproof Sensor with an Arduino UNO:
// Define pins for the Ultrasonic Waterproof Sensor
const int trigPin = 9; // TRIG pin connected to digital pin 9
const int echoPin = 10; // ECHO pin connected to digital pin 10

void setup() {
  pinMode(trigPin, OUTPUT); // Set TRIG pin as output
  pinMode(echoPin, INPUT);  // Set ECHO pin as input
  Serial.begin(9600);       // Initialize serial communication
}

void loop() {
  // Send a 10µs HIGH pulse to the TRIG pin
  digitalWrite(trigPin, LOW);
  delayMicroseconds(2);
  digitalWrite(trigPin, HIGH);
  delayMicroseconds(10);
  digitalWrite(trigPin, LOW);

  // Measure the duration of the HIGH pulse on the ECHO pin
  long duration = pulseIn(echoPin, HIGH);

  // Calculate the distance in cm
  float distance = (duration * 0.034) / 2;

  // Print the distance to the Serial Monitor
  Serial.print("Distance: ");
  Serial.print(distance);
  Serial.println(" cm");

  delay(500); // Wait for 500ms before the next measurement
}
Troubleshooting and FAQs
Common Issues and Solutions
No Output or Incorrect Readings:
Ensure the sensor is powered correctly (3.3V or 5V).
Verify the connections to the TRIG and ECHO pins.
Check for obstructions or reflective surfaces near the sensor.
Unstable or Fluctuating Readings:
Use a pull-down resistor on the ECHO pin to stabilize the signal.
Ensure the sensor is mounted securely to avoid vibrations.
Short Detection Range:
Ensure the sensor is not obstructed by dirt or debris.
Verify that the object being detected is within the specified range (20cm to 450cm).
FAQs
Q: Can this sensor be used underwater?
A: No, the sensor is waterproof but not designed for underwater use. It is suitable for wet or humid environments but should not be submerged.
Q: What is the maximum detection range?
A: The sensor can detect objects up to 450cm (4.5 meters) away.
Q: Can I use this sensor with a 3.3V microcontroller?
A: Yes, the sensor operates with both 3.3V and 5V power supplies, making it compatible with 3.3V microcontrollers like the ESP32.
Q: How do I clean the sensor?
A: Use a soft, damp cloth to clean the sensor. Avoid using abrasive materials or submerging the sensor in water.


 Open Project in Cirkit Designer