Cirkit Designer Logo
Cirkit Designer
Your all-in-one circuit design IDE
Home / 
Component Documentation

How to Use Adafruit Terminal Breakout FeatherWing: Examples, Pinouts, and Specs

Image of Adafruit Terminal Breakout FeatherWing
Cirkit Designer LogoDesign with Adafruit Terminal Breakout FeatherWing in Cirkit Designer

Introduction

The Adafruit Terminal Breakout FeatherWing is an essential accessory for developers and hobbyists who use Adafruit Feather boards. This add-on board simplifies the process of connecting wires to a Feather board by providing screw terminal blocks. It is ideal for quick prototyping and development projects where a sturdy and reusable connection is necessary. The Terminal Breakout FeatherWing is compatible with the entire Feather line and is particularly useful in applications where frequent re-wiring is required, such as in educational settings, rapid prototyping, or test fixtures.

Explore Projects Built with Adafruit Terminal Breakout FeatherWing

Use Cirkit Designer to design, explore, and prototype these projects online. Some projects support real-time simulation. Click "Open Project" to start designing instantly!
Solar-Powered Environmental Data Logger with Adafruit Feather M0 Express
Image of Lake Thoreau Monitoring Station: A project utilizing Adafruit Terminal Breakout FeatherWing in a practical application
This circuit is designed for environmental data collection and logging, utilizing an Adafruit Feather M0 Express microcontroller as the central processing unit. It interfaces with a BME280 sensor for atmospheric temperature, humidity, and pressure measurements, an SGP30 sensor for monitoring air quality (eCO2 and TVOC), and a STEMMA soil sensor for detecting soil moisture and temperature. The system is powered by a solar panel and a 3.7v LiPo battery, managed by an Adafruit BQ24074 Solar-DC-USB Lipo Charger, and provides easy access to the microcontroller's connections through an Adafruit Terminal Breakout FeatherWing.
Cirkit Designer LogoOpen Project in Cirkit Designer
Arduino UNO and OLED FeatherWing Display: Battery-Powered Hello World Project
Image of ARDUINO_SSD1306: A project utilizing Adafruit Terminal Breakout FeatherWing in a practical application
This circuit consists of an Arduino UNO connected to an Adafruit OLED FeatherWing display via I2C communication (SDA and SCL lines). The Arduino is powered through a Vcc source and provides 3.3V and GND connections to the OLED display. The Arduino runs a program to display 'Hello, World!' on the OLED screen.
Cirkit Designer LogoOpen Project in Cirkit Designer
ESP32-Based Vibration Feedback System with Quad Alphanumeric Display and ADXL343 Accelerometer
Image of EC444 - Quest 3: A project utilizing Adafruit Terminal Breakout FeatherWing in a practical application
This circuit features an Adafruit HUZZAH32 ESP32 Feather board as the central microcontroller, which is connected to an Adafruit Quad AlphaNumeric Featherwing display and an Adafruit ADXL343 accelerometer via I2C communication (SCL and SDA lines). The ESP32 controls a vibration motor connected to one of its GPIO pins (A5_IO4) and shares a common power supply (3.3V) and ground (GND) with the other components. The purpose of this circuit is likely to read acceleration data, display information on the alphanumeric display, and provide haptic feedback through the vibration motor.
Cirkit Designer LogoOpen Project in Cirkit Designer
Touch-Sensitive Interface with Adafruit MPR121 and Feather 32u4 Bluefruit
Image of MPR121: A project utilizing Adafruit Terminal Breakout FeatherWing in a practical application
This circuit integrates an Adafruit MPR121 capacitive touch sensor with an Adafruit Feather 32u4 Bluefruit microcontroller. The MPR121 is powered by the Feather and communicates via I2C (SCL and SDA) to detect touch inputs, which can be processed or transmitted wirelessly by the Feather.
Cirkit Designer LogoOpen Project in Cirkit Designer

Explore Projects Built with Adafruit Terminal Breakout FeatherWing

Use Cirkit Designer to design, explore, and prototype these projects online. Some projects support real-time simulation. Click "Open Project" to start designing instantly!
Image of Lake Thoreau Monitoring Station: A project utilizing Adafruit Terminal Breakout FeatherWing in a practical application
Solar-Powered Environmental Data Logger with Adafruit Feather M0 Express
This circuit is designed for environmental data collection and logging, utilizing an Adafruit Feather M0 Express microcontroller as the central processing unit. It interfaces with a BME280 sensor for atmospheric temperature, humidity, and pressure measurements, an SGP30 sensor for monitoring air quality (eCO2 and TVOC), and a STEMMA soil sensor for detecting soil moisture and temperature. The system is powered by a solar panel and a 3.7v LiPo battery, managed by an Adafruit BQ24074 Solar-DC-USB Lipo Charger, and provides easy access to the microcontroller's connections through an Adafruit Terminal Breakout FeatherWing.
Cirkit Designer LogoOpen Project in Cirkit Designer
Image of ARDUINO_SSD1306: A project utilizing Adafruit Terminal Breakout FeatherWing in a practical application
Arduino UNO and OLED FeatherWing Display: Battery-Powered Hello World Project
This circuit consists of an Arduino UNO connected to an Adafruit OLED FeatherWing display via I2C communication (SDA and SCL lines). The Arduino is powered through a Vcc source and provides 3.3V and GND connections to the OLED display. The Arduino runs a program to display 'Hello, World!' on the OLED screen.
Cirkit Designer LogoOpen Project in Cirkit Designer
Image of EC444 - Quest 3: A project utilizing Adafruit Terminal Breakout FeatherWing in a practical application
ESP32-Based Vibration Feedback System with Quad Alphanumeric Display and ADXL343 Accelerometer
This circuit features an Adafruit HUZZAH32 ESP32 Feather board as the central microcontroller, which is connected to an Adafruit Quad AlphaNumeric Featherwing display and an Adafruit ADXL343 accelerometer via I2C communication (SCL and SDA lines). The ESP32 controls a vibration motor connected to one of its GPIO pins (A5_IO4) and shares a common power supply (3.3V) and ground (GND) with the other components. The purpose of this circuit is likely to read acceleration data, display information on the alphanumeric display, and provide haptic feedback through the vibration motor.
Cirkit Designer LogoOpen Project in Cirkit Designer
Image of MPR121: A project utilizing Adafruit Terminal Breakout FeatherWing in a practical application
Touch-Sensitive Interface with Adafruit MPR121 and Feather 32u4 Bluefruit
This circuit integrates an Adafruit MPR121 capacitive touch sensor with an Adafruit Feather 32u4 Bluefruit microcontroller. The MPR121 is powered by the Feather and communicates via I2C (SCL and SDA) to detect touch inputs, which can be processed or transmitted wirelessly by the Feather.
Cirkit Designer LogoOpen Project in Cirkit Designer

Technical Specifications

Key Technical Details

  • Compatibility: Designed to work with all Feather boards
  • Terminal Blocks: Screw terminals for all Feather pins
  • Dimensions: 50.8mm x 22.9mm x 1.6mm / 2.0" x 0.9" x 0.06"
  • Weight: 5.2g / 0.2oz

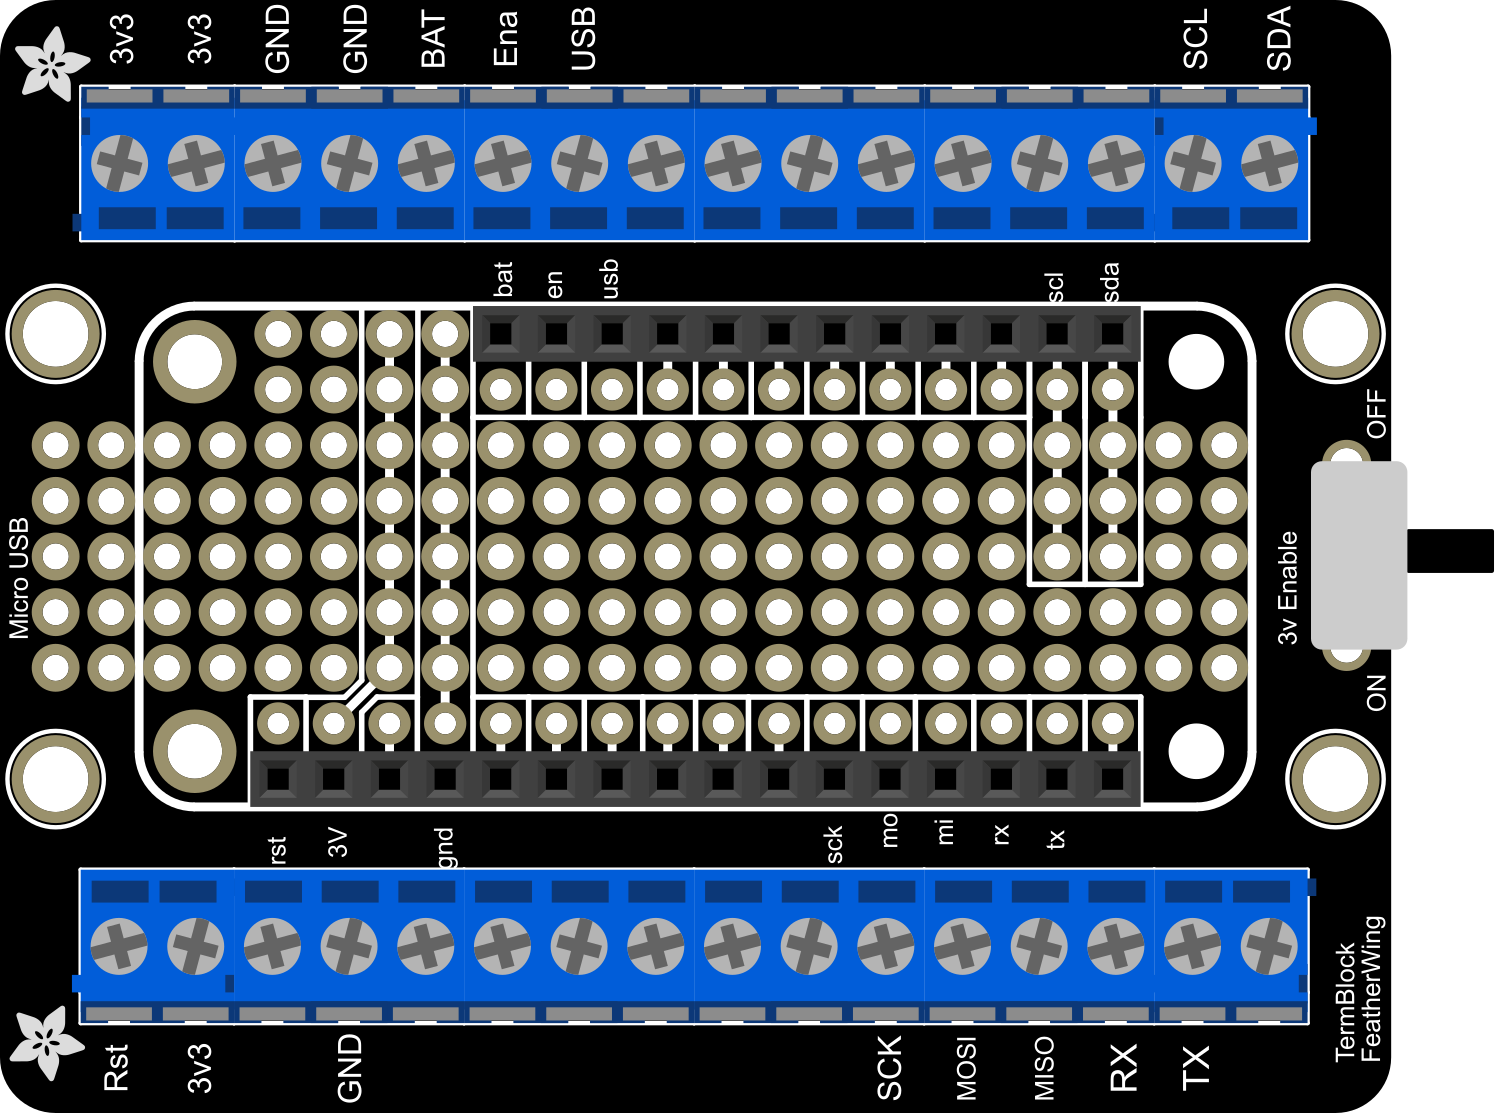
Pin Configuration and Descriptions

Pin Number Description Notes
1 GND Ground
2 3V 3.3V output from the Feather
3-12 Digital Pins Digital I/O pins
13-16 Analog Pins Analog input pins
17 SCK SPI clock
18 MISO SPI Master In Slave Out
19 MOSI SPI Master Out Slave In
20 RX UART Receive pin
21 TX UART Transmit pin
22 SDA I2C Data
23 SCL I2C Clock
24 RST Reset pin

Usage Instructions

Connecting to a Feather Board

  1. Align the Terminal Breakout FeatherWing with the headers on your Feather board.
  2. Carefully press down to mate the connectors. Ensure all pins are aligned correctly.
  3. Use a soldering iron to solder the headers to the Feather board for a permanent connection.
  4. Once soldered, you can use the screw terminals to easily connect and disconnect wires.

Best Practices

  • Wire Gauge: Ensure the wires used are compatible with the screw terminal block specifications.
  • Secure Connections: Always tighten the screws on the terminal blocks to prevent loose connections.
  • Power Ratings: Do not exceed the recommended voltage and current ratings of the Feather board.
  • Short Circuits: Be cautious to avoid creating short circuits when connecting wires to the terminal blocks.

Example Code for Arduino UNO

// Example code to demonstrate how to use the Terminal Breakout FeatherWing
// with an Arduino UNO. This example will blink an LED connected to pin 13.

void setup() {
  pinMode(13, OUTPUT); // Initialize pin 13 as an output
}

void loop() {
  digitalWrite(13, HIGH); // Turn the LED on
  delay(1000);            // Wait for a second
  digitalWrite(13, LOW);  // Turn the LED off
  delay(1000);            // Wait for a second
}

Troubleshooting and FAQs

Common Issues

  • Loose Connections: If your circuit is not working as expected, check all terminal screws to ensure they are tightened properly.
  • Incorrect Wiring: Double-check the wiring against the circuit diagram to ensure all connections are correct.
  • Soldering Quality: Poor soldering can lead to unreliable connections. Inspect solder joints for cold solder or bridges.

FAQs

Q: Can I use the Terminal Breakout FeatherWing with any Feather board? A: Yes, the Terminal Breakout FeatherWing is designed to be compatible with all Feather boards.

Q: Do I need to solder the Terminal Breakout FeatherWing to the Feather board? A: Yes, for a secure and reliable connection, soldering is recommended.

Q: How much current can the terminal blocks handle? A: The current handling capability will depend on the specifications of the Feather board used. Always refer to the Feather board's documentation for power ratings.

Q: Can I use the Terminal Breakout FeatherWing for high-frequency applications? A: The Terminal Breakout FeatherWing is suitable for most prototyping applications, but for high-frequency signals, ensure that the wiring and connections are appropriate for the frequency range.

For further assistance, please refer to the Adafruit support forums or contact Adafruit customer service.