How to Use ESP32-S3 N16R8: Examples, Pinouts, and Specs
Introduction
The ESP32-S3 N16R8 is a powerful microcontroller designed for advanced IoT applications and complex processing tasks. It features integrated Wi-Fi and Bluetooth connectivity, making it ideal for wireless communication in smart devices. With 16MB of flash memory and 8MB of RAM, the ESP32-S3 N16R8 is well-suited for applications requiring high-speed data processing, machine learning, and real-time control.
Explore Projects Built with ESP32-S3 N16R8


Explore Projects Built with ESP32-S3 N16R8
Common Applications and Use Cases
- IoT devices and smart home automation
- Wearable technology
- Industrial automation and control systems
- Machine learning and AI at the edge
- Wireless sensor networks
- Audio processing and streaming
Technical Specifications
The ESP32-S3 N16R8 is packed with advanced features to support a wide range of applications. Below are its key technical specifications:
Key Features
- Processor: Dual-core Xtensa LX7, up to 240 MHz
- Memory: 16MB Flash, 8MB PSRAM
- Connectivity: Wi-Fi 802.11 b/g/n (2.4 GHz), Bluetooth 5.0 (LE)
- GPIO Pins: 45 (configurable for various peripherals)
- Operating Voltage: 3.0V to 3.6V
- Power Consumption: Ultra-low power in deep sleep mode (~10 µA)
- Interfaces: SPI, I2C, UART, I2S, PWM, ADC, DAC, USB OTG
- Temperature Range: -40°C to +85°C
- Package: QFN 56-pin
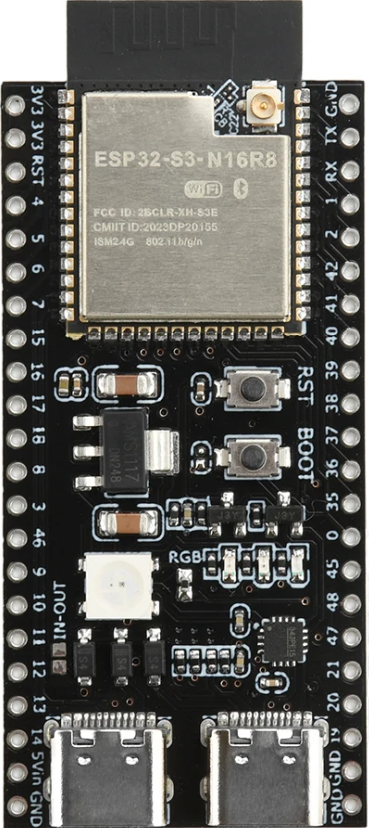
Pin Configuration and Descriptions
The ESP32-S3 N16R8 has a versatile pinout. Below is a table summarizing the key pins and their functions:
| Pin Name | Function | Description |
|---|---|---|
| GPIO0 | Boot Mode Selection | Used to enter bootloader mode during programming. |
| GPIO1-45 | General Purpose I/O | Configurable for digital I/O, ADC, DAC, PWM, etc. |
| EN | Enable | Resets the chip when pulled low. |
| 3V3 | Power Supply | 3.3V power input. |
| GND | Ground | Ground connection. |
| TXD0/RXD0 | UART0 (TX/RX) | Default UART for serial communication. |
| SCL/SDA | I2C Clock/Data | Used for I2C communication. |
| MISO/MOSI | SPI Data | SPI Master-In-Slave-Out and Master-Out-Slave-In pins. |
| VDD_SDIO | Power for External Flash | Supplies power to external flash or peripherals. |
| USB_D+/D- | USB Data Lines | USB OTG data lines for programming or communication. |
Usage Instructions
The ESP32-S3 N16R8 is highly versatile and can be used in a variety of circuits. Below are the steps and best practices for using this microcontroller:
Basic Setup
- Power Supply: Provide a stable 3.3V power supply to the 3V3 pin. Ensure the current rating of the power source meets the requirements of your application.
- Programming: Use a USB-to-serial adapter or a development board with built-in USB support to program the ESP32-S3. Connect the USB D+ and D- lines to the adapter.
- Boot Mode: To enter bootloader mode, hold GPIO0 low while resetting the chip using the EN pin.
Connecting to an Arduino UNO
The ESP32-S3 can communicate with an Arduino UNO via UART, I2C, or SPI. Below is an example of using UART for communication:
Example Code for Arduino UNO
#include <SoftwareSerial.h>

// Define RX and TX pins for communication with ESP32-S3
SoftwareSerial espSerial(10, 11); // RX = Pin 10, TX = Pin 11

void setup() {
  Serial.begin(9600); // Initialize serial monitor
  espSerial.begin(115200); // Initialize communication with ESP32-S3

  Serial.println("Arduino is ready to communicate with ESP32-S3.");
}

void loop() {
  // Send data to ESP32-S3
  espSerial.println("Hello from Arduino!");

  // Check if data is available from ESP32-S3
  if (espSerial.available()) {
    String data = espSerial.readString();
    Serial.println("Received from ESP32-S3: " + data);
  }

  delay(1000); // Wait for 1 second
}
Important Considerations
- GPIO Voltage Levels: Ensure all GPIO pins operate at 3.3V logic levels. Use level shifters if interfacing with 5V devices.
- Antenna Placement: For optimal Wi-Fi and Bluetooth performance, ensure the antenna area is free from obstructions and metal components.
- Power Management: Use deep sleep mode to minimize power consumption in battery-powered applications.
Troubleshooting and FAQs
Common Issues and Solutions
ESP32-S3 Not Detected by Computer
- Ensure the USB cable is functional and supports data transfer.
- Check the USB-to-serial driver installation on your computer.
- Verify that the ESP32-S3 is in bootloader mode (GPIO0 held low during reset).
Wi-Fi Connection Fails
- Double-check the SSID and password in your code.
- Ensure the Wi-Fi network operates on the 2.4 GHz band (ESP32-S3 does not support 5 GHz).
Program Upload Fails
- Verify the correct COM port is selected in your IDE.
- Ensure the baud rate matches the settings in the ESP32-S3 bootloader.
Overheating
- Check for excessive current draw in your circuit.
- Ensure proper ventilation and avoid placing the ESP32-S3 near heat sources.
FAQs
Q: Can the ESP32-S3 N16R8 run machine learning models?
A: Yes, the ESP32-S3 supports TensorFlow Lite Micro and other lightweight ML frameworks, making it suitable for edge AI applications.
Q: How do I update the firmware?
A: Use the ESP-IDF (Espressif IoT Development Framework) or Arduino IDE to upload new firmware via USB or OTA (Over-The-Air) updates.
Q: What is the maximum range of Wi-Fi and Bluetooth?
A: The Wi-Fi range is approximately 50 meters indoors and 200 meters outdoors. Bluetooth range depends on the environment but typically reaches up to 10 meters.
By following this documentation, you can effectively utilize the ESP32-S3 N16R8 in your projects.