How to Use KISS Flight Controller: Examples, Pinouts, and Specs
Introduction
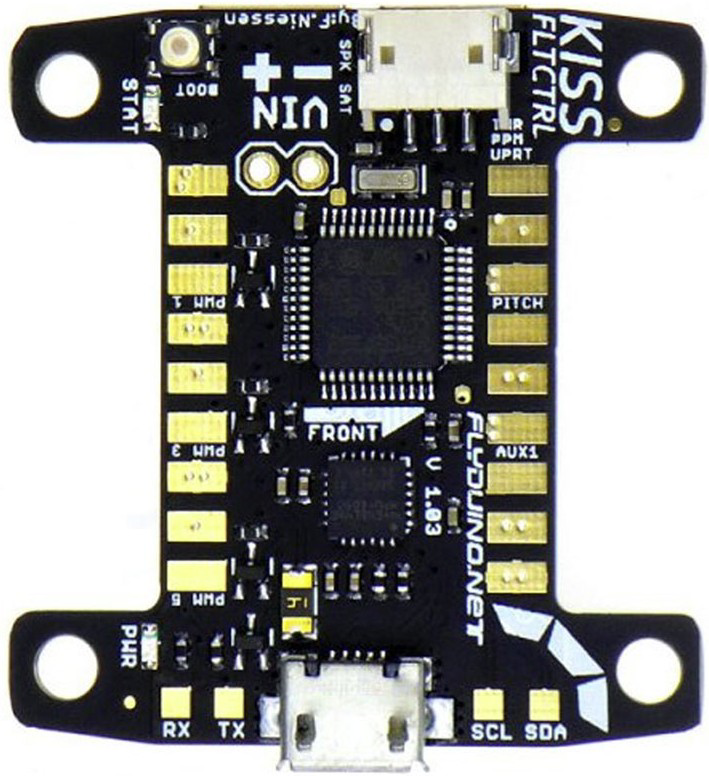
The KISS Flight Controller, manufactured by Flyduino, is a compact and lightweight flight controller specifically designed for racing drones. It features advanced stabilization and control algorithms, enabling precise maneuverability and responsiveness. This component is highly regarded for its simplicity, reliability, and performance, making it a popular choice among drone enthusiasts and professionals.
Explore Projects Built with KISS Flight Controller


Explore Projects Built with KISS Flight Controller
Common Applications and Use Cases
- Racing drones for competitive events
- Freestyle drone flying
- Aerial photography and videography (when paired with compatible systems)
- Educational and experimental drone projects
- Custom-built quadcopters and multirotors
Technical Specifications
The KISS Flight Controller is engineered to deliver high performance while maintaining ease of use. Below are its key technical specifications:
General Specifications
- Processor: STM32F303CCT6 (32-bit ARM Cortex-M4)
- Input Voltage: 2S–6S LiPo (7.4V–25.2V)
- Gyroscope: MPU6050 (6-axis gyro and accelerometer)
- Dimensions: 36mm x 36mm (standard 30.5mm mounting holes)
- Weight: ~5g
- Firmware: KISS proprietary firmware
- UART Ports: 2 (for peripherals like receivers, telemetry, or OSD)
- ESC Protocols: DShot, Oneshot42, Oneshot125, Multishot
- Supported Configurations: Quadcopters (X, +, H configurations)
Pin Configuration and Descriptions
The KISS Flight Controller features a straightforward pin layout for easy integration into drone builds. Below is the pin configuration:
| Pin Name | Description |
|---|---|
| GND | Ground connection for power and peripherals |
| VBAT | Battery voltage input (2S–6S LiPo) |
| M1–M4 | Motor signal outputs for ESCs (Electronic Speed Controllers) |
| RX | UART input for receiver signal (e.g., SBUS, PPM, DSMX) |
| TX | UART output for telemetry or other peripherals |
| 5V | 5V output for powering external devices (e.g., receiver, LEDs) |
| LED | Output for programmable LED strips (WS2812B or similar) |
| Buzzer | Output for connecting a buzzer (for alerts and notifications) |
| Boot | Bootloader pin for firmware updates |
Usage Instructions
The KISS Flight Controller is designed to simplify the process of building and configuring a racing drone. Follow the steps below to use it effectively:
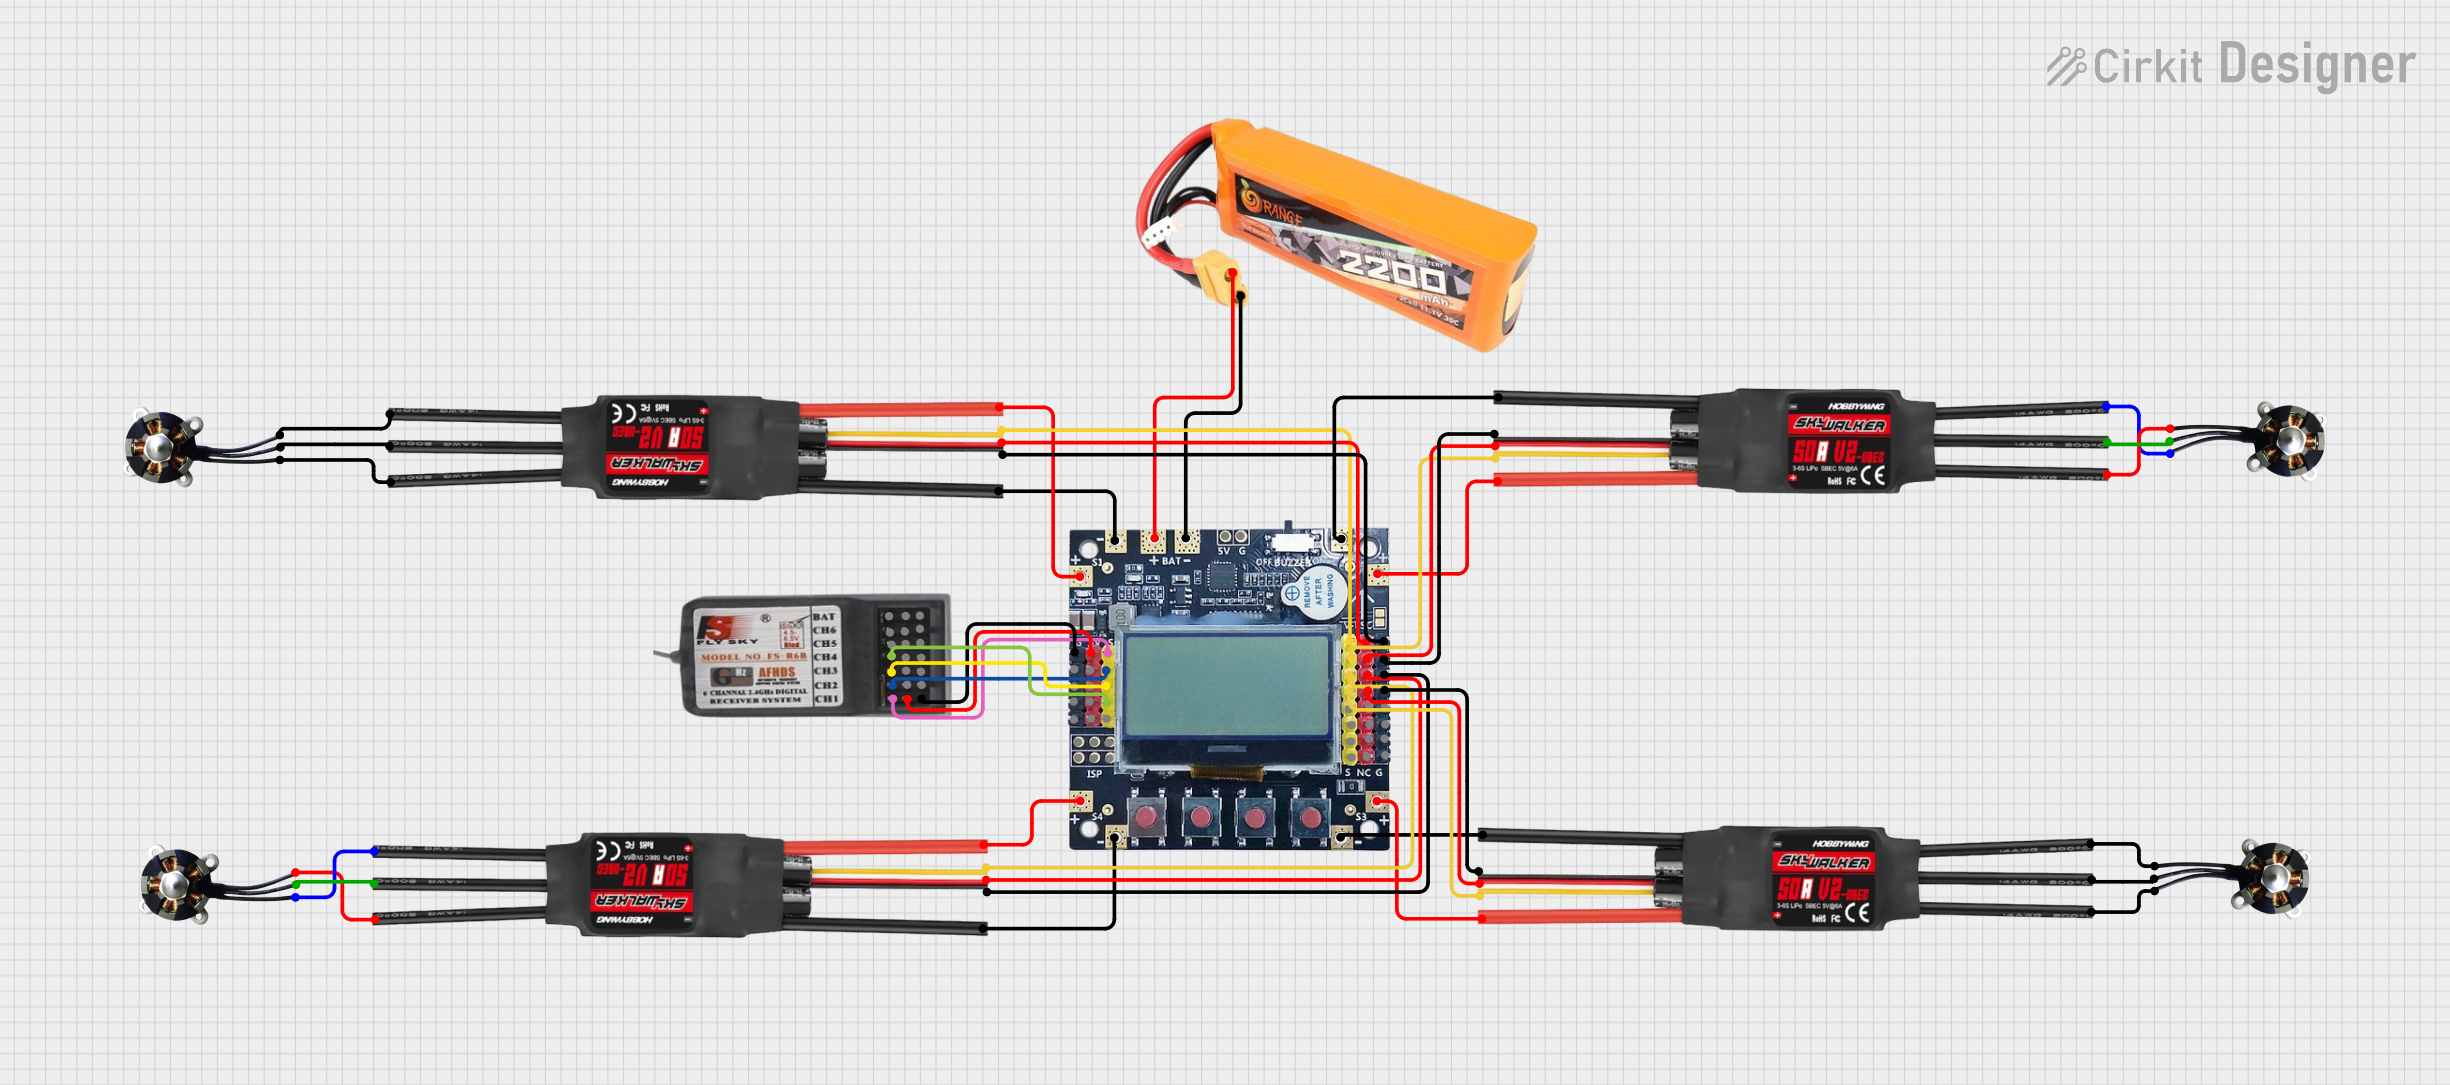
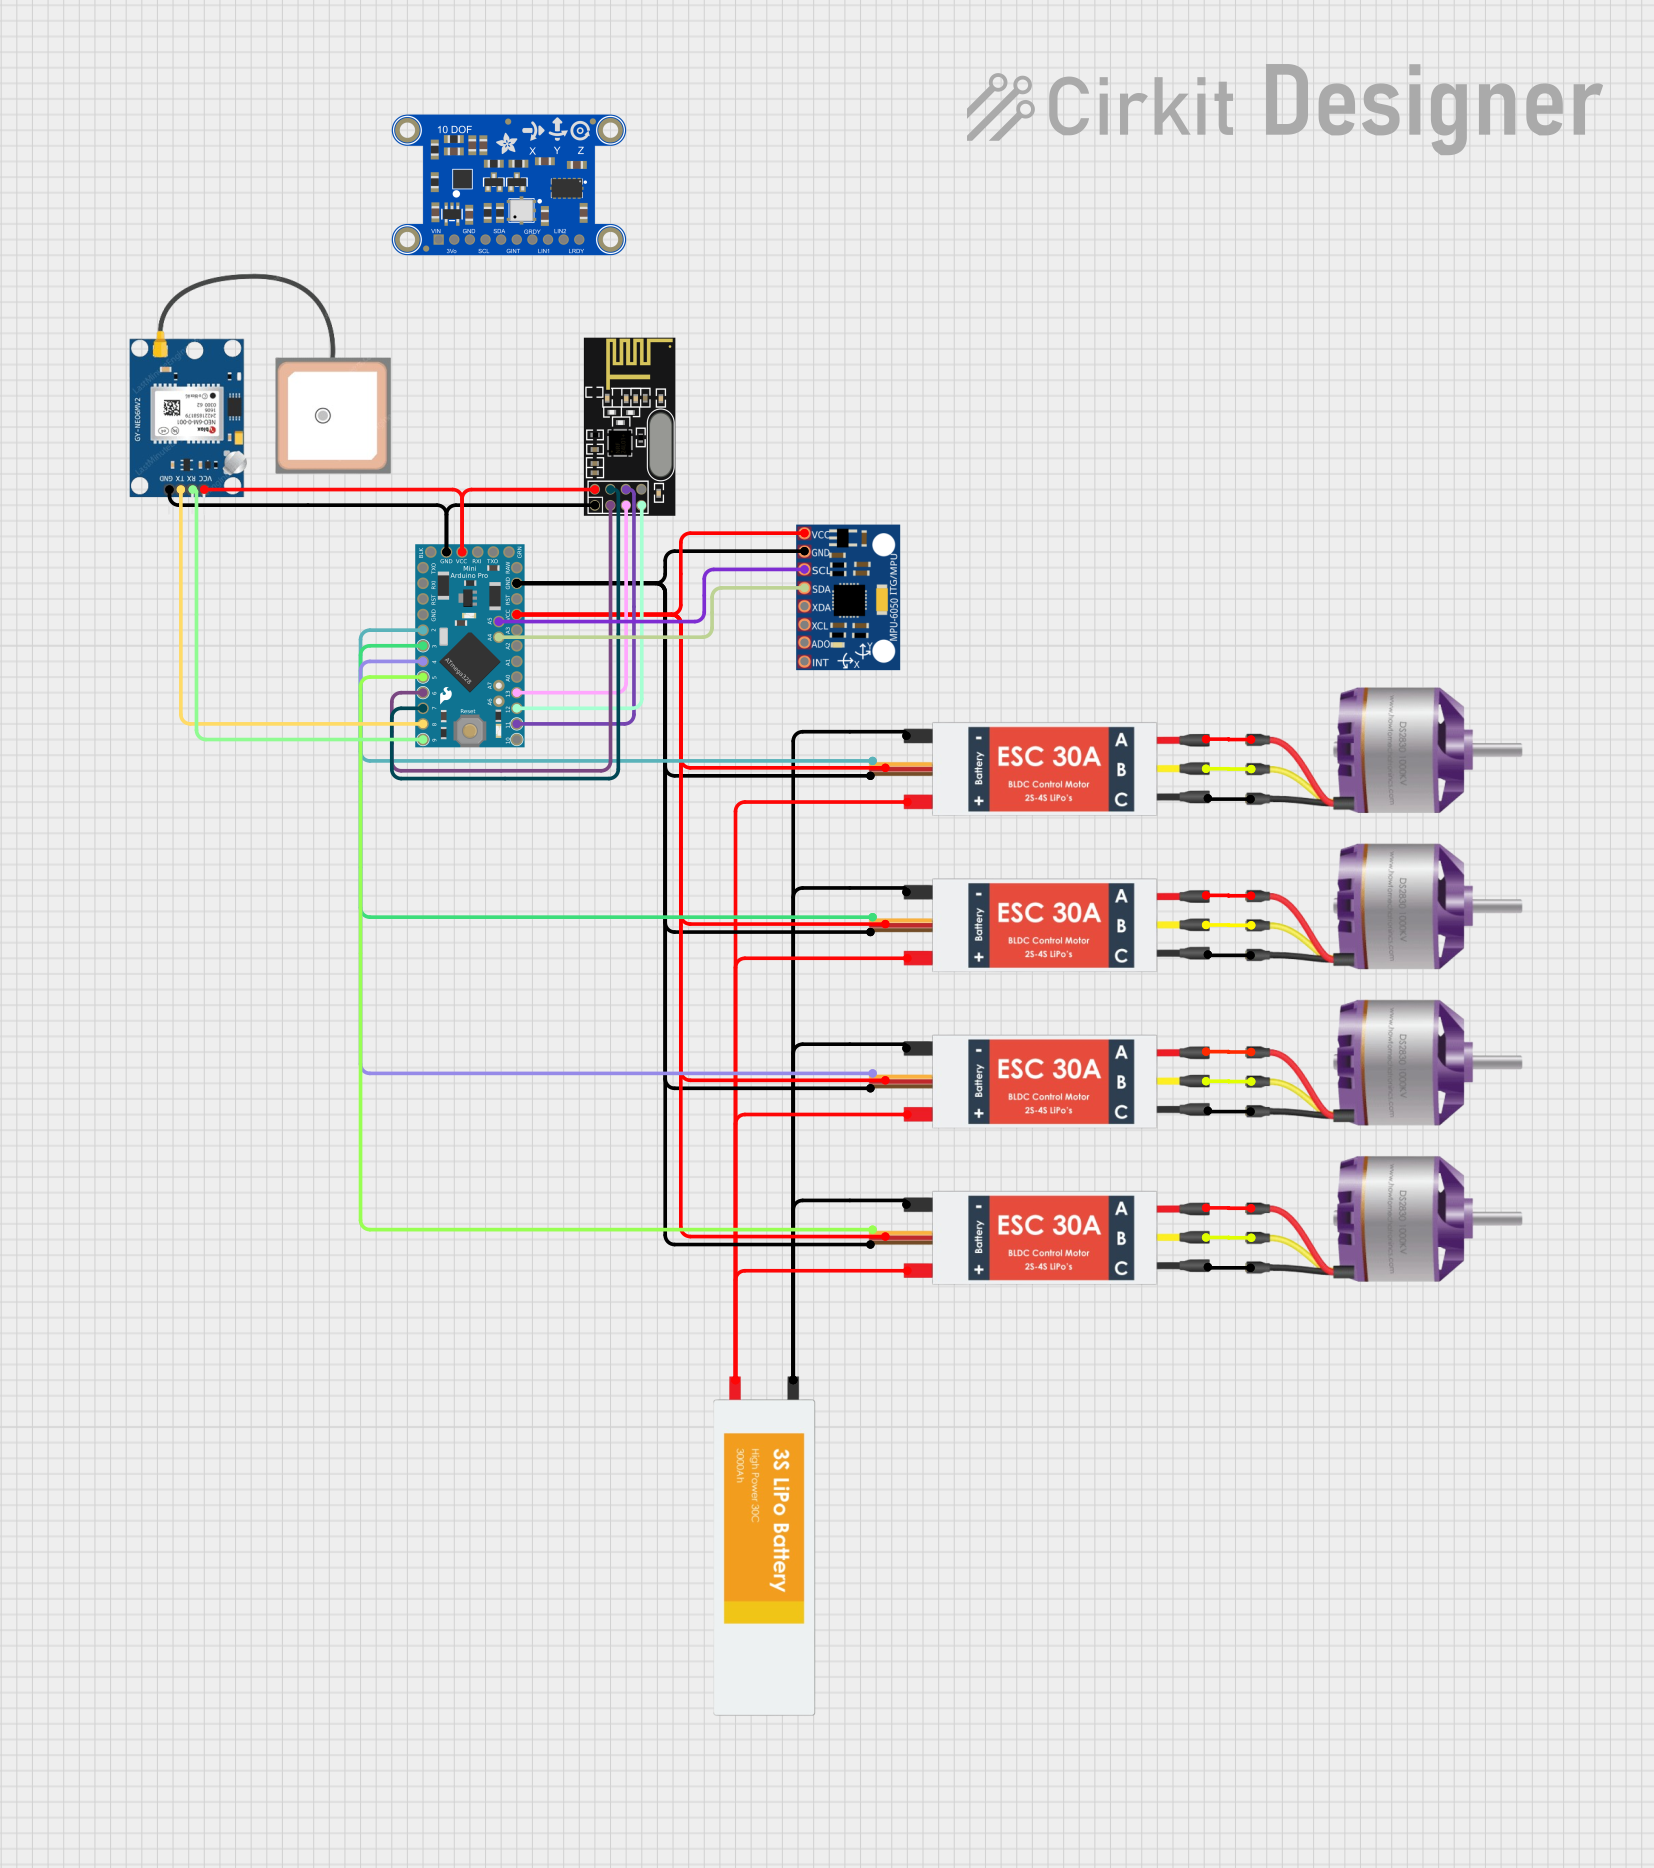
Step 1: Wiring the Flight Controller
- Power Connection: Connect the VBAT pin to the positive terminal of your LiPo battery and the GND pin to the negative terminal.
- ESC Connections: Connect the signal wires from your ESCs to the M1–M4 pins on the flight controller. Ensure the motor order matches the configuration in the firmware.
- Receiver Connection: Connect your receiver to the RX pin (and TX pin if telemetry is supported). Ensure compatibility with supported protocols like SBUS or PPM.
- Optional Peripherals: Attach additional components like LED strips, buzzers, or telemetry modules to their respective pins.
Step 2: Configuring the Flight Controller
- Download the KISS GUI software from the Flyduino website and install it on your computer.
- Connect the flight controller to your computer using a micro-USB cable.
- Open the KISS GUI and follow the on-screen instructions to:
- Flash the latest firmware (if necessary).
- Calibrate the accelerometer and gyroscope.
- Configure motor directions and assign flight modes.
- Set up PID tuning for optimal flight performance.
Step 3: Testing and Flying
- Perform a pre-flight check to ensure all connections are secure and the motors spin in the correct direction.
- Arm the drone and test its responsiveness in a safe, open area.
- Fine-tune the settings in the KISS GUI as needed to achieve the desired flight characteristics.
Arduino UNO Integration
While the KISS Flight Controller is not typically used with an Arduino UNO, you can use the Arduino to programmatically control peripherals like LED strips or buzzers connected to the flight controller. Below is an example of Arduino code to control a WS2812B LED strip:
#include <Adafruit_NeoPixel.h>

// Define the pin connected to the LED strip
#define LED_PIN 6
// Define the number of LEDs in the strip
#define NUM_LEDS 8

// Create an instance of the Adafruit_NeoPixel library
Adafruit_NeoPixel strip = Adafruit_NeoPixel(NUM_LEDS, LED_PIN, NEO_GRB + NEO_KHZ800);

void setup() {
  strip.begin();  // Initialize the LED strip
  strip.show();   // Turn off all LEDs initially
}

void loop() {
  // Example: Cycle through colors on the LED strip
  for (int i = 0; i < strip.numPixels(); i++) {
    strip.setPixelColor(i, strip.Color(255, 0, 0)); // Set LED to red
    strip.show();                                   // Update the strip
    delay(100);                                     // Wait 100ms
    strip.setPixelColor(i, 0);                      // Turn off the LED
  }
}
Important Considerations
- Ensure the flight controller is securely mounted to minimize vibrations, which can affect the gyroscope and accelerometer.
- Use a capacitor on the power input to reduce electrical noise from the ESCs.
- Always check for firmware updates to benefit from the latest features and bug fixes.
Troubleshooting and FAQs
Common Issues and Solutions
Flight Controller Not Powering On
- Verify the battery voltage is within the supported range (2S–6S).
- Check all power connections, including the VBAT and GND pins.
Motors Not Spinning
- Ensure the ESCs are properly connected to the M1–M4 pins.
- Verify motor directions and calibration in the KISS GUI.
Drone Is Unstable During Flight
- Recalibrate the accelerometer and gyroscope in the KISS GUI.
- Adjust PID settings to match your drone's configuration and weight.
No Communication with KISS GUI
- Confirm the USB cable is data-capable (not charge-only).
- Install the correct USB drivers for the flight controller.
FAQs
Q: Can I use the KISS Flight Controller with 7-inch propellers?
A: Yes, the KISS Flight Controller supports larger propellers, but you may need to adjust the PID settings for optimal performance.
Q: Does the KISS Flight Controller support GPS modules?
A: No, the KISS Flight Controller is designed for simplicity and does not natively support GPS modules.
Q: How do I update the firmware?
A: Use the KISS GUI software to flash the latest firmware. Connect the flight controller via USB, select the firmware file, and follow the on-screen instructions.
Q: Can I use this flight controller with a hexacopter or octocopter?
A: No, the KISS Flight Controller is designed for quadcopters only.
By following this documentation, you can effectively integrate and operate the KISS Flight Controller in your drone projects.