
How to Use Piezo Speaker: Examples, Pinouts, and Specs

 Design with Piezo Speaker in Cirkit Designer
Introduction
A Piezo Speaker is a type of audio output device that uses the piezoelectric effect to produce sound. It converts electrical signals into mechanical vibrations, generating sound waves. These speakers are known for their compact size, low power consumption, and ability to produce a range of frequencies.
Explore Projects Built with Piezo Speaker
 Open Project in Cirkit Designer
 Open Project in Cirkit Designer
 Open Project in Cirkit Designer
 Open Project in Cirkit Designer
Explore Projects Built with Piezo Speaker
Open Project in Cirkit DesignerOpen Project in Cirkit DesignerOpen Project in Cirkit DesignerOpen Project in Cirkit DesignerCommon Applications and Use Cases
- Alarms and buzzers: Used in security systems, smoke detectors, and timers.
- Toys and gadgets: Produces sound effects in small electronic devices.
- Notification systems: Provides audio feedback in appliances and equipment.
- Musical applications: Generates tones in simple musical circuits.
Technical Specifications
Key Technical Details
| Parameter | Value |
|---|---|
| Operating Voltage | 3V to 12V |
| Operating Current | Typically < 20mA |
| Frequency Range | 2 kHz to 5 kHz (varies by model) |
| Sound Pressure Level | ~85 dB at 10 cm (varies by model) |
| Dimensions | Compact, typically 10-30 mm |
| Mounting Type | PCB mount or wire leads |
Pin Configuration and Descriptions
| Pin Name | Description |
|---|---|
| Positive (+) | Connects to the positive terminal of the power supply or signal source. |
| Negative (-) | Connects to the ground or negative terminal of the power supply. |
Usage Instructions
How to Use the Component in a Circuit
Basic Connection:
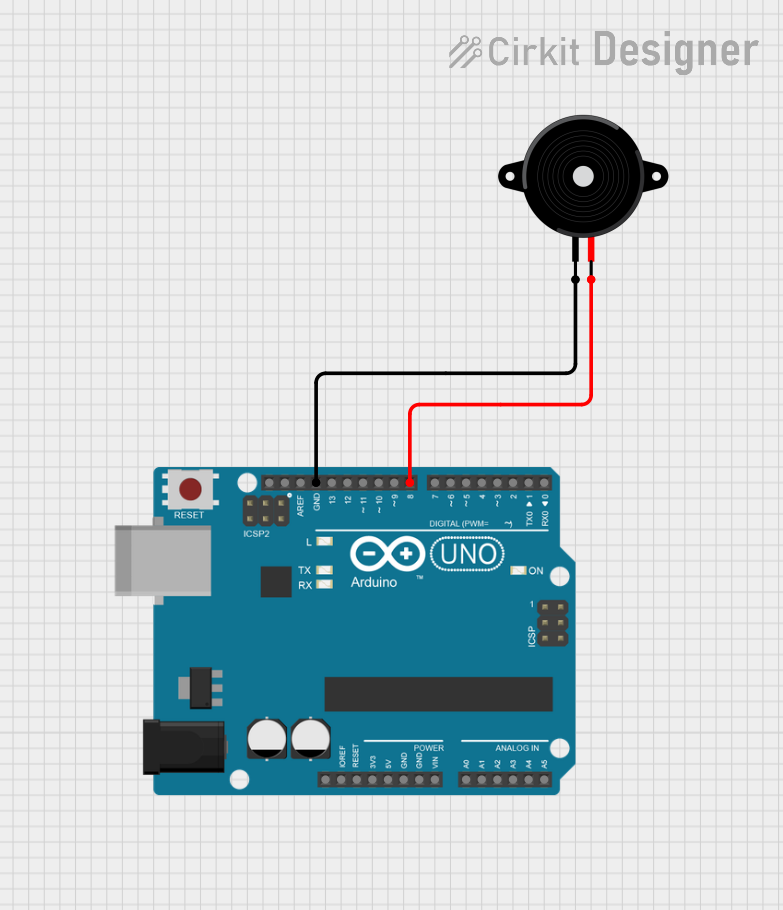
- Connect the positive pin of the Piezo Speaker to the output pin of a microcontroller or signal generator.
- Connect the negative pin to the ground of the circuit.
- Optionally, use a current-limiting resistor (e.g., 100Ω) in series with the positive pin to protect the speaker.
Driving with a Microcontroller:
- The Piezo Speaker can be directly driven by a microcontroller's digital output pin.
- Use Pulse Width Modulation (PWM) to generate tones of varying frequencies.
Example Circuit:
Microcontroller Output Pin ---- Resistor ---- Positive Pin of Piezo Speaker
Ground ------------------------- Negative Pin of Piezo Speaker
Important Considerations and Best Practices
- Voltage Limits: Ensure the input voltage does not exceed the Piezo Speaker's rated voltage to avoid damage.
- Frequency Range: Operate the speaker within its specified frequency range for optimal sound output.
- Mounting: Secure the speaker properly to avoid mechanical vibrations affecting performance.
- Current Limiting: Use a resistor if necessary to limit current and protect the speaker.
Arduino UNO Example Code
Below is an example of how to use a Piezo Speaker with an Arduino UNO to generate a tone:
// Piezo Speaker connected to pin 8
const int piezoPin = 8;

void setup() {
  // No setup required for basic tone generation
}

void loop() {
  // Generate a 1 kHz tone for 500 ms
  tone(piezoPin, 1000, 500); // tone(pin, frequency, duration)
  delay(1000);               // Wait for 1 second before repeating

  // Generate a 2 kHz tone for 300 ms
  tone(piezoPin, 2000, 300);
  delay(1000);               // Wait for 1 second before repeating
}
Code Explanation
tone(pin, frequency, duration): Generates a square wave on the specified pin at the given frequency (in Hz) for the specified duration (in milliseconds).delay(ms): Pauses the program for the specified time in milliseconds.
Troubleshooting and FAQs
Common Issues and Solutions
No Sound Output:
- Cause: Incorrect wiring or loose connections.
- Solution: Verify that the positive and negative pins are correctly connected.
Distorted Sound:
- Cause: Input voltage or frequency is outside the specified range.
- Solution: Ensure the voltage and frequency are within the Piezo Speaker's specifications.
Low Volume:
- Cause: Insufficient input voltage or improper mounting.
- Solution: Increase the input voltage (within the rated range) or secure the speaker properly.
Overheating:
- Cause: Excessive current or prolonged operation at high voltage.
- Solution: Use a current-limiting resistor and operate within the recommended voltage range.
FAQs
Q: Can I use a Piezo Speaker without a microcontroller?
A: Yes, you can use a signal generator or a simple oscillator circuit to drive the speaker.Q: What is the difference between a Piezo Speaker and a Piezo Buzzer?
A: A Piezo Speaker requires an external signal to produce sound, while a Piezo Buzzer has a built-in oscillator and produces sound when powered.Q: Can I generate multiple tones with a Piezo Speaker?
A: Yes, by varying the frequency of the input signal, you can produce different tones.Q: Is it safe to connect a Piezo Speaker directly to a microcontroller?
A: Yes, as long as the current and voltage are within the microcontroller's and speaker's limits. Use a resistor if needed for protection.