How to Use BEC: Examples, Pinouts, and Specs
Introduction
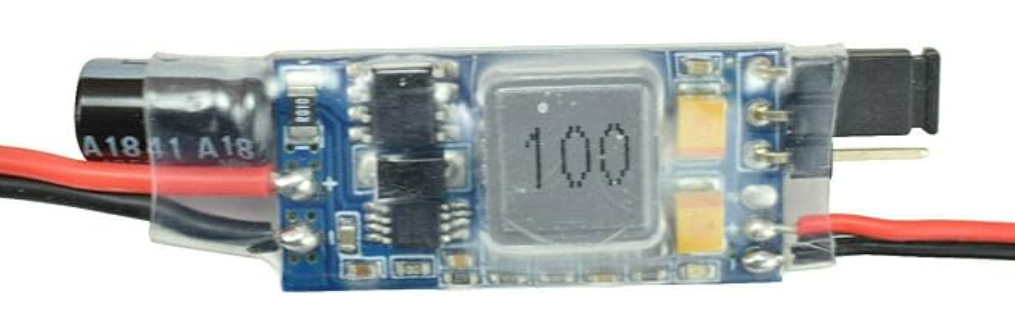
A Buck-Boost Converter (BEC) is a type of DC-DC converter designed to efficiently step down (buck) or step up (boost) voltage levels. Manufactured by APEX RC, the 3AMP 6-25.2V 5V/6V BEC is a versatile power management component that ensures stable voltage output for sensitive electronic devices. It is commonly used in remote-controlled vehicles, drones, robotics, and other applications requiring reliable voltage regulation.
Explore Projects Built with BEC

Explore Projects Built with BEC
Common Applications and Use Cases
- Powering RC receivers, servos, and flight controllers in drones and RC vehicles.
- Voltage regulation for microcontrollers and sensors in robotics.
- Providing stable power to LED lighting systems.
- General-purpose DC-DC voltage conversion in portable electronics.
Technical Specifications
Key Technical Details
| Parameter | Value |
|---|---|
| Manufacturer | APEX RC |
| Part ID | 3AMP 6-25.2V 5V/6V |
| Input Voltage Range | 6V to 25.2V |
| Output Voltage Options | 5V or 6V (selectable) |
| Maximum Output Current | 3A |
| Efficiency | Up to 92% |
| Dimensions | Compact and lightweight design |
| Weight | Approximately 10g |
Pin Configuration and Descriptions
| Pin Name | Description |
|---|---|
| Input (+) | Positive input terminal for the DC voltage source (6V to 25.2V). |
| Input (-) | Negative input terminal (ground) for the DC voltage source. |
| Output (+) | Positive output terminal providing regulated 5V or 6V (selectable). |
| Output (-) | Negative output terminal (ground) for the regulated voltage. |
| Voltage Select | Jumper or switch to select between 5V and 6V output. |
Usage Instructions
How to Use the Component in a Circuit
Connect the Input Terminals:
- Attach the positive terminal of your DC power source (6V to 25.2V) to the
Input (+)pin. - Connect the ground of your power source to the
Input (-)pin.
- Attach the positive terminal of your DC power source (6V to 25.2V) to the
Set the Output Voltage:
- Use the jumper or switch on the BEC to select the desired output voltage (5V or 6V).
Connect the Output Terminals:
- Attach the
Output (+)pin to the positive terminal of your load (e.g., RC receiver, microcontroller). - Connect the
Output (-)pin to the ground of your load.
- Attach the
Verify Connections:
- Double-check all connections to ensure proper polarity and secure wiring.
Power On:
- Turn on the DC power source. The BEC will regulate the input voltage to the selected output voltage.
Important Considerations and Best Practices
- Input Voltage Range: Ensure the input voltage is within the specified range (6V to 25.2V) to avoid damage.
- Current Limit: Do not exceed the maximum output current of 3A to prevent overheating or failure.
- Heat Dissipation: If operating near the maximum current, ensure adequate ventilation or cooling to maintain efficiency.
- Polarity: Always observe correct polarity when connecting the input and output terminals.
- Voltage Selection: Confirm the output voltage setting (5V or 6V) before connecting sensitive devices.
Example: Using the BEC with an Arduino UNO
The BEC can be used to power an Arduino UNO by providing a stable 5V output. Below is an example circuit and code:
Circuit
- Connect the BEC's
Output (+)to the Arduino's5Vpin. - Connect the BEC's
Output (-)to the Arduino'sGNDpin. - Power the BEC with a DC source (e.g., a 2S or 3S LiPo battery).
Code
// Example code to blink an LED using an Arduino UNO powered by the BEC
// Ensure the BEC is set to 5V output before connecting to the Arduino

const int ledPin = 13; // Built-in LED pin on Arduino UNO

void setup() {
  pinMode(ledPin, OUTPUT); // Set the LED pin as an output
}

void loop() {
  digitalWrite(ledPin, HIGH); // Turn the LED on
  delay(1000);                // Wait for 1 second
  digitalWrite(ledPin, LOW);  // Turn the LED off
  delay(1000);                // Wait for 1 second
}
Troubleshooting and FAQs
Common Issues and Solutions
| Issue | Possible Cause | Solution |
|---|---|---|
| No output voltage | Incorrect input voltage or polarity | Verify input voltage and polarity. |
| Overheating | Exceeding maximum current limit | Reduce load current or improve cooling. |
| Output voltage not stable | Input voltage too low or noisy | Ensure input voltage is within range and stable. |
| Device not powering on | Jumper/switch not set correctly | Check and set the output voltage jumper. |
FAQs
Can I use the BEC with a 4S LiPo battery?
- Yes, as long as the battery voltage is within the 6V to 25.2V range.
How do I select between 5V and 6V output?
- Use the onboard jumper or switch to toggle between the two voltage options.
What happens if I exceed the 3A current limit?
- The BEC may overheat or shut down to protect itself. Always ensure the load does not exceed 3A.
Can I use the BEC to power multiple devices?
- Yes, as long as the total current draw does not exceed 3A.
Is the BEC waterproof?
- No, the BEC is not waterproof. Protect it from moisture and water exposure.
This documentation provides a comprehensive guide to using the APEX RC 3AMP 6-25.2V 5V/6V BEC. Follow the instructions and best practices to ensure optimal performance and longevity of the component.