Cirkit Designer Logo
Cirkit Designer
Your all-in-one circuit design IDE
Home / 
Component Documentation

How to Use Adafruit 1.44 inch TFT Breakout: Examples, Pinouts, and Specs

Image of Adafruit 1.44 inch TFT Breakout
Cirkit Designer LogoDesign with Adafruit 1.44 inch TFT Breakout in Cirkit Designer

Introduction

The Adafruit 1.44" TFT Breakout is a compact and versatile display module that features a 1.44-inch TFT screen capable of displaying full 16-bit color. This breakout board is ideal for adding a small, colorful, and bright display to any project. With its simple SPI interface, it is suitable for a wide range of applications, including handheld instruments, user interfaces, gaming devices, and wearable technology.

Explore Projects Built with Adafruit 1.44 inch TFT Breakout

Use Cirkit Designer to design, explore, and prototype these projects online. Some projects support real-time simulation. Click "Open Project" to start designing instantly!
Arduino Mega 2560 Controlled TFT Touchscreen Interface
Image of Tablero Moto: A project utilizing Adafruit 1.44 inch TFT Breakout in a practical application
This circuit connects an Arduino Mega 2560 microcontroller to a 3.5-inch 480x320 TFT LCD display. The Arduino provides power, ground, and digital signals to control the display, including data lines for pixel information and control lines for reset, write, and command/data selection. The embedded code initializes the display and configures the Arduino's pins for communication, likely to create a user interface or visual output for a project.
Cirkit Designer LogoOpen Project in Cirkit Designer
Arduino Nano Controlled TFT Display with Multiple Pushbuttons
Image of rey: A project utilizing Adafruit 1.44 inch TFT Breakout in a practical application
This circuit features an Arduino Nano microcontroller connected to a ST7735 128x128 1.44 TFT I2C Color display and multiple pushbuttons. The display is interfaced with the Arduino via digital pins for control signals and SPI pins for data transfer. The pushbuttons are connected to various digital and analog input pins on the Arduino, likely intended for user input to control the display or other functions within the code.
Cirkit Designer LogoOpen Project in Cirkit Designer
Arduino UNO and ILI9341 TFT Display Interactive Graphics Demo
Image of CE Test ili9341: A project utilizing Adafruit 1.44 inch TFT Breakout in a practical application
This circuit interfaces an Arduino UNO with an ILI9341 TFT display using two bi-directional logic level converters to manage voltage differences. The Arduino runs a program to test various graphical functions on the TFT display, demonstrating its capabilities through a series of visual benchmarks.
Cirkit Designer LogoOpen Project in Cirkit Designer
Arduino Nano and 3.5 TFT LCD Shield Display Interface
Image of BAROMETR BMP280 TFT 9488: A project utilizing Adafruit 1.44 inch TFT Breakout in a practical application
This circuit interfaces an Arduino Nano with a 3.5-inch TFT LCD Shield, allowing the Arduino to control the display and read/write data to it. The connections include data lines, control signals, and power, enabling the Arduino to drive the LCD for various display applications.
Cirkit Designer LogoOpen Project in Cirkit Designer

Explore Projects Built with Adafruit 1.44 inch TFT Breakout

Use Cirkit Designer to design, explore, and prototype these projects online. Some projects support real-time simulation. Click "Open Project" to start designing instantly!
Image of Tablero Moto: A project utilizing Adafruit 1.44 inch TFT Breakout in a practical application
Arduino Mega 2560 Controlled TFT Touchscreen Interface
This circuit connects an Arduino Mega 2560 microcontroller to a 3.5-inch 480x320 TFT LCD display. The Arduino provides power, ground, and digital signals to control the display, including data lines for pixel information and control lines for reset, write, and command/data selection. The embedded code initializes the display and configures the Arduino's pins for communication, likely to create a user interface or visual output for a project.
Cirkit Designer LogoOpen Project in Cirkit Designer
Image of rey: A project utilizing Adafruit 1.44 inch TFT Breakout in a practical application
Arduino Nano Controlled TFT Display with Multiple Pushbuttons
This circuit features an Arduino Nano microcontroller connected to a ST7735 128x128 1.44 TFT I2C Color display and multiple pushbuttons. The display is interfaced with the Arduino via digital pins for control signals and SPI pins for data transfer. The pushbuttons are connected to various digital and analog input pins on the Arduino, likely intended for user input to control the display or other functions within the code.
Cirkit Designer LogoOpen Project in Cirkit Designer
Image of CE Test ili9341: A project utilizing Adafruit 1.44 inch TFT Breakout in a practical application
Arduino UNO and ILI9341 TFT Display Interactive Graphics Demo
This circuit interfaces an Arduino UNO with an ILI9341 TFT display using two bi-directional logic level converters to manage voltage differences. The Arduino runs a program to test various graphical functions on the TFT display, demonstrating its capabilities through a series of visual benchmarks.
Cirkit Designer LogoOpen Project in Cirkit Designer
Image of BAROMETR BMP280 TFT 9488: A project utilizing Adafruit 1.44 inch TFT Breakout in a practical application
Arduino Nano and 3.5 TFT LCD Shield Display Interface
This circuit interfaces an Arduino Nano with a 3.5-inch TFT LCD Shield, allowing the Arduino to control the display and read/write data to it. The connections include data lines, control signals, and power, enabling the Arduino to drive the LCD for various display applications.
Cirkit Designer LogoOpen Project in Cirkit Designer

Technical Specifications

Key Technical Details

  • Display Size: 1.44 inches
  • Resolution: 128x128 pixels
  • Color Depth: 16-bit (65,000 colors)
  • Interface: SPI
  • Operating Voltage: 3.3V to 5V
  • Logic Level: 3.3V (5V tolerant)
  • Current Draw: 20mA (typical)

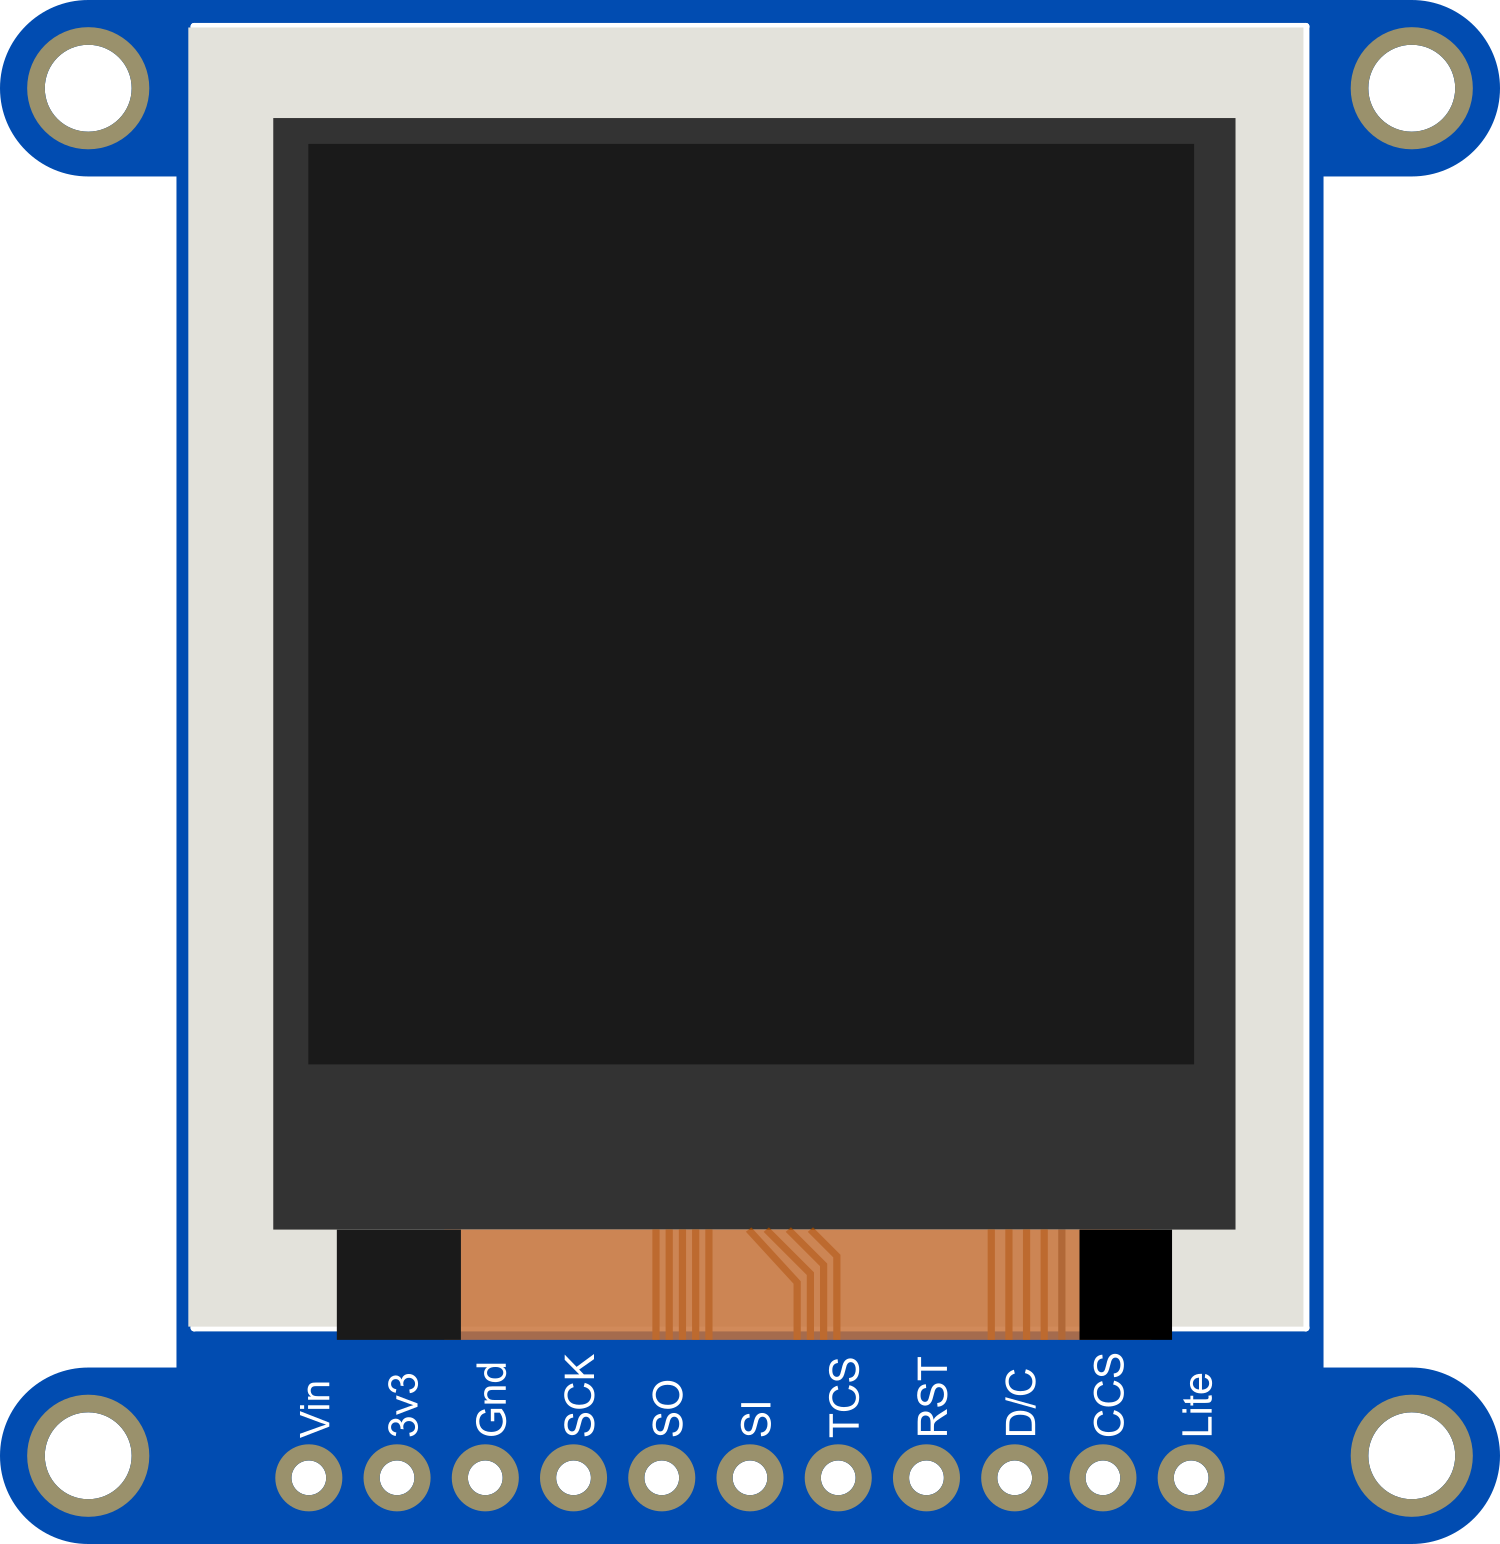
Pin Configuration and Descriptions

Pin Number Name Description
1 VCC Power supply (3.3V to 5V)
2 GND Ground
3 CS Chip Select for SPI
4 RST Reset pin
5 A0/D/C Data/Command control pin
6 SDA SPI Data pin
7 SCK SPI Clock pin
8 LED Backlight control (anode)

Usage Instructions

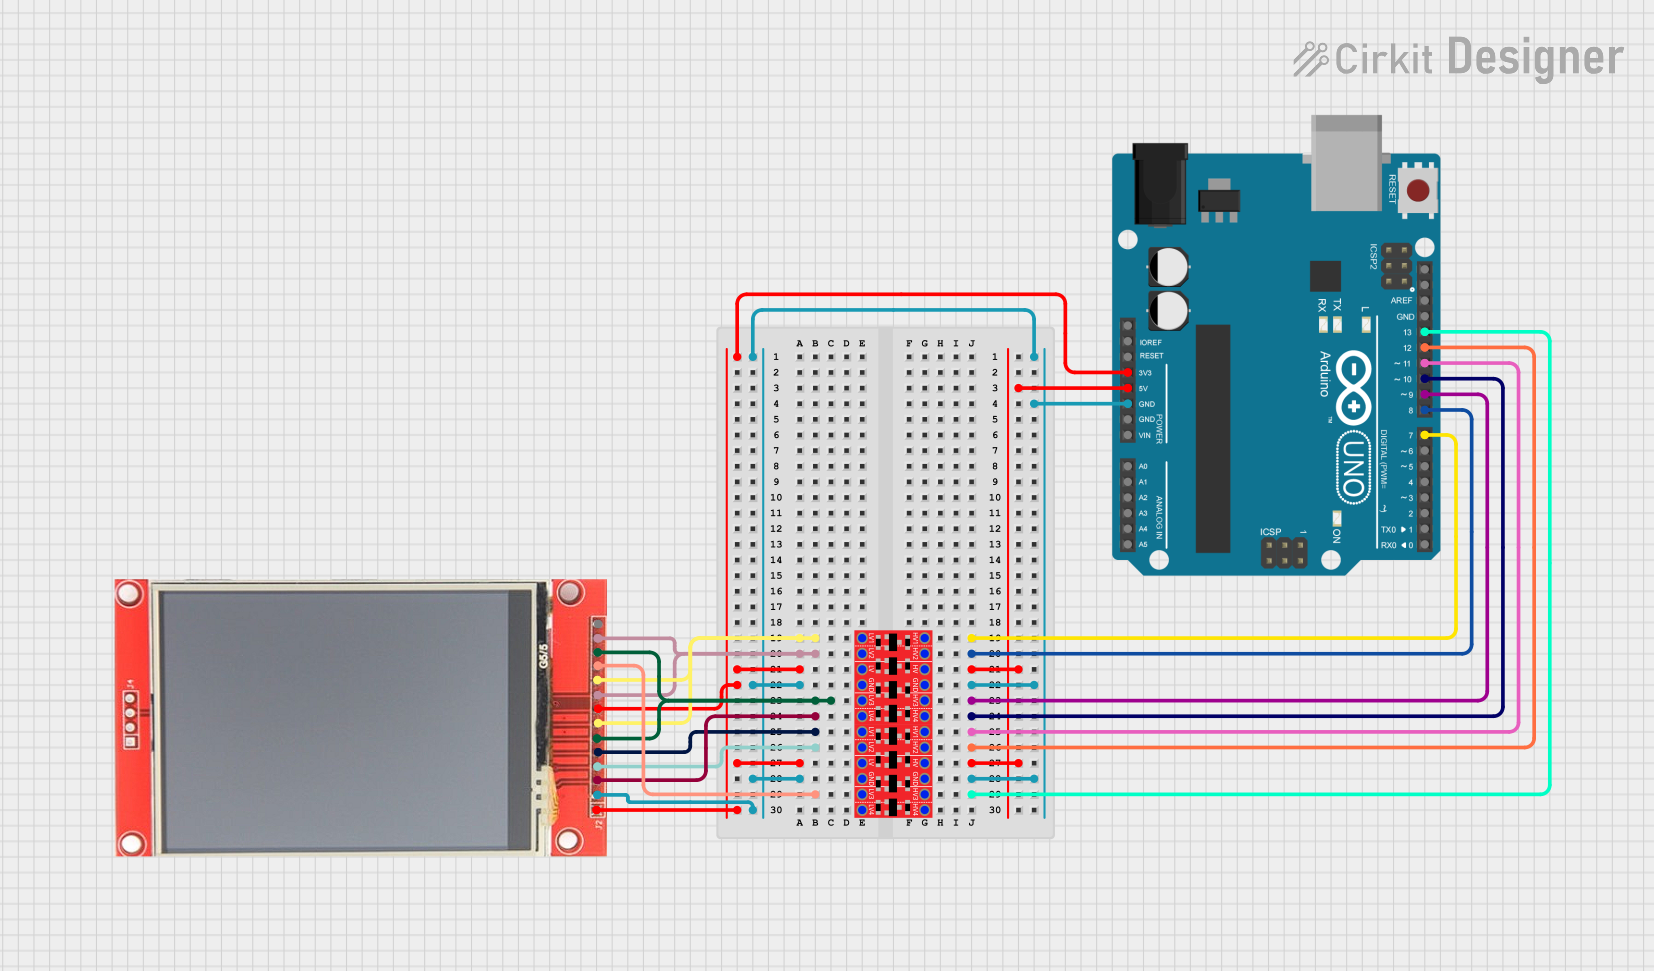
Integrating with a Circuit

To use the Adafruit 1.44" TFT Breakout in a circuit, follow these steps:

  1. Connect the VCC pin to a 3.3V or 5V power supply.
  2. Connect the GND pin to the ground of your power supply.
  3. Connect the CS, RST, A0/D/C, SDA, and SCK pins to the corresponding SPI pins on your microcontroller.
  4. Optionally, connect the LED pin to a PWM-capable pin for backlight control.

Best Practices

  • Use a level shifter or logic level converter if your microcontroller operates at a voltage higher than 3.3V.
  • To prevent damage to the display, avoid exposing it to static electricity or physical stress.
  • When soldering, ensure that the temperature does not exceed the recommended levels to prevent damage to the board.

Example Code for Arduino UNO

#include <Adafruit_GFX.h>    // Core graphics library
#include <Adafruit_ST7735.h> // Hardware-specific library for ST7735

// Pin definitions
#define TFT_CS     10
#define TFT_RST    9
#define TFT_DC     8

// Create an ST7735 object
Adafruit_ST7735 tft = Adafruit_ST7735(TFT_CS, TFT_DC, TFT_RST);

void setup() {
  tft.initR(INITR_144GREENTAB); // Initialize display with the correct tab color
  tft.fillScreen(ST7735_BLACK);  // Clear the screen to black
}

void loop() {
  // Example: Draw a red rectangle
  tft.fillRect(10, 10, 50, 50, ST7735_RED);
  delay(500);

  // Example: Draw text
  tft.setCursor(0, 0);
  tft.setTextColor(ST7735_WHITE);
  tft.setTextWrap(true);
  tft.print("Hello, World!");
  delay(2000);
}

Ensure you have installed the Adafruit_GFX and Adafruit_ST7735 libraries before uploading this code to your Arduino UNO.

Troubleshooting and FAQs

Common Issues

  • Display not powering on: Check the connections to VCC and GND, and ensure that the power supply is within the specified voltage range.
  • No image or incorrect colors: Verify that the SPI connections are correct and that the correct display driver is being used in the code.
  • Dim display: Ensure that the LED backlight pin is connected and being driven with the correct voltage.

Solutions and Tips

  • If the display is not responding, try resetting the Arduino and ensuring that the RST pin is correctly connected.
  • For better performance, use hardware SPI rather than software SPI.
  • Adjust the contrast or the backlight if the display is hard to read.

FAQs

Q: Can I use this display with a 5V microcontroller? A: Yes, the Adafruit 1.44" TFT Breakout is 5V tolerant, but it is recommended to use a level shifter for the data lines.

Q: How do I control the backlight brightness? A: You can control the backlight brightness by connecting the LED pin to a PWM-capable pin on your microcontroller and adjusting the duty cycle.

Q: What library should I use for this display? A: The Adafruit_GFX library and the Adafruit_ST7735 library are recommended for this display.

For further assistance, refer to the Adafruit forums or the product's official page for community support and additional resources.