
How to Use mbed NXP LPC1768: Examples, Pinouts, and Specs
 Design with mbed NXP LPC1768 in Cirkit Designer
Introduction
The mbed NXP LPC1768 is a powerful microcontroller development board designed for rapid prototyping and development of embedded systems. It is based on the NXP LPC1768 microcontroller, which features an ARM Cortex-M3 core running at up to 100 MHz. This board is ideal for developers looking to create applications with advanced connectivity, real-time control, and peripheral integration.
Explore Projects Built with mbed NXP LPC1768
 Open Project in Cirkit Designer
 Open Project in Cirkit Designer
 Open Project in Cirkit Designer
 Open Project in Cirkit Designer
Explore Projects Built with mbed NXP LPC1768
Open Project in Cirkit DesignerOpen Project in Cirkit DesignerOpen Project in Cirkit DesignerOpen Project in Cirkit DesignerCommon Applications and Use Cases
- Internet of Things (IoT) devices
- Robotics and automation systems
- Data acquisition and processing
- Prototyping for industrial control systems
- Educational projects and embedded systems learning
Technical Specifications
The mbed NXP LPC1768 offers a wide range of features and capabilities. Below are its key technical specifications:
| Specification | Details |
|---|---|
| Microcontroller | NXP LPC1768 |
| Core | ARM Cortex-M3 |
| Clock Speed | 100 MHz |
| Flash Memory | 512 KB |
| RAM | 64 KB |
| GPIO Pins | 40 |
| Analog Inputs | 6 (12-bit ADC) |
| Analog Outputs | 1 (10-bit DAC) |
| Communication Interfaces | UART, SPI, I2C, CAN, Ethernet, USB |
| Power Supply | 4.5V to 9V (via VIN) or 5V (via USB) |
| Dimensions | 54 mm x 26 mm |
| Operating Temperature | -40°C to +85°C |
Pin Configuration and Descriptions
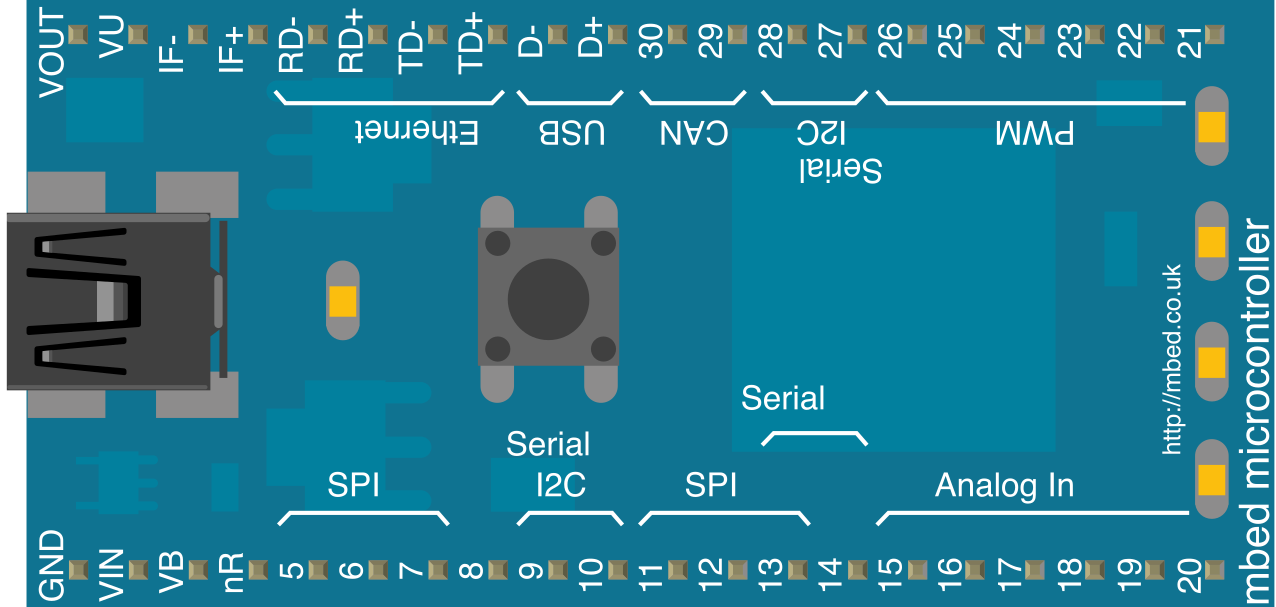
The mbed NXP LPC1768 has a 40-pin DIP form factor. Below is a table summarizing the key pins and their functions:
| Pin | Name | Description |
|---|---|---|
| 1 | VOUT | 3.3V output voltage |
| 2 | GND | Ground |
| 3 | p5 to p30 | General-purpose I/O pins (GPIO) |
| 4 | p19, p20 | I2C SDA and SCL |
| 5 | p9, p10 | UART TX and RX |
| 6 | p11 to p13 | SPI MOSI, MISO, and SCK |
| 7 | p15, p16 | CAN TD and RD |
| 8 | p18 | PWM output |
| 9 | p17 | Analog output (DAC) |
| 10 | p15 to p20 | Analog inputs (ADC) |
| 11 | USB | USB interface for programming and communication |
| 12 | Ethernet | Ethernet interface pins |
Usage Instructions
How to Use the mbed NXP LPC1768 in a Circuit
Powering the Board:
- Connect the board to a computer via the USB port for power and programming.
- Alternatively, supply 4.5V to 9V to the VIN pin for standalone operation.
Programming the Board:
- Use the mbed online compiler or an offline IDE such as Keil µVision or Arm Mbed Studio.
- Drag and drop the compiled binary file onto the board, which appears as a USB mass storage device.
Connecting Peripherals:
- Use the GPIO pins for digital input/output.
- Connect sensors to the ADC pins for analog input.
- Use the UART, SPI, or I2C interfaces for communication with other devices.
Running the Program:
- Once the binary file is uploaded, the board will automatically reset and execute the program.
Important Considerations and Best Practices
- Ensure the power supply voltage does not exceed the recommended range to avoid damaging the board.
- Use pull-up or pull-down resistors for GPIO pins when necessary to ensure stable operation.
- Avoid connecting high-current loads directly to the GPIO pins; use external drivers or relays.
- For Ethernet applications, ensure proper grounding and shielding to minimize noise.
Example Code for Arduino UNO Integration
The mbed NXP LPC1768 can communicate with an Arduino UNO via UART. Below is an example code snippet for the LPC1768:
#include "mbed.h"

// Initialize UART communication
Serial pc(USBTX, USBRX); // USBTX and USBRX are default TX and RX pins
Serial arduino(p9, p10); // p9 = TX, p10 = RX for Arduino communication

int main() {
    pc.printf("mbed LPC1768 UART Example\n");
    arduino.printf("Hello from LPC1768!\n");

    while (true) {
        if (arduino.readable()) {
            char c = arduino.getc(); // Read data from Arduino
            pc.putc(c);             // Send data to PC via USB
        }
    }
}
On the Arduino UNO, you can use the following code to communicate with the LPC1768:
void setup() {
    Serial.begin(9600); // Initialize UART communication
}

void loop() {
    if (Serial.available()) {
        char c = Serial.read(); // Read data from LPC1768
        Serial.print(c);        // Echo data back to LPC1768
    }
    delay(100);
}
Troubleshooting and FAQs
Common Issues and Solutions
The board is not recognized by the computer:
- Ensure the USB cable is functional and properly connected.
- Try a different USB port or reinstall the USB drivers.
Program does not run after uploading:
- Verify that the binary file is compiled for the LPC1768 target.
- Check for errors in the code and ensure the correct pins are used.
Analog readings are unstable:
- Use proper decoupling capacitors near the ADC pins.
- Ensure the input signal is within the ADC voltage range (0V to 3.3V).
Ethernet connection is not working:
- Verify the Ethernet cable and network configuration.
- Check the MAC and IP address settings in the code.
FAQs
Q: Can I power the board using a battery?
A: Yes, you can power the board using a 4.5V to 9V battery connected to the VIN pin.
Q: Is the mbed NXP LPC1768 compatible with Arduino shields?
A: No, the LPC1768 does not have the same pin layout as Arduino boards, but you can use jumper wires to connect shields manually.
Q: Can I use the mbed LPC1768 for real-time applications?
A: Yes, the ARM Cortex-M3 core supports real-time operations with its interrupt handling and deterministic behavior.
Q: How do I reset the board?
A: Press the reset button located on the board to restart the program.