How to Use LiFePO4 Charger 14.6V 20A: Examples, Pinouts, and Specs
Introduction
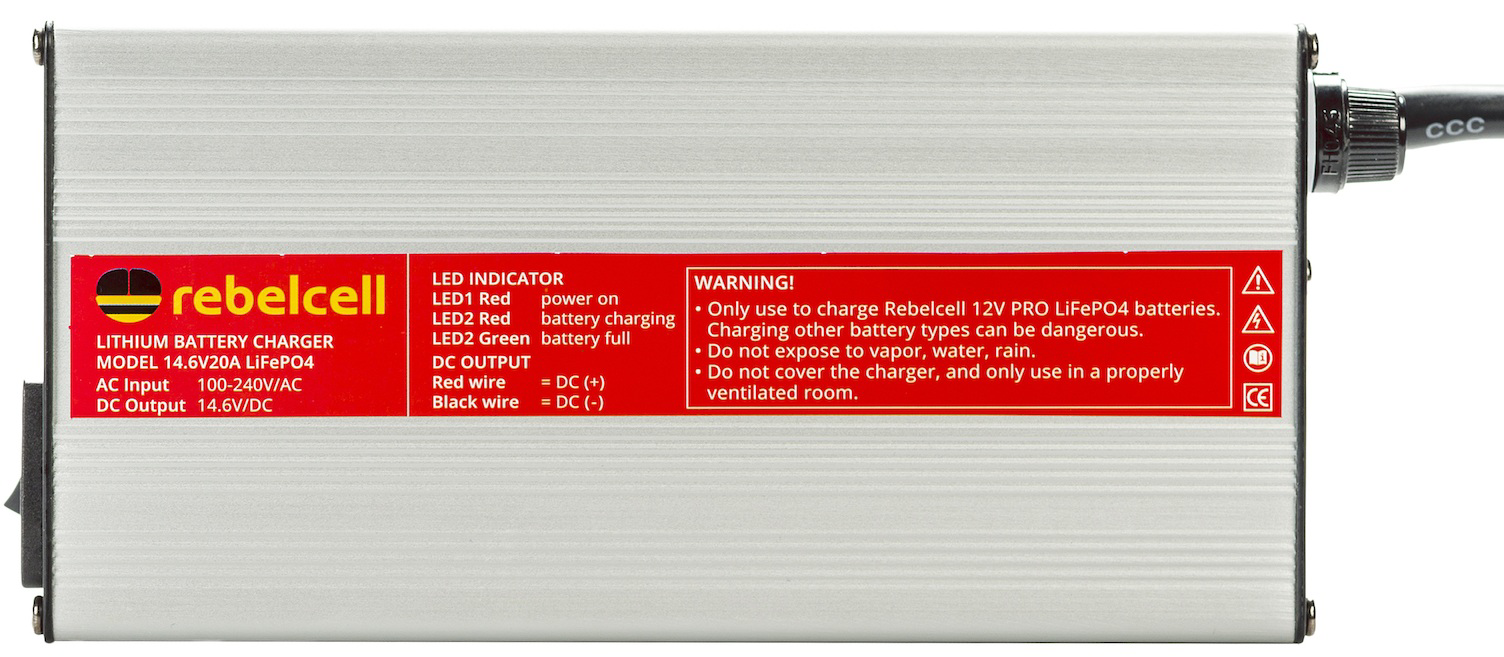
The LiFePO4 Charger 14.6V 20A is a specialized charging device designed for Lithium Iron Phosphate (LiFePO4) batteries. It provides a maximum output voltage of 14.6V and a current of 20A, ensuring safe, efficient, and reliable charging. This charger is equipped with advanced safety features such as overvoltage, overcurrent, and thermal protection, making it ideal for both personal and industrial applications.
Explore Projects Built with LiFePO4 Charger 14.6V 20A


Explore Projects Built with LiFePO4 Charger 14.6V 20A
Common Applications and Use Cases
- Charging LiFePO4 batteries in electric vehicles (EVs), solar energy systems, and backup power supplies.
- Use in battery packs for robotics, drones, and portable power stations.
- Applications requiring high-capacity and fast-charging battery systems.
Technical Specifications
Below are the key technical details and pin configuration for the LiFePO4 Charger 14.6V 20A:
Key Technical Details
| Parameter | Specification |
|---|---|
| Input Voltage Range | 100V - 240V AC (50/60Hz) |
| Output Voltage | 14.6V DC |
| Maximum Output Current | 20A |
| Charging Algorithm | CC (Constant Current) / CV (Constant Voltage) |
| Efficiency | ≥ 90% |
| Operating Temperature | -10°C to 50°C |
| Storage Temperature | -20°C to 70°C |
| Dimensions | 200mm x 100mm x 60mm |
| Weight | 1.5kg |
| Safety Features | Overvoltage, Overcurrent, Overtemperature, Short Circuit Protection |
Pin Configuration and Descriptions
| Pin Name | Description |
|---|---|
| AC Input (L) | Live wire connection for AC input |
| AC Input (N) | Neutral wire connection for AC input |
| DC Output (+) | Positive terminal for battery connection |
| DC Output (-) | Negative terminal for battery connection |
| Ground (GND) | Earth/ground connection for safety |
| Status LED | Indicates charging status (e.g., charging, fully charged, error) |
Usage Instructions
How to Use the Component in a Circuit
Connect the AC Input:
- Plug the charger into a standard AC power outlet (100V-240V AC).
- Ensure the live (L) and neutral (N) wires are securely connected.
Connect the Battery:
- Attach the positive terminal of the charger (DC Output +) to the positive terminal of the LiFePO4 battery.
- Attach the negative terminal of the charger (DC Output -) to the negative terminal of the battery.
Monitor Charging:
- Observe the status LED to monitor the charging process:
- Red LED: Charging in progress.
- Green LED: Charging complete.
- Flashing LED: Error or fault detected.
- Observe the status LED to monitor the charging process:
Disconnect Safely:
- Once the battery is fully charged, disconnect the charger from the battery and then unplug it from the AC outlet.
Important Considerations and Best Practices
- Battery Compatibility: Ensure the charger is used only with LiFePO4 batteries rated for 14.6V.
- Ventilation: Operate the charger in a well-ventilated area to prevent overheating.
- Polarity Check: Double-check the polarity of the connections to avoid damage to the battery or charger.
- Avoid Overcharging: Do not leave the charger connected to the battery for extended periods after charging is complete.
- Environmental Conditions: Avoid using the charger in extreme temperatures or humid environments.
Arduino Integration Example
While the LiFePO4 Charger 14.6V 20A is not directly controlled by an Arduino, you can monitor the battery's voltage during charging using an Arduino and a voltage divider circuit. Below is an example code snippet:
// Arduino code to monitor LiFePO4 battery voltage during charging
// Ensure the voltage divider reduces the battery voltage to within 0-5V range
// for safe input to the Arduino analog pin.

const int voltagePin = A0; // Analog pin connected to the voltage divider
float voltage = 0.0;       // Variable to store the measured voltage
float dividerRatio = 5.7;  // Adjust based on your voltage divider resistors

void setup() {
  Serial.begin(9600); // Initialize serial communication
  pinMode(voltagePin, INPUT);
}

void loop() {
  int sensorValue = analogRead(voltagePin); // Read analog value
  voltage = (sensorValue * 5.0 / 1023.0) * dividerRatio;
  // Convert analog value to actual voltage

  Serial.print("Battery Voltage: ");
  Serial.print(voltage);
  Serial.println(" V");

  delay(1000); // Wait 1 second before next reading
}
Note: Use appropriate resistors for the voltage divider to ensure the Arduino does not receive a voltage higher than 5V.
Troubleshooting and FAQs
Common Issues and Solutions
| Issue | Possible Cause | Solution |
|---|---|---|
| Charger does not power on | No AC input or loose connection | Check the AC power source and connections. |
| Battery not charging | Incorrect polarity or loose connection | Verify the polarity and ensure secure connections. |
| Status LED flashing | Fault detected (e.g., overcurrent) | Disconnect the charger, check connections, and retry. |
| Charger overheating | Poor ventilation or high ambient temperature | Ensure proper ventilation and operate within the specified temperature range. |
FAQs
Can I use this charger for other battery types?
No, this charger is specifically designed for LiFePO4 batteries. Using it with other battery chemistries may result in damage or unsafe operation.What happens if I exceed the 20A current limit?
The charger is equipped with overcurrent protection and will shut down to prevent damage.Can I leave the charger connected to the battery indefinitely?
It is not recommended to leave the charger connected after the battery is fully charged to avoid unnecessary wear on the battery.How do I know when the battery is fully charged?
The status LED will turn green when the battery is fully charged.
By following this documentation, you can safely and effectively use the LiFePO4 Charger 14.6V 20A for your applications.