
How to Use Blend Micro v1.0: Examples, Pinouts, and Specs
 Design with Blend Micro v1.0 in Cirkit Designer
Introduction
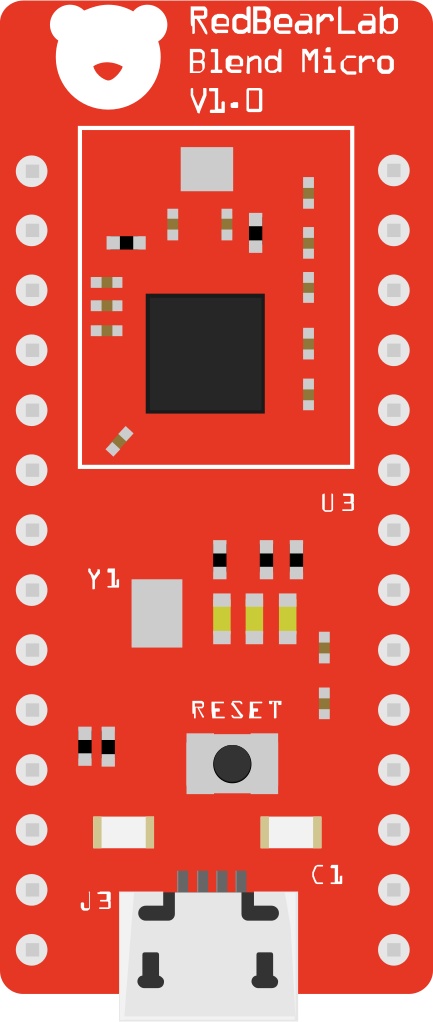
The Blend Micro v1.0, developed by RedBearLab, is a compact microcontroller board that combines the power of Arduino with built-in Bluetooth Low Energy (BLE) capabilities. This versatile board is designed for wireless communication and is ideal for projects requiring seamless integration with sensors, actuators, and mobile devices. Its small form factor and robust features make it a popular choice for IoT applications, wearable devices, and smart home projects.
Explore Projects Built with Blend Micro v1.0
 Open Project in Cirkit Designer
 Open Project in Cirkit Designer
 Open Project in Cirkit Designer
 Open Project in Cirkit Designer
Explore Projects Built with Blend Micro v1.0
Open Project in Cirkit DesignerOpen Project in Cirkit DesignerOpen Project in Cirkit DesignerOpen Project in Cirkit DesignerCommon Applications and Use Cases
- Wireless sensor networks
- IoT (Internet of Things) devices
- Wearable technology
- Home automation systems
- Remote control and monitoring
- Prototyping Bluetooth-enabled devices
Technical Specifications
The Blend Micro v1.0 is built around the ATmega32U4 microcontroller and the Nordic nRF8001 Bluetooth chip. Below are the key technical details:
General Specifications
| Feature | Specification |
|---|---|
| Microcontroller | ATmega32U4 |
| Bluetooth Chip | Nordic nRF8001 (Bluetooth 4.0 BLE) |
| Operating Voltage | 3.3V |
| Input Voltage (via USB) | 5V |
| Clock Speed | 16 MHz |
| Flash Memory | 32 KB (4 KB used by bootloader) |
| SRAM | 2.5 KB |
| EEPROM | 1 KB |
| Digital I/O Pins | 20 (7 PWM outputs) |
| Analog Input Pins | 12 |
| Communication Interfaces | UART, I2C, SPI |
| Dimensions | 25.4 mm x 19 mm |
Pin Configuration and Descriptions
The Blend Micro v1.0 features a standard Arduino-compatible pinout. Below is a detailed description of its pins:
Power Pins
| Pin Name | Description |
|---|---|
| VIN | Input voltage pin (5V input via USB or external power source). |
| 3.3V | Regulated 3.3V output for powering external components. |
| GND | Ground pin. |
Digital I/O Pins
| Pin Number | Description |
|---|---|
| D0 - D13 | General-purpose digital I/O pins. Some pins support PWM (e.g., D3, D5). |
| D0, D1 | UART communication (RX, TX). |
Analog Input Pins
| Pin Number | Description |
|---|---|
| A0 - A11 | Analog input pins for reading sensor data (10-bit resolution). |
Communication Pins
| Pin Name | Description |
|---|---|
| SDA | I2C data line. |
| SCL | I2C clock line. |
| MISO | SPI Master-In-Slave-Out. |
| MOSI | SPI Master-Out-Slave-In. |
| SCK | SPI clock line. |
Usage Instructions
How to Use the Blend Micro v1.0 in a Circuit
Powering the Board:
- Connect the Blend Micro to your computer via a micro-USB cable for programming and power.
- Alternatively, supply 5V to the VIN pin for external power.
Programming the Board:
- Install the Arduino IDE on your computer.
- Add the RedBearLab Blend Micro board to the Arduino IDE by installing the necessary board package.
- Select "Blend Micro" from the Tools > Board menu.
- Write your Arduino sketch and upload it to the board via the USB connection.
Using Bluetooth:
- Pair the Blend Micro with a Bluetooth-enabled device (e.g., smartphone or tablet).
- Use the Nordic nRF UART app or a similar BLE app to send and receive data wirelessly.
- Ensure the BLE library is installed in the Arduino IDE for Bluetooth functionality.
Connecting Sensors and Actuators:
- Use the digital and analog pins to interface with sensors and actuators.
- Ensure the voltage and current requirements of connected components are compatible with the Blend Micro.
Important Considerations and Best Practices
- Voltage Levels: The Blend Micro operates at 3.3V. Ensure all connected components are compatible with this voltage level to avoid damage.
- Bluetooth Range: The BLE module has a typical range of 10-20 meters. Ensure there are no significant obstructions for optimal performance.
- Heat Management: Avoid overloading the board with high-current devices to prevent overheating.
- Firmware Updates: Regularly check for firmware updates for the BLE module to ensure compatibility and performance.
Example Code for Arduino UNO
Below is an example sketch to send and receive data via Bluetooth using the Blend Micro:
#include <BLEPeripheral.h> // Include the BLE library

BLEPeripheral blePeripheral; // Create a BLE Peripheral object
BLEService uartService("6E400001-B5A3-F393-E0A9-E50E24DCCA9E"); // UART service
BLECharacteristic txCharacteristic("6E400003-B5A3-F393-E0A9-E50E24DCCA9E", BLEWrite, 20);
BLECharacteristic rxCharacteristic("6E400002-B5A3-F393-E0A9-E50E24DCCA9E", BLERead, 20);

void setup() {
  Serial.begin(9600); // Initialize serial communication
  blePeripheral.setLocalName("BlendMicro"); // Set BLE device name
  blePeripheral.setAdvertisedServiceUuid(uartService.uuid());
  blePeripheral.addAttribute(uartService);
  blePeripheral.addAttribute(txCharacteristic);
  blePeripheral.addAttribute(rxCharacteristic);
  blePeripheral.begin(); // Start BLE
  Serial.println("BLE UART ready");
}

void loop() {
  BLECentral central = blePeripheral.central(); // Check for BLE central device
  if (central) {
    Serial.print("Connected to central: ");
    Serial.println(central.address());
    while (central.connected()) {
      if (txCharacteristic.written()) {
        String receivedData = txCharacteristic.value();
        Serial.print("Received: ");
        Serial.println(receivedData);
        rxCharacteristic.setValue("Echo: " + receivedData); // Echo back data
      }
    }
    Serial.println("Disconnected from central");
  }
}
Troubleshooting and FAQs
Common Issues and Solutions
The board is not detected by the Arduino IDE:
- Ensure the correct USB drivers are installed.
- Check that the Blend Micro is selected under Tools > Board.
- Verify the correct COM port is selected under Tools > Port.
Bluetooth connection issues:
- Ensure the BLE device is within range.
- Restart the Blend Micro and the Bluetooth device.
- Check that the BLE library is correctly installed in the Arduino IDE.
Sensors or actuators not working:
- Verify the wiring and connections.
- Ensure the voltage and current requirements of the components are within the board's limits.
FAQs
Q: Can the Blend Micro be powered by a battery?
A: Yes, you can power the board using a 3.7V LiPo battery connected to the VIN pin.
Q: What is the maximum data rate for Bluetooth communication?
A: The Nordic nRF8001 supports a maximum data rate of 250 kbps.
Q: Is the Blend Micro compatible with all Arduino libraries?
A: Most Arduino libraries are compatible, but some may require modifications for BLE functionality.
Q: Can I use the Blend Micro without Bluetooth?
A: Yes, the board can function as a standard Arduino microcontroller without using the BLE module.