Cirkit Designer Logo
Cirkit Designer
Your all-in-one circuit design IDE
Home / 
Component Documentation

How to Use SparkFun Electret Microphone Breakout: Examples, Pinouts, and Specs

Image of SparkFun Electret Microphone Breakout
Cirkit Designer LogoDesign with SparkFun Electret Microphone Breakout in Cirkit Designer

Introduction

The SparkFun Electret Microphone Breakout is a compact and versatile module designed to capture audio signals through its onboard electret microphone. This breakout board amplifies the weak electrical signals from the microphone, providing a usable analog output that can be easily interfaced with a variety of microcontrollers, such as the Arduino UNO, for audio detection and recording applications. Common use cases include sound level meters, audio recording, voice recognition, and simple audio-triggered systems.

Explore Projects Built with SparkFun Electret Microphone Breakout

Use Cirkit Designer to design, explore, and prototype these projects online. Some projects support real-time simulation. Click "Open Project" to start designing instantly!
ESP32-Based Voice-Controlled Speaker
Image of Main Design: A project utilizing SparkFun Electret Microphone Breakout in a practical application
This circuit is a digital voice playback and recording system powered by a 3.7V battery. It features an ESP32 microcontroller for processing, an Adafruit MAX98357A amplifier to drive a loudspeaker for audio output, and an Adafruit MAX9814 microphone amplifier for audio input. A pushbutton provides user interaction, and a 3.3V regulator ensures stable power supply to the components.
Cirkit Designer LogoOpen Project in Cirkit Designer
Voice-Activated ESP32 & Wemos Controllers with TFT Display and Battery Management
Image of prototype schematic: A project utilizing SparkFun Electret Microphone Breakout in a practical application
This circuit features multiple microcontroller units (MCUs) including a Wemos S2 Mini, Wemos D1 Mini, and an ESP32 Devkit V1, each interfaced with an Adafruit MAX4466 Electret Microphone Amplifier for audio input and an LCD TFT screen for display output. The circuit is powered by Polymer Lithium Ion Batteries connected through TP4056 charging modules, with power management facilitated by push and rocker switches. The primary function of this circuit appears to be audio capture and processing with visual feedback.
Cirkit Designer LogoOpen Project in Cirkit Designer
ESP32-Based Voice-Activated SD Card Audio Recorder
Image of Main Design: A project utilizing SparkFun Electret Microphone Breakout in a practical application
This circuit features an ESP32 Devkit V1 microcontroller connected to a Micro SD Card Module for data storage, an Adafruit MAX9814 Electret Microphone Amplifier for audio input, and an Adafruit MAX98357A I2S Class-D Mono Amp connected to a loudspeaker for audio output. A pushbutton is interfaced with the ESP32 for user input. The circuit is likely designed for audio recording and playback with the capability to store the audio data on the SD card.
Cirkit Designer LogoOpen Project in Cirkit Designer
Arduino Nano Controlled Clap-Activated Sound and Light System
Image of Clap-Back: A project utilizing SparkFun Electret Microphone Breakout in a practical application
This circuit features an Arduino Nano interfaced with an Adafruit Audio FX Mini Sound Board, a SparkFun Electret Microphone Breakout, a TIP120 Darlington Transistor controlling a 12V Power LED, and a loudspeaker. The Arduino processes audio signals from the microphone to detect claps and toggles the LED accordingly, while also sending signals to the sound board to play audio tracks through the loudspeaker based on the clap pattern. The circuit is powered by a 12V power supply, with the Arduino and sound board receiving regulated voltage from the supply.
Cirkit Designer LogoOpen Project in Cirkit Designer

Explore Projects Built with SparkFun Electret Microphone Breakout

Use Cirkit Designer to design, explore, and prototype these projects online. Some projects support real-time simulation. Click "Open Project" to start designing instantly!
Image of Main Design: A project utilizing SparkFun Electret Microphone Breakout in a practical application
ESP32-Based Voice-Controlled Speaker
This circuit is a digital voice playback and recording system powered by a 3.7V battery. It features an ESP32 microcontroller for processing, an Adafruit MAX98357A amplifier to drive a loudspeaker for audio output, and an Adafruit MAX9814 microphone amplifier for audio input. A pushbutton provides user interaction, and a 3.3V regulator ensures stable power supply to the components.
Cirkit Designer LogoOpen Project in Cirkit Designer
Image of prototype schematic: A project utilizing SparkFun Electret Microphone Breakout in a practical application
Voice-Activated ESP32 & Wemos Controllers with TFT Display and Battery Management
This circuit features multiple microcontroller units (MCUs) including a Wemos S2 Mini, Wemos D1 Mini, and an ESP32 Devkit V1, each interfaced with an Adafruit MAX4466 Electret Microphone Amplifier for audio input and an LCD TFT screen for display output. The circuit is powered by Polymer Lithium Ion Batteries connected through TP4056 charging modules, with power management facilitated by push and rocker switches. The primary function of this circuit appears to be audio capture and processing with visual feedback.
Cirkit Designer LogoOpen Project in Cirkit Designer
Image of Main Design: A project utilizing SparkFun Electret Microphone Breakout in a practical application
ESP32-Based Voice-Activated SD Card Audio Recorder
This circuit features an ESP32 Devkit V1 microcontroller connected to a Micro SD Card Module for data storage, an Adafruit MAX9814 Electret Microphone Amplifier for audio input, and an Adafruit MAX98357A I2S Class-D Mono Amp connected to a loudspeaker for audio output. A pushbutton is interfaced with the ESP32 for user input. The circuit is likely designed for audio recording and playback with the capability to store the audio data on the SD card.
Cirkit Designer LogoOpen Project in Cirkit Designer
Image of Clap-Back: A project utilizing SparkFun Electret Microphone Breakout in a practical application
Arduino Nano Controlled Clap-Activated Sound and Light System
This circuit features an Arduino Nano interfaced with an Adafruit Audio FX Mini Sound Board, a SparkFun Electret Microphone Breakout, a TIP120 Darlington Transistor controlling a 12V Power LED, and a loudspeaker. The Arduino processes audio signals from the microphone to detect claps and toggles the LED accordingly, while also sending signals to the sound board to play audio tracks through the loudspeaker based on the clap pattern. The circuit is powered by a 12V power supply, with the Arduino and sound board receiving regulated voltage from the supply.
Cirkit Designer LogoOpen Project in Cirkit Designer

Technical Specifications

Key Technical Details

  • Supply Voltage (Vcc): 2.7V to 5.5V
  • Output Voltage (Vout): 1.25V (typical at Vcc = 3.3V)
  • Frequency Response: 20Hz to 20kHz
  • Gain: Adjustable with onboard potentiometer
  • Current Consumption: 2mA (typical)

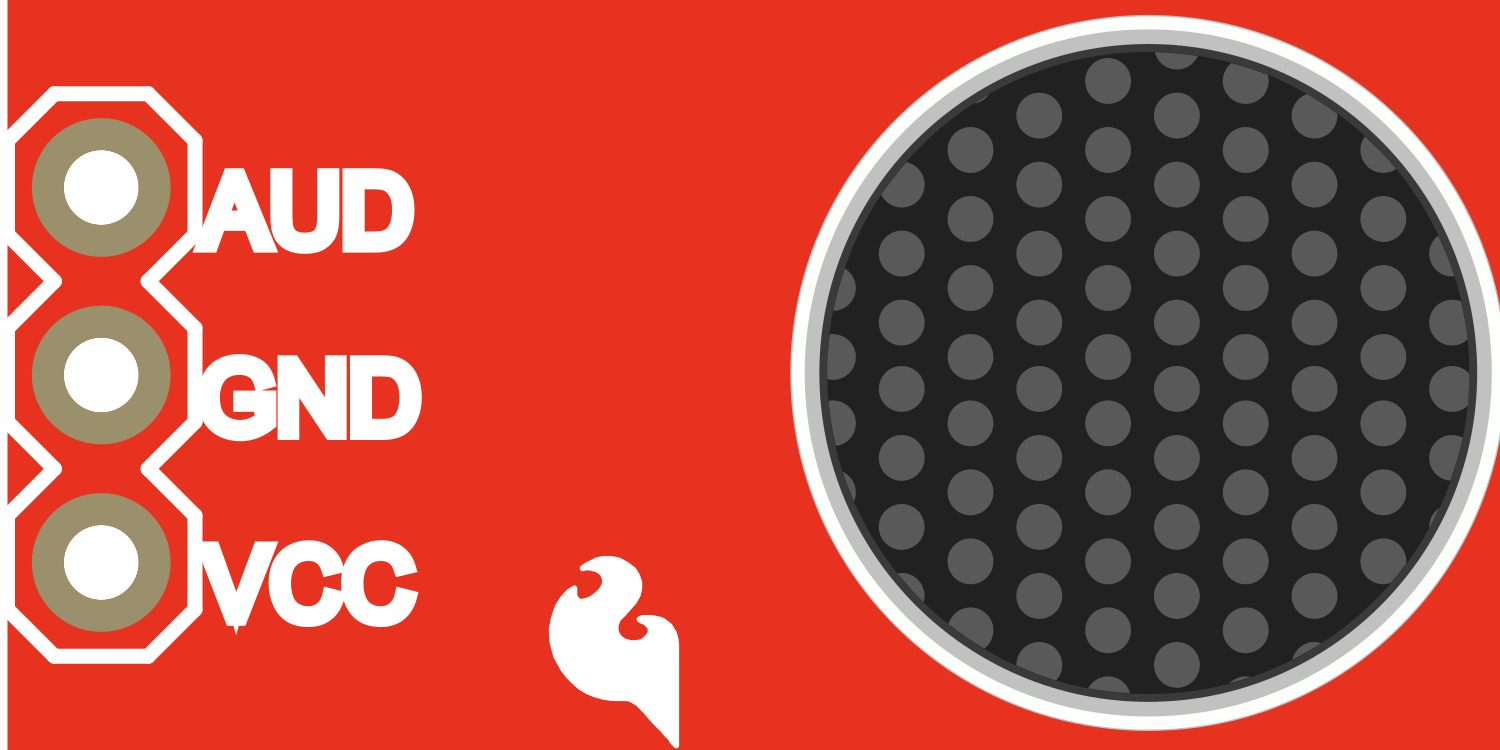
Pin Configuration and Descriptions

Pin Name Description
AUD Audio output signal
GND Ground
VCC Power supply (2.7V to 5.5V)
Gain Gain adjustment (potentiometer onboard)

Usage Instructions

Interfacing with a Circuit

  1. Powering the Module:

    • Connect the VCC pin to a 2.7V to 5.5V power supply.
    • Connect the GND pin to the ground of your power supply.
  2. Adjusting Gain:

    • Use the onboard potentiometer to adjust the gain as needed for your application.
  3. Reading Audio Signal:

    • Connect the AUD pin to an analog input pin on your microcontroller to read the audio signal.

Important Considerations and Best Practices

  • Power Supply: Ensure that the power supply is within the specified range to avoid damaging the module.
  • Signal Clipping: Adjust the gain to prevent the output signal from clipping at the peaks of the audio waveform.
  • Noise Reduction: Keep the breakout board away from high-frequency switching devices to minimize noise.
  • Analog-to-Digital Conversion: When using with a microcontroller, ensure that the analog-to-digital converter (ADC) resolution is sufficient for your application.

Example Code for Arduino UNO

// Define the pin connected to the audio output
const int microphonePin = A0;

void setup() {
  // Initialize serial communication at 9600 baud rate
  Serial.begin(9600);
}

void loop() {
  // Read the analog value from the microphone
  int audioLevel = analogRead(microphonePin);

  // Print the audio level to the Serial Monitor
  Serial.println(audioLevel);

  // Delay for a short period to avoid flooding the serial output
  delay(10);
}

Troubleshooting and FAQs

Common Issues

  • Low Audio Output: If the audio output is too low, adjust the onboard potentiometer to increase the gain.
  • No Audio Output: Ensure that the module is correctly powered and that the AUD pin is connected to the correct analog input on your microcontroller.
  • Distorted Audio: If the audio signal is distorted, the gain may be set too high, causing clipping. Adjust the potentiometer to lower the gain.

Solutions and Tips for Troubleshooting

  • Check Connections: Verify that all connections are secure and correct.
  • Power Supply: Confirm that the power supply voltage is within the specified range.
  • Gain Adjustment: Use a screwdriver to carefully adjust the onboard potentiometer.
  • Isolate Noise: Keep the microphone breakout away from noise sources such as motors or high-frequency electronics.

FAQs

Q: Can I use this module with a 5V Arduino? A: Yes, the module can be powered with a 5V supply, making it compatible with 5V Arduinos.

Q: How do I adjust the gain on the module? A: Use a small screwdriver to turn the onboard potentiometer. Clockwise increases the gain, while counterclockwise decreases it.

Q: What is the purpose of the AUD pin? A: The AUD pin outputs the amplified audio signal from the microphone, which can be read by an analog input on a microcontroller.

Q: Can I connect this module directly to a speaker? A: No, the output is an analog signal meant for microcontroller ADCs. To drive a speaker, additional amplification is needed.

For further assistance, please refer to the SparkFun Electret Microphone Breakout product page and forums for community support and resources.