How to Use W5500 Lite Ethernet: Examples, Pinouts, and Specs
Introduction
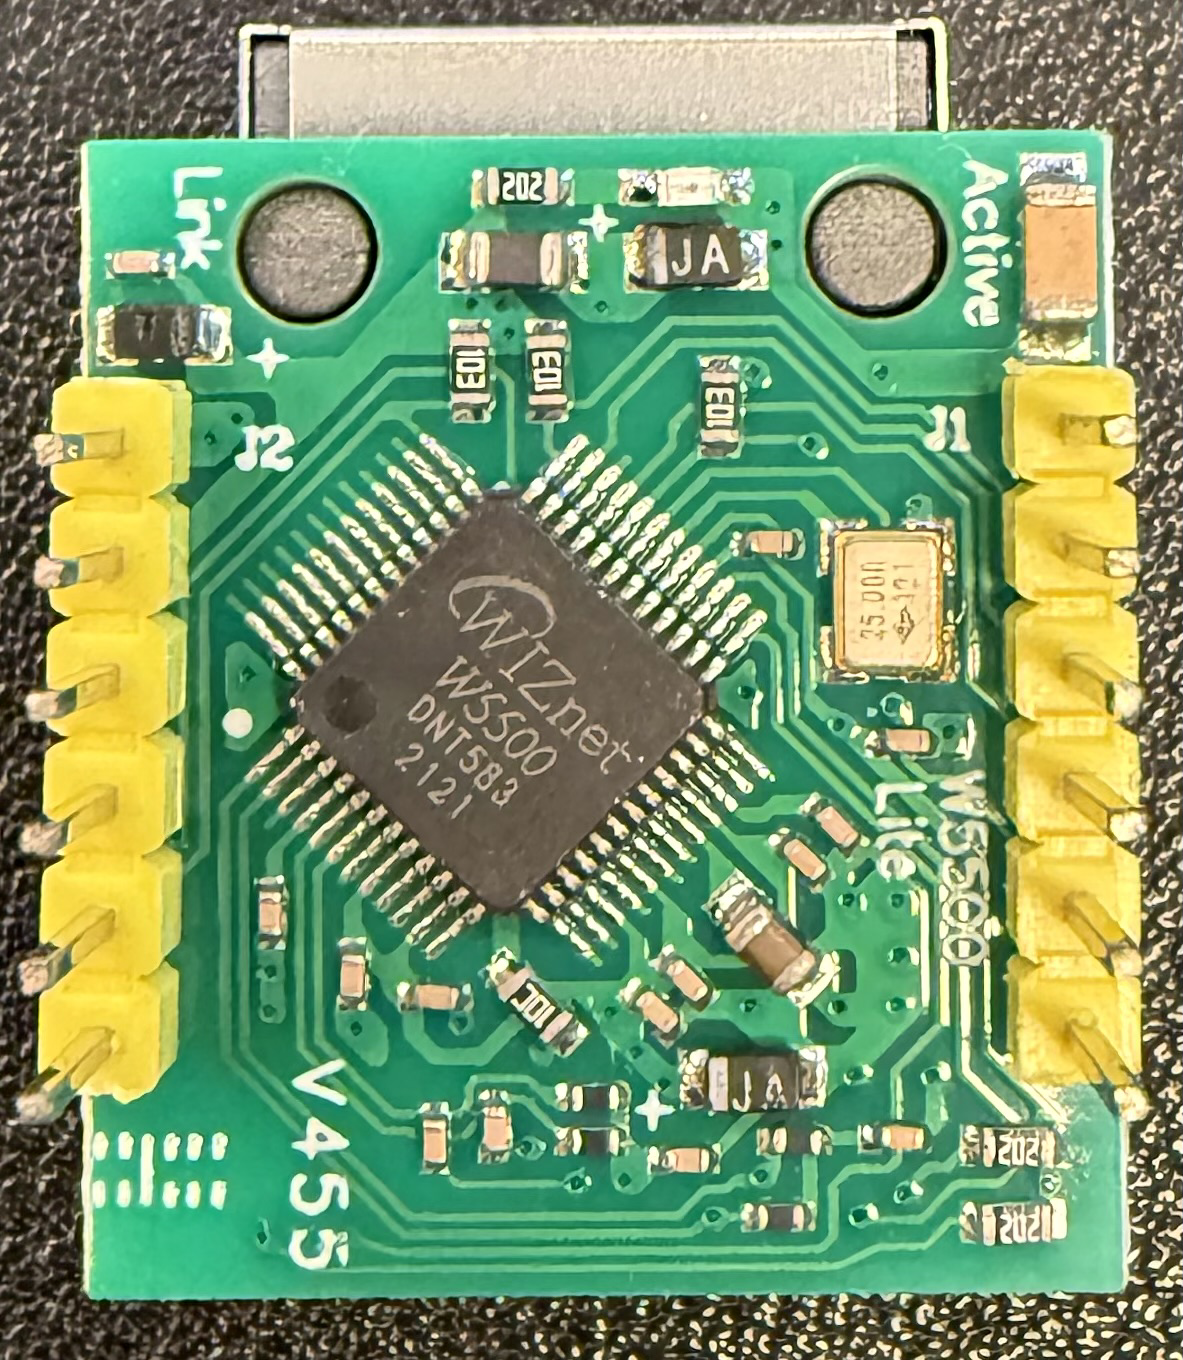
The W5500 Lite Ethernet module by Hailege is a compact and efficient solution for adding Ethernet connectivity to your projects. With an integrated TCP/IP stack, it supports TCP, UDP, and IP protocols, making it suitable for a wide range of Internet of Things (IoT) applications. This module is commonly used in networked sensors, home automation systems, and other embedded systems requiring network connectivity.
Explore Projects Built with W5500 Lite Ethernet
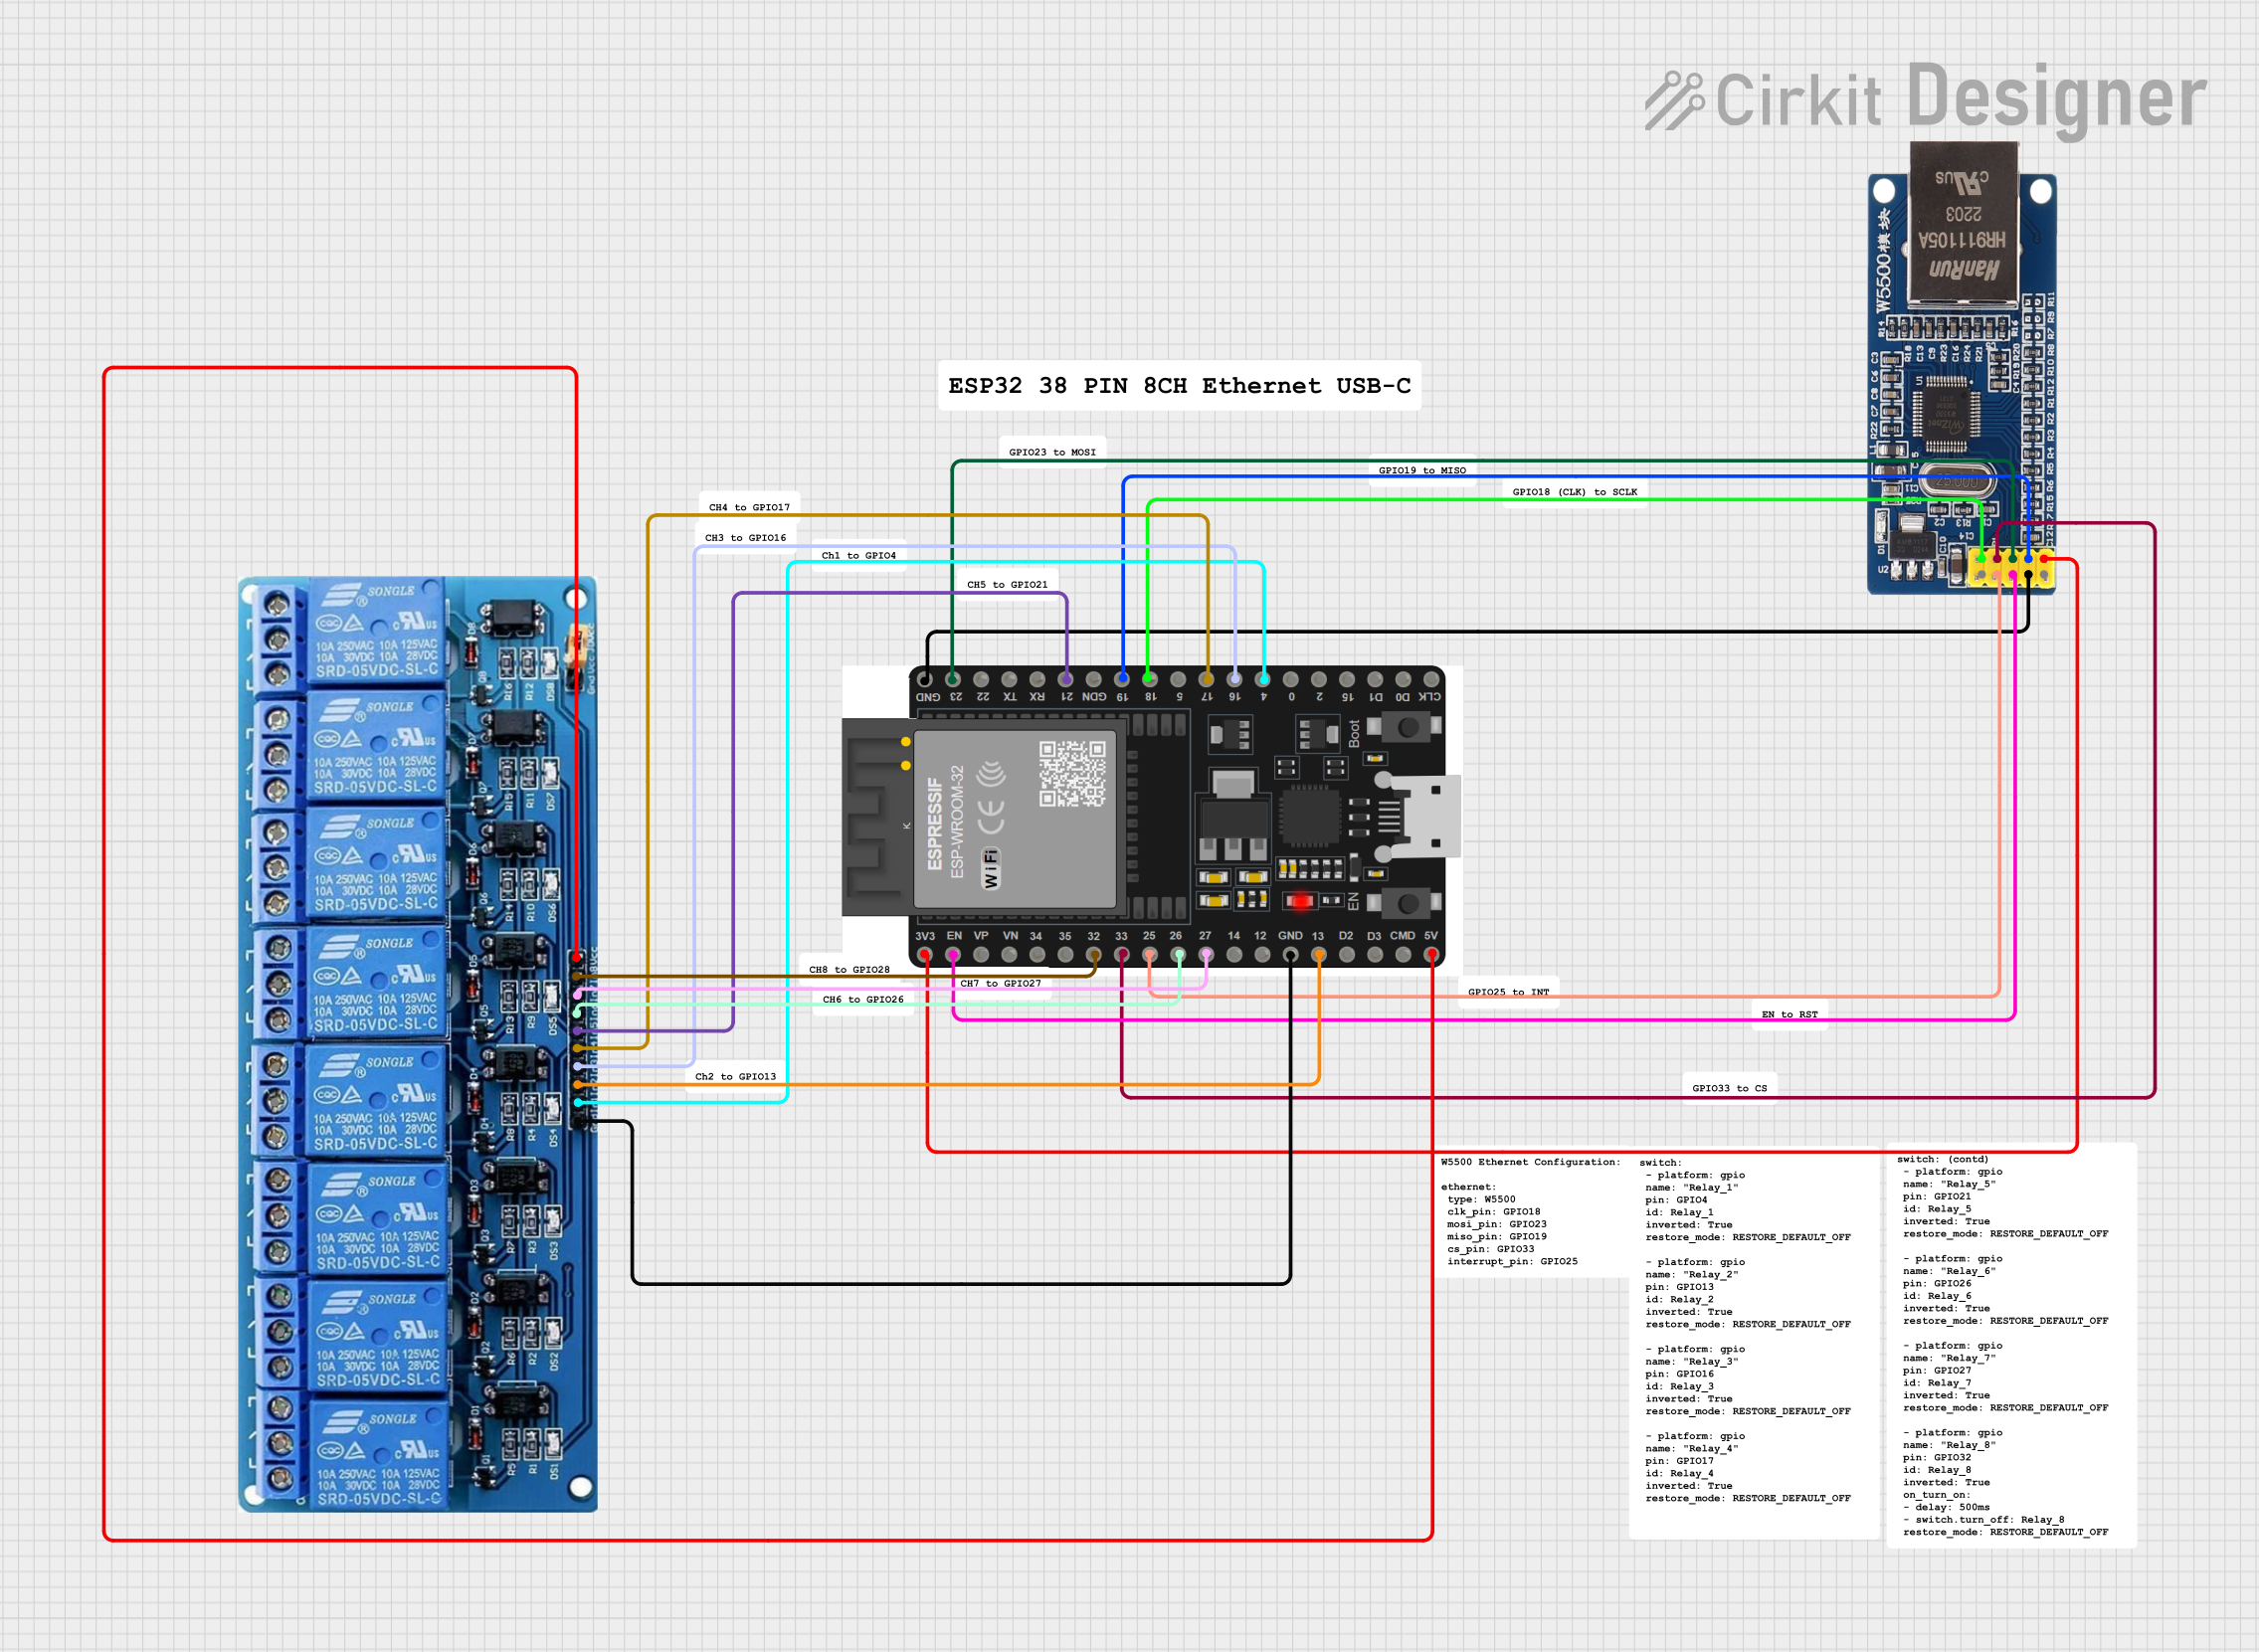
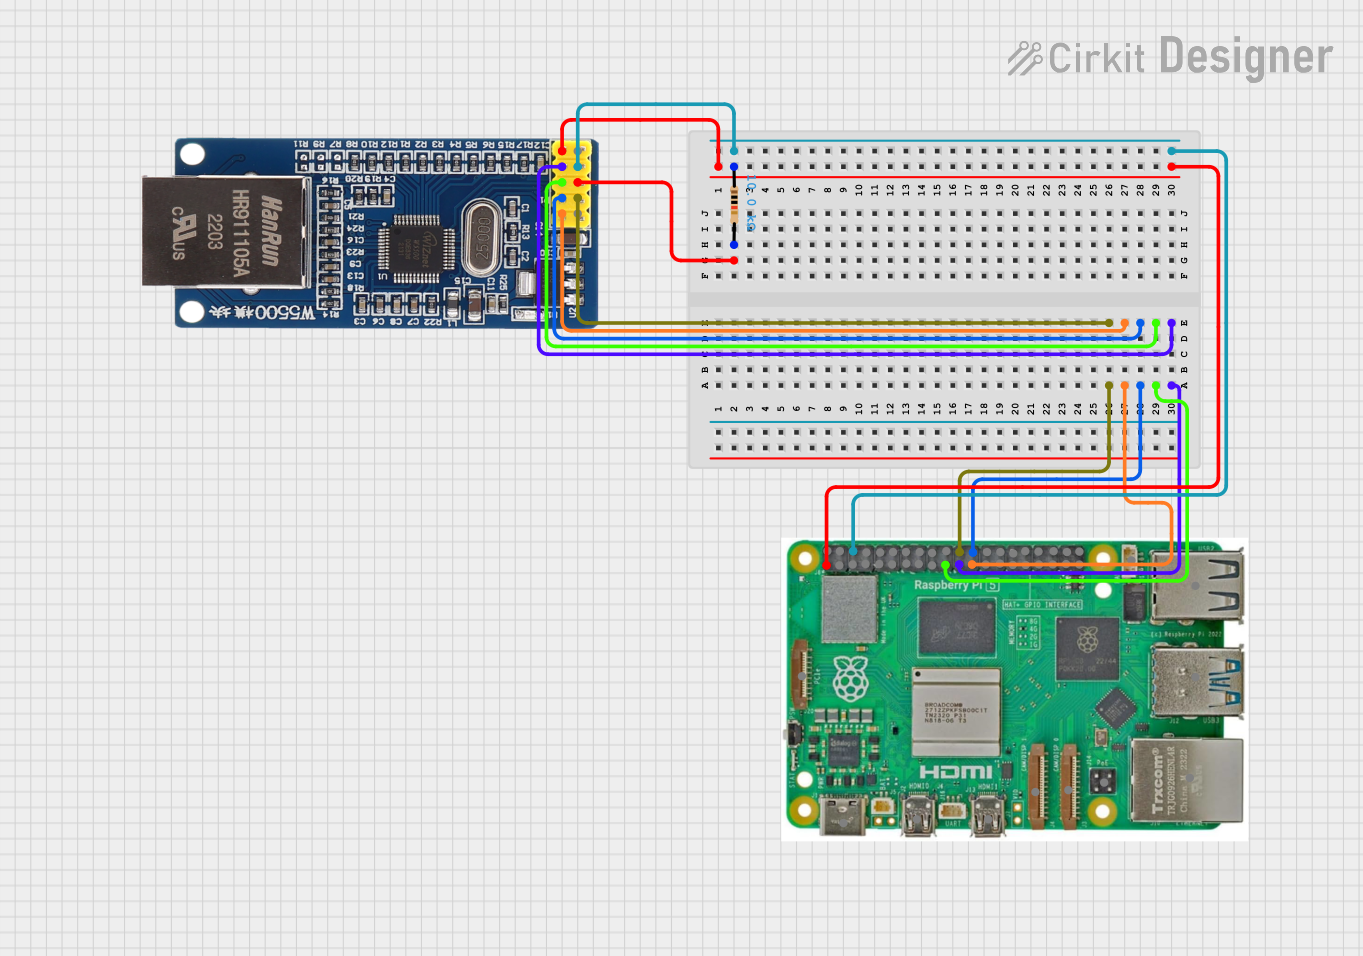
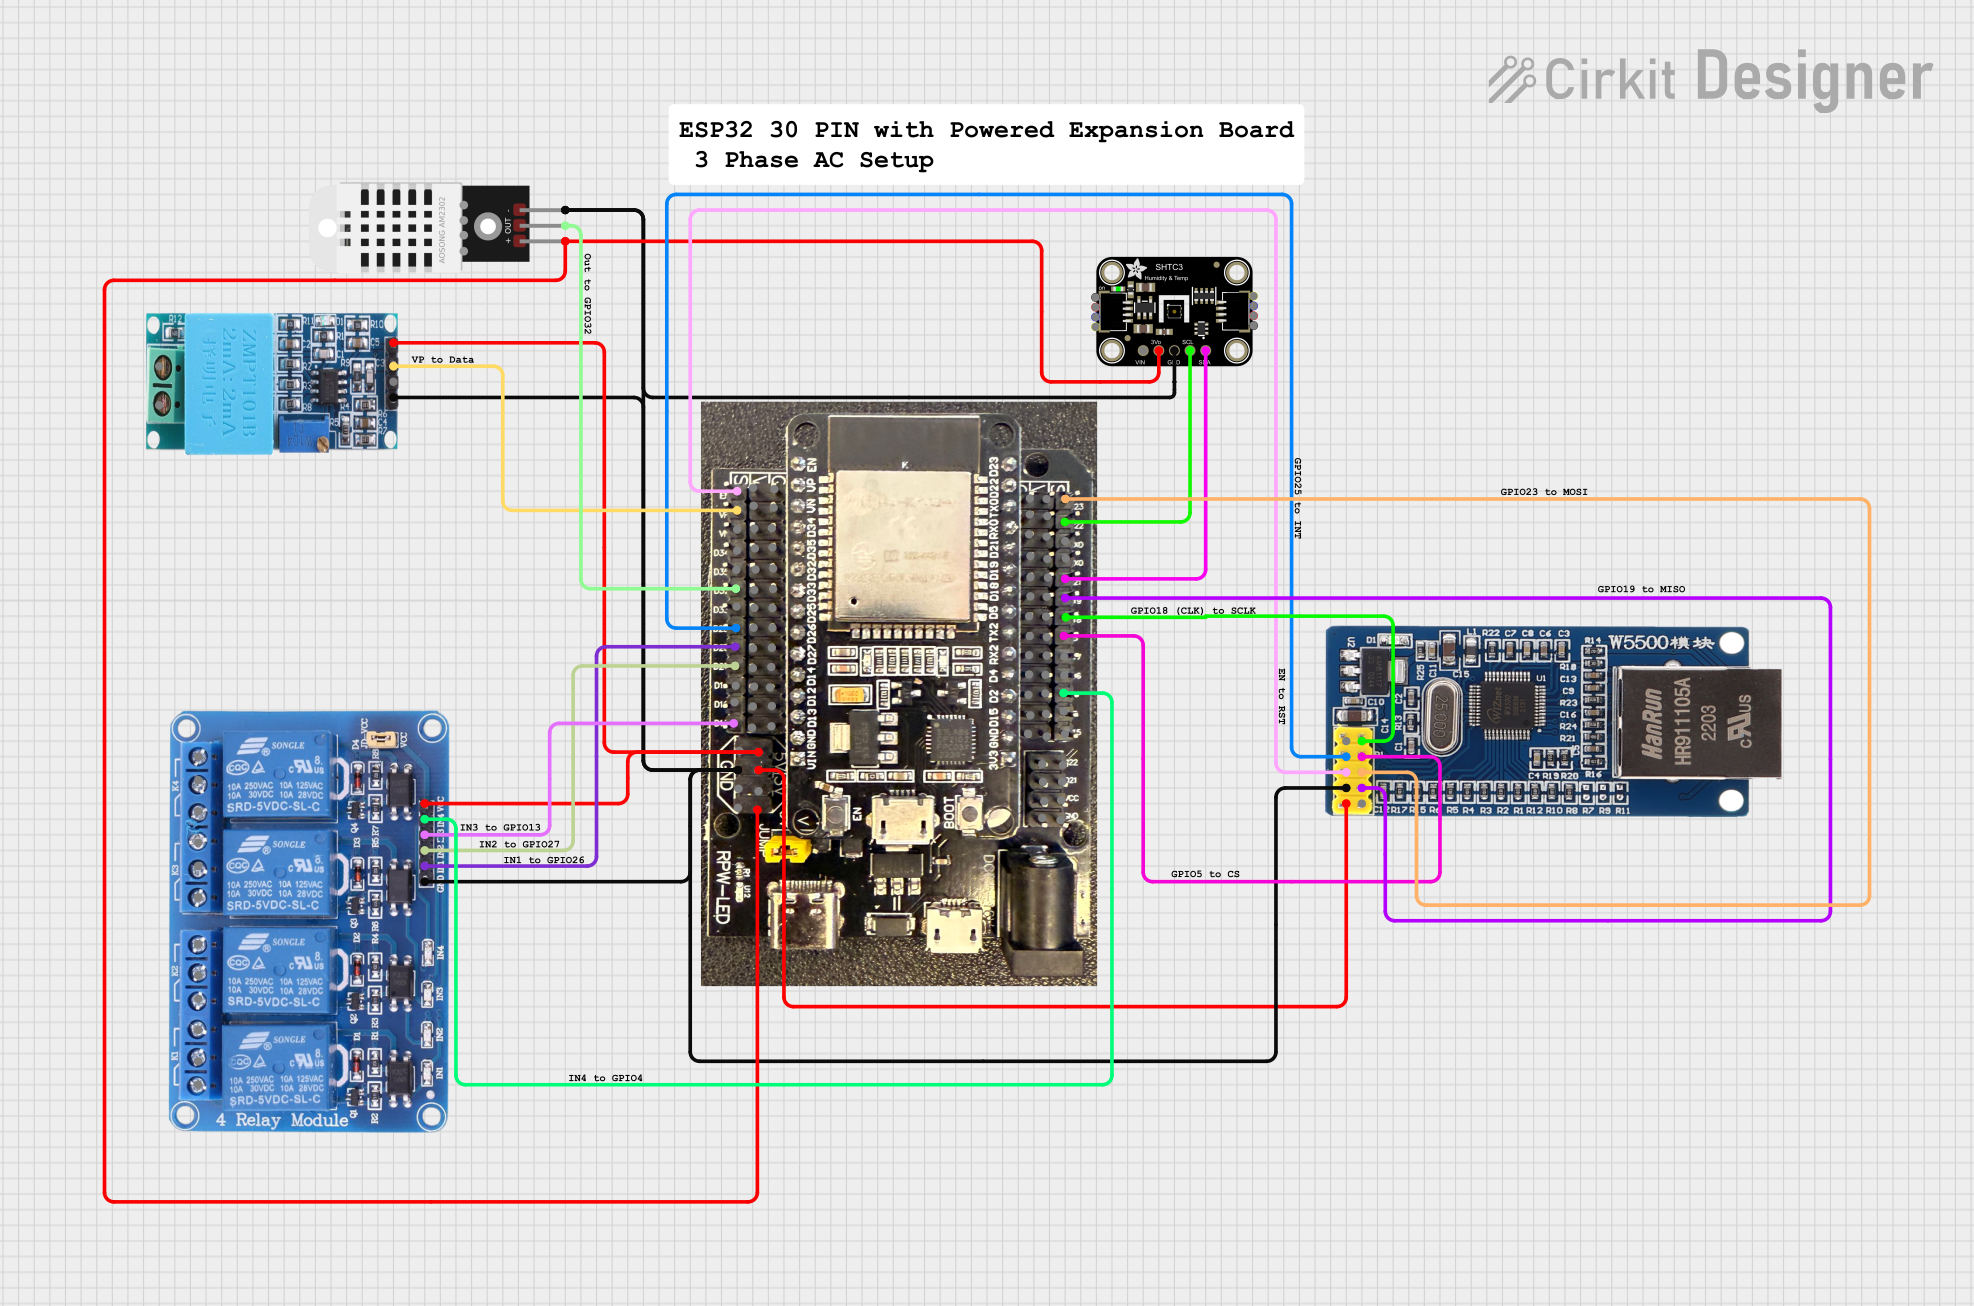
Explore Projects Built with W5500 Lite Ethernet
Common Applications and Use Cases
- IoT devices
- Networked sensors and controllers
- Home automation systems
- Remote data logging
- Web servers for embedded systems
Technical Specifications
The W5500 Lite Ethernet module is designed to operate with a wide range of microcontrollers, including the popular Arduino UNO. Below are the key technical specifications and pin configurations for the module.
Key Technical Details
- Voltage: 3.3V (5V tolerant I/O)
- Current: Typical 132 mA
- Power Ratings: 3.3V supply recommended
- Network Interface: Ethernet (10/100 Base-T)
- Protocols Supported: TCP, UDP, ICMP, IPv4, ARP, IGMP, PPPoE
- Connector Type: RJ-45
- Operating Temperature: -40°C to 85°C
Pin Configuration and Descriptions
| Pin Number | Pin Name | Description |
|---|---|---|
| 1 | VCC | Power supply (3.3V input) |
| 2 | GND | Ground |
| 3 | SCS | SPI Chip Select |
| 4 | SCLK | SPI Clock |
| 5 | MISO | Master In Slave Out (SPI Bus) |
| 6 | MOSI | Master Out Slave In (SPI Bus) |
| 7 | INT | Interrupt Output (Active Low) |
| 8 | RST | Reset Input (Active Low) |
Usage Instructions
Connecting to a Circuit
To use the W5500 Lite Ethernet module with a microcontroller like the Arduino UNO, follow these steps:
- Connect the VCC pin to the 3.3V output on the Arduino.
- Connect the GND pin to a ground pin on the Arduino.
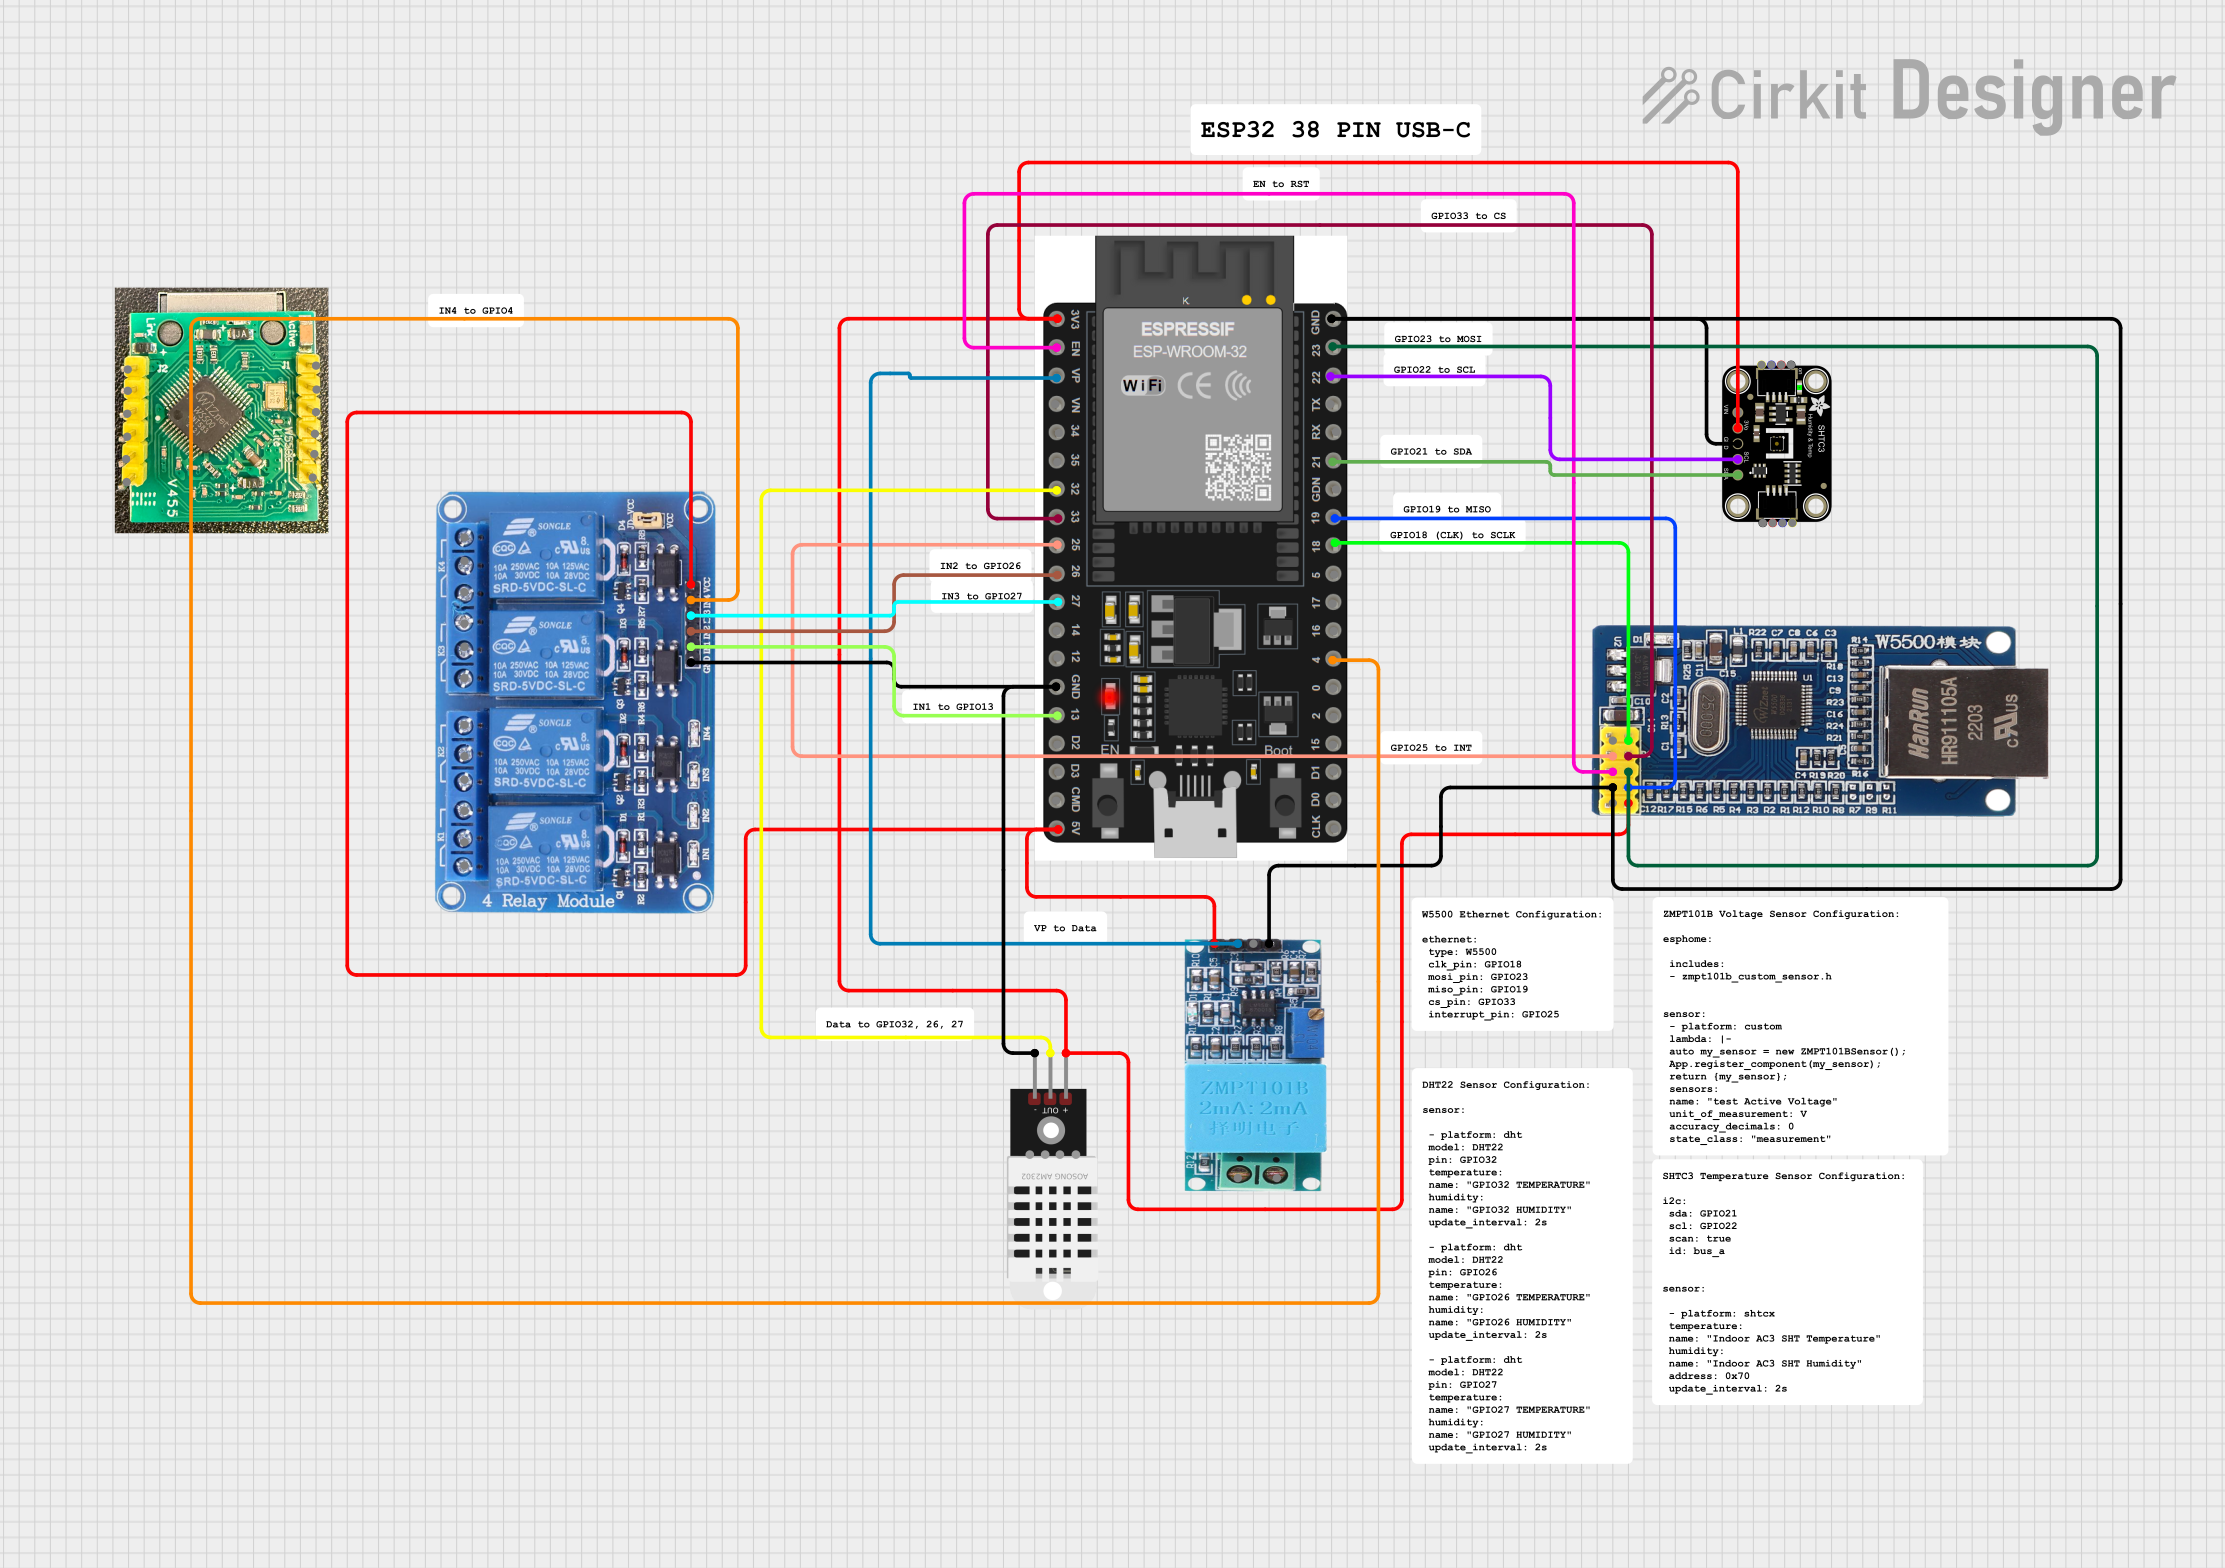
- Connect the SCS, SCLK, MISO, and MOSI pins to the corresponding SPI pins on the Arduino.
- Optionally, connect the INT pin to an interrupt-capable pin on the Arduino if you wish to use interrupt-driven programming.
- Connect the RST pin to a digital pin on the Arduino for software reset capability.
Important Considerations and Best Practices
- Ensure that the power supply is stable and within the specified voltage range.
- Use a level shifter if you are interfacing with a 5V microcontroller to protect the module's 3.3V logic.
- Keep the Ethernet cable away from high-power lines to avoid electromagnetic interference.
- Use proper decoupling capacitors close to the module's power pins to minimize power supply noise.
Example Code for Arduino UNO
#include <SPI.h>
#include <Ethernet.h>

// MAC address for the Ethernet shield
byte mac[] = { 0xDE, 0xAD, 0xBE, 0xEF, 0xFE, 0xED };

// Initialize the Ethernet client library
EthernetClient client;

void setup() {
  // Open serial communications and wait for port to open:
  Serial.begin(9600);
  while (!Serial) {
    ; // Wait for serial port to connect. Needed for native USB port only
  }

  // Start the Ethernet connection:
  if (Ethernet.begin(mac) == 0) {
    Serial.println("Failed to configure Ethernet using DHCP");
    // No point in carrying on, so do nothing forevermore:
    for (;;)
      ;
  }
  // Print your local IP address:
  Serial.print("My IP address: ");
  Serial.println(Ethernet.localIP());
}

void loop() {
  // You can add your logic here to send/receive data
}
Troubleshooting and FAQs
Common Issues
- No Network Connection: Ensure that the Ethernet cable is properly connected and that the router or switch is operational.
- Module Not Responding: Check the power supply and ensure that the module's pins are correctly connected to the microcontroller.
- Inconsistent Data Transfer: Verify the integrity of the SPI connections and ensure that there is no electromagnetic interference affecting the signals.
Solutions and Tips for Troubleshooting
- Always double-check wiring and connections.
- Use the
Ethernet.hlibrary's diagnostic functions to check for network status and errors. - Reset the module using the RST pin if it becomes unresponsive.
- Ensure that the latest firmware is loaded onto the microcontroller.
FAQs
Q: Can the W5500 Lite Ethernet module be used with a 5V system?
A: Yes, but a level shifter is recommended to protect the 3.3V logic of the module.
Q: Does the module support Power over Ethernet (PoE)?
A: No, the W5500 Lite Ethernet module does not support PoE natively.
Q: Can I connect multiple W5500 modules to a single microcontroller?
A: Yes, you can connect multiple modules using separate chip select (SCS) lines for each module.
For further assistance, please refer to the manufacturer's support resources or community forums dedicated to the W5500 Lite Ethernet module.