How to Use Shelly Pro 3: Examples, Pinouts, and Specs
Introduction
The Shelly Pro 3 is a versatile smart relay designed for remote control and automation of electrical devices. Manufactured by Shelly, this device features Wi-Fi connectivity and is compatible with a wide range of home automation systems, including MQTT, REST API, and popular platforms like Home Assistant. With three independent relay channels, the Shelly Pro 3 is ideal for controlling lighting, appliances, and other electrical loads in residential, commercial, or industrial environments.
Explore Projects Built with Shelly Pro 3


Explore Projects Built with Shelly Pro 3
Common Applications and Use Cases
- Smart home automation for lighting, fans, and appliances.
- Remote control of electrical devices via mobile apps or voice assistants.
- Integration with home automation platforms like Home Assistant or OpenHAB.
- Energy monitoring and scheduling for efficient power usage.
- Industrial automation for controlling machinery or equipment.
Technical Specifications
Key Technical Details
| Parameter | Specification |
|---|---|
| Manufacturer | Shelly |
| Model | Pro 3 |
| Power Supply | 110-240V AC, 50/60Hz |
| Maximum Load per Channel | 16A |
| Total Device Load | 48A |
| Connectivity | Wi-Fi 802.11 b/g/n (2.4 GHz) |
| Control Channels | 3 independent relay channels |
| Operating Temperature | -20°C to +40°C |
| Dimensions | 90mm x 52mm x 57mm |
| Certifications | CE, RoHS |
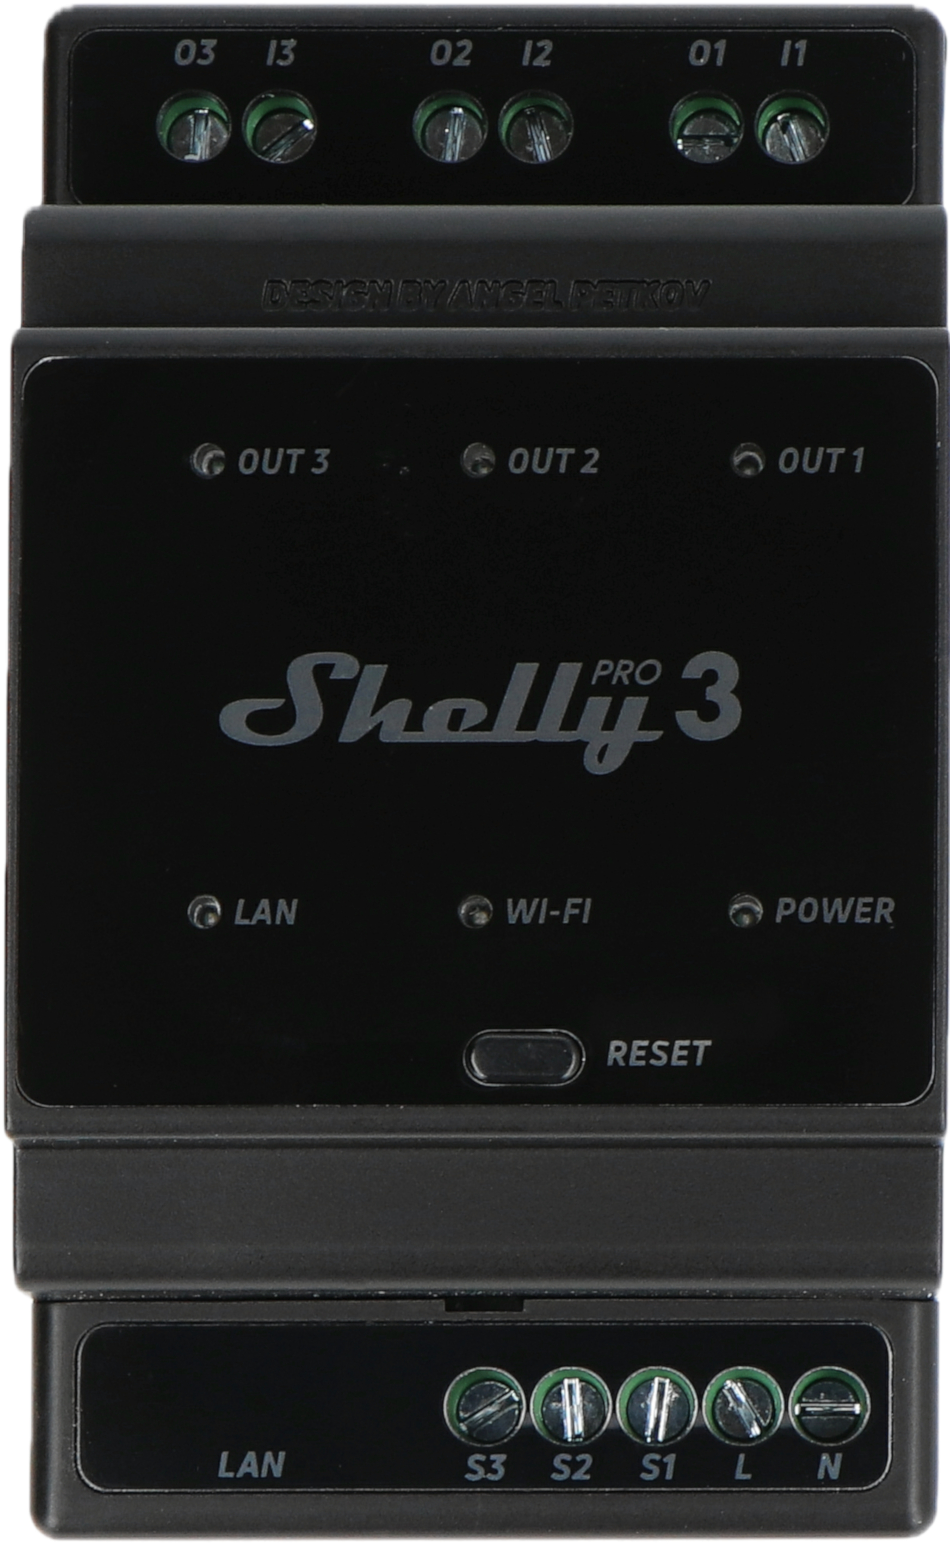
Pin Configuration and Descriptions
The Shelly Pro 3 features terminal blocks for wiring connections. Below is the pin configuration:
| Pin Label | Description |
|---|---|
| L | Live input for the device |
| N | Neutral input for the device |
| O1 | Output for Channel 1 |
| O2 | Output for Channel 2 |
| O3 | Output for Channel 3 |
| I1 | Input for Channel 1 (manual switch control) |
| I2 | Input for Channel 2 (manual switch control) |
| I3 | Input for Channel 3 (manual switch control) |
Usage Instructions
How to Use the Shelly Pro 3 in a Circuit
Wiring the Device:
- Connect the live (L) and neutral (N) wires to the respective input terminals.
- Connect the output terminals (O1, O2, O3) to the devices you want to control.
- Optionally, connect manual switches to the input terminals (I1, I2, I3) for local control.
Powering On:
- Once wired, power on the device by supplying 110-240V AC to the input terminals.
Connecting to Wi-Fi:
- Download the Shelly app on your smartphone.
- Follow the app instructions to connect the Shelly Pro 3 to your Wi-Fi network.
Configuring Automation:
- Use the Shelly app or integrate the device with your preferred home automation platform.
- Set up schedules, timers, or scenes for automated control.
Important Considerations and Best Practices
- Ensure the total load on the device does not exceed 48A.
- Use appropriate circuit breakers for safety.
- Avoid exposing the device to extreme temperatures or moisture.
- For advanced users, the Shelly Pro 3 supports MQTT and REST API for custom integrations.
Example: Connecting to an Arduino UNO
The Shelly Pro 3 can be controlled via MQTT, which can be integrated with an Arduino UNO using an Ethernet or Wi-Fi shield. Below is an example of Arduino code to send MQTT commands to the Shelly Pro 3:
#include <PubSubClient.h>
#include <WiFi.h>

// Wi-Fi credentials
const char* ssid = "YourWiFiSSID";
const char* password = "YourWiFiPassword";

// MQTT broker details
const char* mqtt_server = "192.168.1.100"; // Replace with your MQTT broker IP
const int mqtt_port = 1883;
const char* mqtt_user = "mqtt_user";       // Replace with your MQTT username
const char* mqtt_password = "mqtt_pass";  // Replace with your MQTT password

WiFiClient espClient;
PubSubClient client(espClient);

void setup() {
  Serial.begin(115200);

  // Connect to Wi-Fi
  WiFi.begin(ssid, password);
  while (WiFi.status() != WL_CONNECTED) {
    delay(500);
    Serial.print(".");
  }
  Serial.println("\nWiFi connected");

  // Connect to MQTT broker
  client.setServer(mqtt_server, mqtt_port);
  while (!client.connected()) {
    if (client.connect("ArduinoClient", mqtt_user, mqtt_password)) {
      Serial.println("Connected to MQTT broker");
    } else {
      Serial.print("Failed to connect, rc=");
      Serial.print(client.state());
      delay(2000);
    }
  }
}

void loop() {
  // Example: Turn on Channel 1 of Shelly Pro 3
  if (client.connected()) {
    client.publish("shellypro3/relay/0/command", "on");
    delay(5000); // Wait 5 seconds
    client.publish("shellypro3/relay/0/command", "off");
    delay(5000); // Wait 5 seconds
  }
}
Troubleshooting and FAQs
Common Issues and Solutions
Device Not Connecting to Wi-Fi:
- Ensure the Wi-Fi network is 2.4 GHz (Shelly Pro 3 does not support 5 GHz).
- Check that the Wi-Fi credentials are entered correctly in the Shelly app.
Relay Channels Not Responding:
- Verify the wiring connections and ensure the load does not exceed the rated capacity.
- Check the Shelly app or automation platform for proper configuration.
Device Overheating:
- Ensure the device is installed in a well-ventilated area.
- Avoid exceeding the maximum load per channel or total device load.
MQTT Commands Not Working:
- Verify the MQTT broker IP, port, username, and password.
- Ensure the Shelly Pro 3 is configured to use MQTT in its settings.
FAQs
Can the Shelly Pro 3 be used outdoors?
- No, the Shelly Pro 3 is designed for indoor use only. Use a weatherproof enclosure if outdoor installation is required.
Does the Shelly Pro 3 support dimming?
- No, the Shelly Pro 3 is a relay switch and does not support dimming functionality.
Can I control the Shelly Pro 3 without the internet?
- Yes, the device can be controlled locally via its web interface or local MQTT server.
Is the Shelly Pro 3 compatible with voice assistants?
- Yes, it is compatible with Google Assistant and Amazon Alexa.
This concludes the documentation for the Shelly Pro 3. For further assistance, refer to the official Shelly support resources.