
How to Use SparkFun LilyPad Vibe Board: Examples, Pinouts, and Specs
 Design with SparkFun LilyPad Vibe Board in Cirkit Designer
Introduction
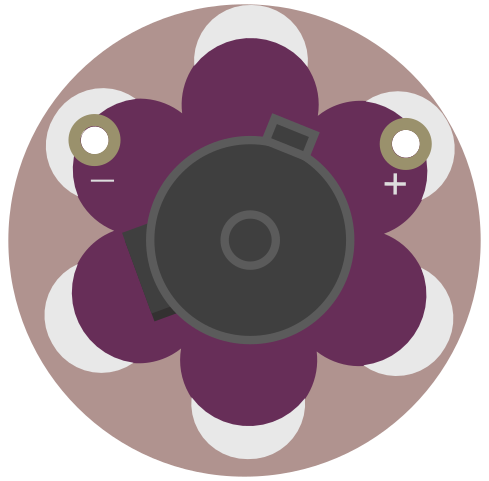
The SparkFun LilyPad Vibe Board (Manufacturer Part ID: DEV-08468) is a small, lightweight vibration motor board designed specifically for wearable electronics. It features a compact design, low power consumption, and seamless integration with microcontrollers, making it ideal for projects that require haptic feedback or silent notifications.
Explore Projects Built with SparkFun LilyPad Vibe Board
 Open Project in Cirkit Designer
 Open Project in Cirkit Designer
 Open Project in Cirkit Designer
 Open Project in Cirkit Designer
Explore Projects Built with SparkFun LilyPad Vibe Board
Open Project in Cirkit DesignerOpen Project in Cirkit DesignerOpen Project in Cirkit DesignerOpen Project in Cirkit DesignerCommon Applications and Use Cases
- Wearable electronics for haptic feedback
- Silent notifications in smart clothing
- Tactile feedback in assistive devices
- Interactive art and design projects
- Educational projects involving microcontrollers like Arduino
Technical Specifications
The following table outlines the key technical details of the SparkFun LilyPad Vibe Board:
| Parameter | Specification |
|---|---|
| Operating Voltage | 2.7V - 5.5V |
| Operating Current | ~80mA (at 3.3V) |
| Motor Type | Eccentric Rotating Mass (ERM) motor |
| Dimensions | 20mm diameter |
| Weight | ~1.5g |
| Mounting | Sewable pads for wearable projects |
Pin Configuration and Descriptions
The LilyPad Vibe Board has two sewable connection pads:
| Pin | Label | Description |
|---|---|---|
| 1 | + |
Positive voltage input (2.7V - 5.5V) |
| 2 | - |
Ground connection |
Usage Instructions
How to Use the Component in a Circuit
- Powering the Board: Connect the
+pad to a power source (2.7V - 5.5V) and the-pad to ground. The board can be powered directly from a microcontroller's GPIO pin or an external power supply. - Controlling the Vibration: To control the vibration motor, use a microcontroller's GPIO pin to toggle the power to the
+pad. For PWM (Pulse Width Modulation) control, connect the+pad to a PWM-capable GPIO pin to adjust the vibration intensity. - Integration with Wearables: Use conductive thread to sew the board into fabric and connect it to other LilyPad components or a microcontroller.
Important Considerations and Best Practices
- Current Limitation: Ensure the GPIO pin used to power the board can supply sufficient current (~80mA). If not, use a transistor or MOSFET to drive the motor.
- Voltage Range: Do not exceed the maximum operating voltage of 5.5V to avoid damaging the motor.
- Mounting: Secure the board properly in wearable projects to prevent damage from movement or stress on the connections.
- Heat Dissipation: Although the motor is low-power, prolonged use may generate slight heat. Ensure proper ventilation in enclosed designs.
Example Code for Arduino UNO
The following example demonstrates how to control the LilyPad Vibe Board using an Arduino UNO:
// Define the pin connected to the LilyPad Vibe Board
const int vibePin = 9; // Use a PWM-capable pin for intensity control

void setup() {
  pinMode(vibePin, OUTPUT); // Set the pin as an output
}

void loop() {
  // Turn the motor on for 1 second
  digitalWrite(vibePin, HIGH); // Send HIGH signal to power the motor
  delay(1000); // Wait for 1 second

  // Turn the motor off for 1 second
  digitalWrite(vibePin, LOW); // Send LOW signal to stop the motor
  delay(1000); // Wait for 1 second
}
For PWM control to adjust vibration intensity, replace digitalWrite with analogWrite:
// Example of PWM control for vibration intensity
void loop() {
  // Gradually increase vibration intensity
  for (int i = 0; i <= 255; i += 5) {
    analogWrite(vibePin, i); // Set PWM value (0-255)
    delay(50); // Short delay for smooth ramp-up
  }

  // Gradually decrease vibration intensity
  for (int i = 255; i >= 0; i -= 5) {
    analogWrite(vibePin, i); // Set PWM value (0-255)
    delay(50); // Short delay for smooth ramp-down
  }
}
Troubleshooting and FAQs
Common Issues Users Might Face
Motor Not Vibrating:
- Cause: Insufficient power supply or incorrect wiring.
- Solution: Verify the voltage and current supplied to the
+pad. Ensure proper connections to the+and-pads.
Weak Vibration:
- Cause: Low PWM duty cycle or insufficient voltage.
- Solution: Increase the PWM duty cycle or ensure the supply voltage is within the recommended range.
Overheating:
- Cause: Prolonged operation at maximum voltage or current.
- Solution: Reduce the operating time or use PWM to limit the motor's duty cycle.
Intermittent Operation:
- Cause: Loose connections or poor soldering/sewing.
- Solution: Check and secure all connections. Use conductive thread or solder properly.
Solutions and Tips for Troubleshooting
- Use a multimeter to verify voltage and continuity in the circuit.
- Test the motor with a direct power source to confirm functionality.
- If using conductive thread, ensure tight and secure stitches to maintain good electrical contact.
- For wearable projects, avoid placing the board in areas prone to excessive bending or stress.
By following this documentation, you can effectively integrate the SparkFun LilyPad Vibe Board into your projects and troubleshoot any issues that arise.