How to Use LVD: Examples, Pinouts, and Specs

Introduction
A Low Voltage Disconnect (LVD) is a protective device designed to disconnect a battery from its load when the battery voltage falls below a predefined threshold. This functionality prevents over-discharge, which can damage the battery and significantly reduce its lifespan. LVDs are commonly used in off-grid solar systems, backup power systems, and other battery-powered applications to ensure reliable operation and battery longevity.
Explore Projects Built with LVD


Explore Projects Built with LVD
Common Applications and Use Cases
- Off-grid solar power systems to protect deep-cycle batteries.
- Backup power systems for critical equipment.
- Automotive and marine battery systems.
- Portable power stations and uninterruptible power supplies (UPS).
- Any application requiring battery protection from over-discharge.
Technical Specifications
Below are the general technical specifications for a typical LVD. Specific values may vary depending on the manufacturer and model.
| Parameter | Value |
|---|---|
| Operating Voltage Range | 6V to 48V (model-dependent) |
| Disconnect Voltage | Adjustable (e.g., 10.5V for 12V systems) |
| Reconnect Voltage | Adjustable (e.g., 12.5V for 12V systems) |
| Maximum Load Current | 10A to 100A (model-dependent) |
| Power Consumption | < 10mA (standby mode) |
| Operating Temperature | -20°C to 60°C |
| Protection Features | Overload, short circuit, reverse polarity |
Pin Configuration and Descriptions
The LVD typically has the following terminals or pins for connection:
| Pin/Terminal | Description |
|---|---|
| Battery (+) | Positive terminal for battery connection. |
| Battery (-) | Negative terminal for battery connection. |
| Load (+) | Positive terminal for load connection. |
| Load (-) | Negative terminal for load connection. |
| Control Input | Optional input for external control or override. |
| Status Output | Optional output to indicate LVD status (e.g., LED). |
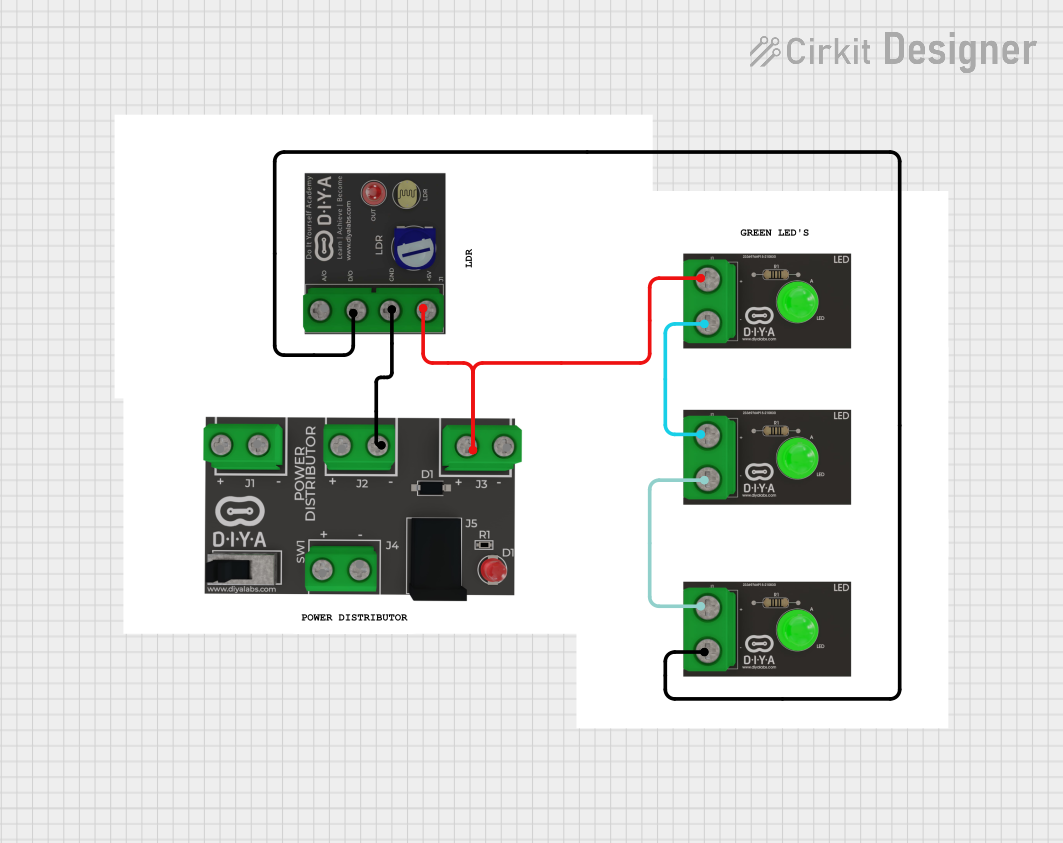
Usage Instructions
How to Use the LVD in a Circuit
- Connect the Battery:
- Connect the positive terminal of the battery to the
Battery (+)pin. - Connect the negative terminal of the battery to the
Battery (-)pin.
- Connect the positive terminal of the battery to the
- Connect the Load:
- Connect the positive terminal of the load to the
Load (+)pin. - Connect the negative terminal of the load to the
Load (-)pin.
- Connect the positive terminal of the load to the
- Adjust Voltage Thresholds (if applicable):
- Use the adjustment knobs or programming interface (if available) to set the disconnect and reconnect voltage levels according to your battery's specifications.
- Power On:
- Ensure all connections are secure, then power on the system. The LVD will monitor the battery voltage and disconnect the load if the voltage drops below the set threshold.
Important Considerations and Best Practices
- Set Proper Voltage Levels: Ensure the disconnect and reconnect voltage levels are appropriate for your battery type (e.g., lead-acid, lithium-ion).
- Check Current Ratings: Verify that the LVD's maximum load current rating exceeds the current draw of your load.
- Use Proper Wiring: Use wires with sufficient gauge to handle the current without excessive voltage drop or overheating.
- Monitor Status: If the LVD has a status output, connect it to an LED or microcontroller to monitor its operation.
- Avoid Overloading: Do not exceed the LVD's maximum current rating, as this may damage the device.
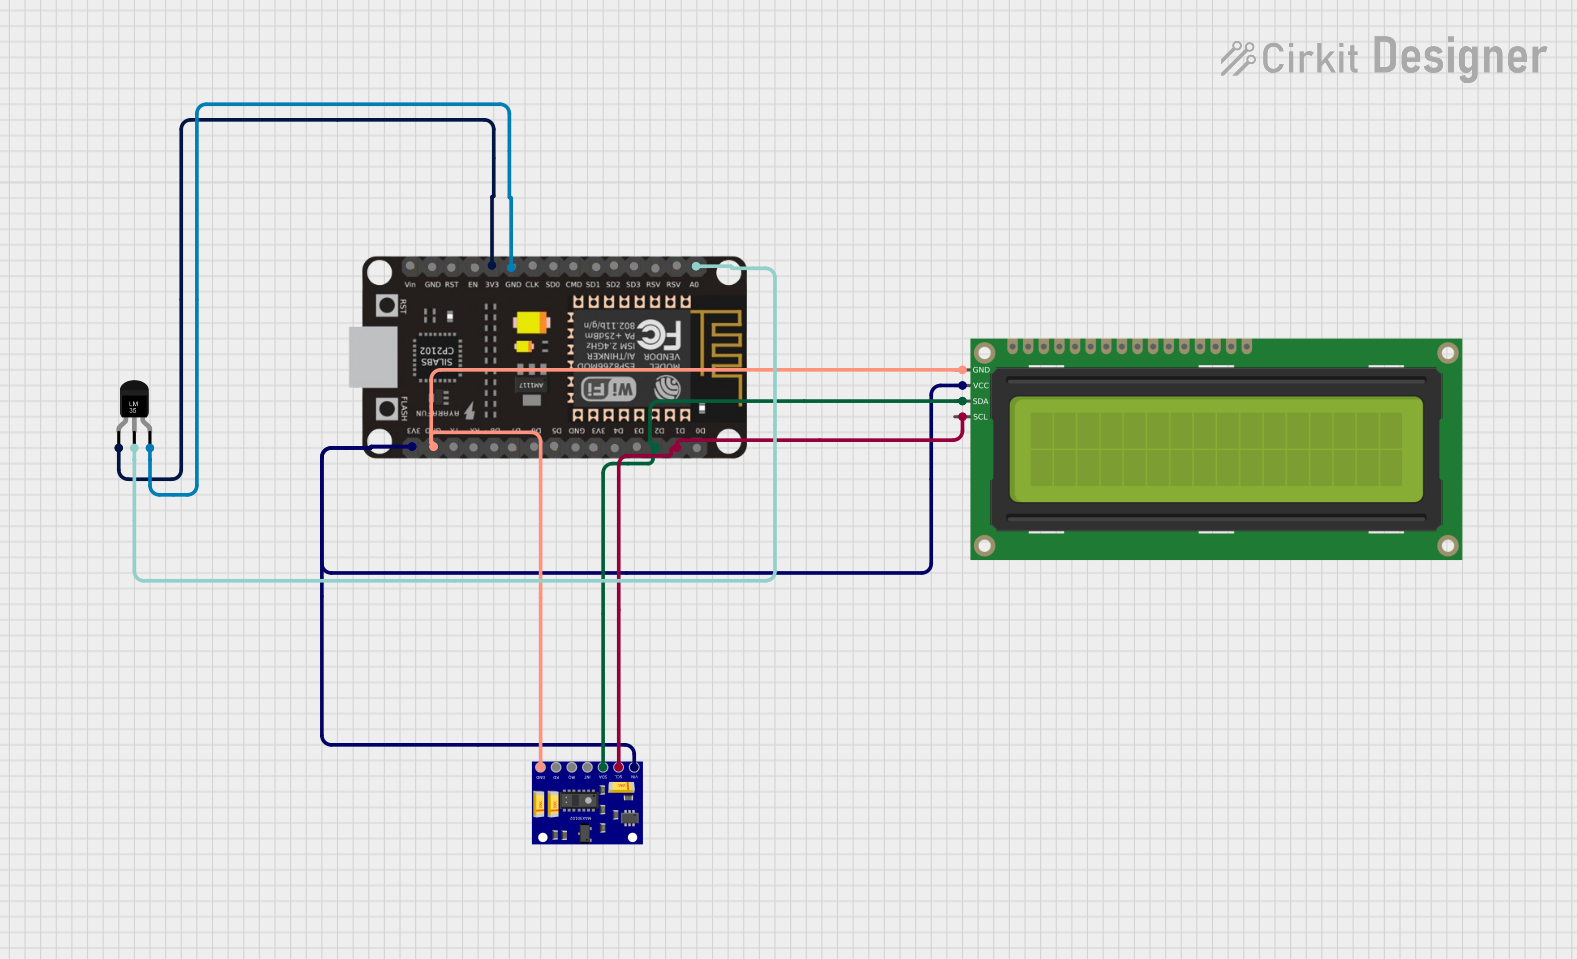
Example: Connecting an LVD to an Arduino UNO
If your LVD has a status output, you can use an Arduino UNO to monitor its state. Below is an example code snippet:
// Define the pin connected to the LVD status output
const int lvdStatusPin = 2; // Connect LVD status output to digital pin 2
const int ledPin = 13;      // Built-in LED for status indication

void setup() {
  pinMode(lvdStatusPin, INPUT); // Set LVD status pin as input
  pinMode(ledPin, OUTPUT);      // Set LED pin as output
  Serial.begin(9600);           // Initialize serial communication
}

void loop() {
  int lvdStatus = digitalRead(lvdStatusPin); // Read LVD status

  if (lvdStatus == HIGH) {
    // LVD is active (load disconnected)
    digitalWrite(ledPin, HIGH); // Turn on LED
    Serial.println("LVD Active: Load disconnected to protect battery.");
  } else {
    // LVD is inactive (load connected)
    digitalWrite(ledPin, LOW);  // Turn off LED
    Serial.println("LVD Inactive: Load connected.");
  }

  delay(1000); // Wait 1 second before next status check
}
Troubleshooting and FAQs
Common Issues and Solutions
| Issue | Possible Cause | Solution |
|---|---|---|
| LVD does not disconnect the load. | Incorrect disconnect voltage setting. | Verify and adjust the disconnect voltage. |
| LVD disconnects the load prematurely. | Voltage drop due to undersized wiring. | Use thicker wires to reduce voltage drop. |
| LVD does not reconnect the load. | Reconnect voltage set too high. | Lower the reconnect voltage to an appropriate level. |
| LVD status output not working. | Incorrect wiring or damaged output. | Check wiring and ensure the status output is functional. |
| Overheating of the LVD. | Load current exceeds LVD rating. | Reduce load current or use a higher-rated LVD. |
FAQs
Can I use an LVD with a lithium-ion battery?
- Yes, but ensure the disconnect and reconnect voltage levels are set according to the lithium-ion battery's specifications.
What happens if the LVD fails?
- Most LVDs are designed to fail in a safe state (disconnecting the load). However, regular maintenance and monitoring are recommended.
Can I use an LVD in a 24V system?
- Yes, as long as the LVD's operating voltage range includes 24V and the disconnect/reconnect thresholds are properly configured.
Is the LVD waterproof?
- Not all LVDs are waterproof. Check the product specifications and use a waterproof enclosure if necessary for outdoor applications.