Cirkit Designer Logo
Cirkit Designer
Your all-in-one circuit design IDE
Home / 
Component Documentation

How to Use MPR121 Capacitive Touch Keypad: Examples, Pinouts, and Specs

Image of MPR121 Capacitive Touch Keypad
Cirkit Designer LogoDesign with MPR121 Capacitive Touch Keypad in Cirkit Designer

Introduction

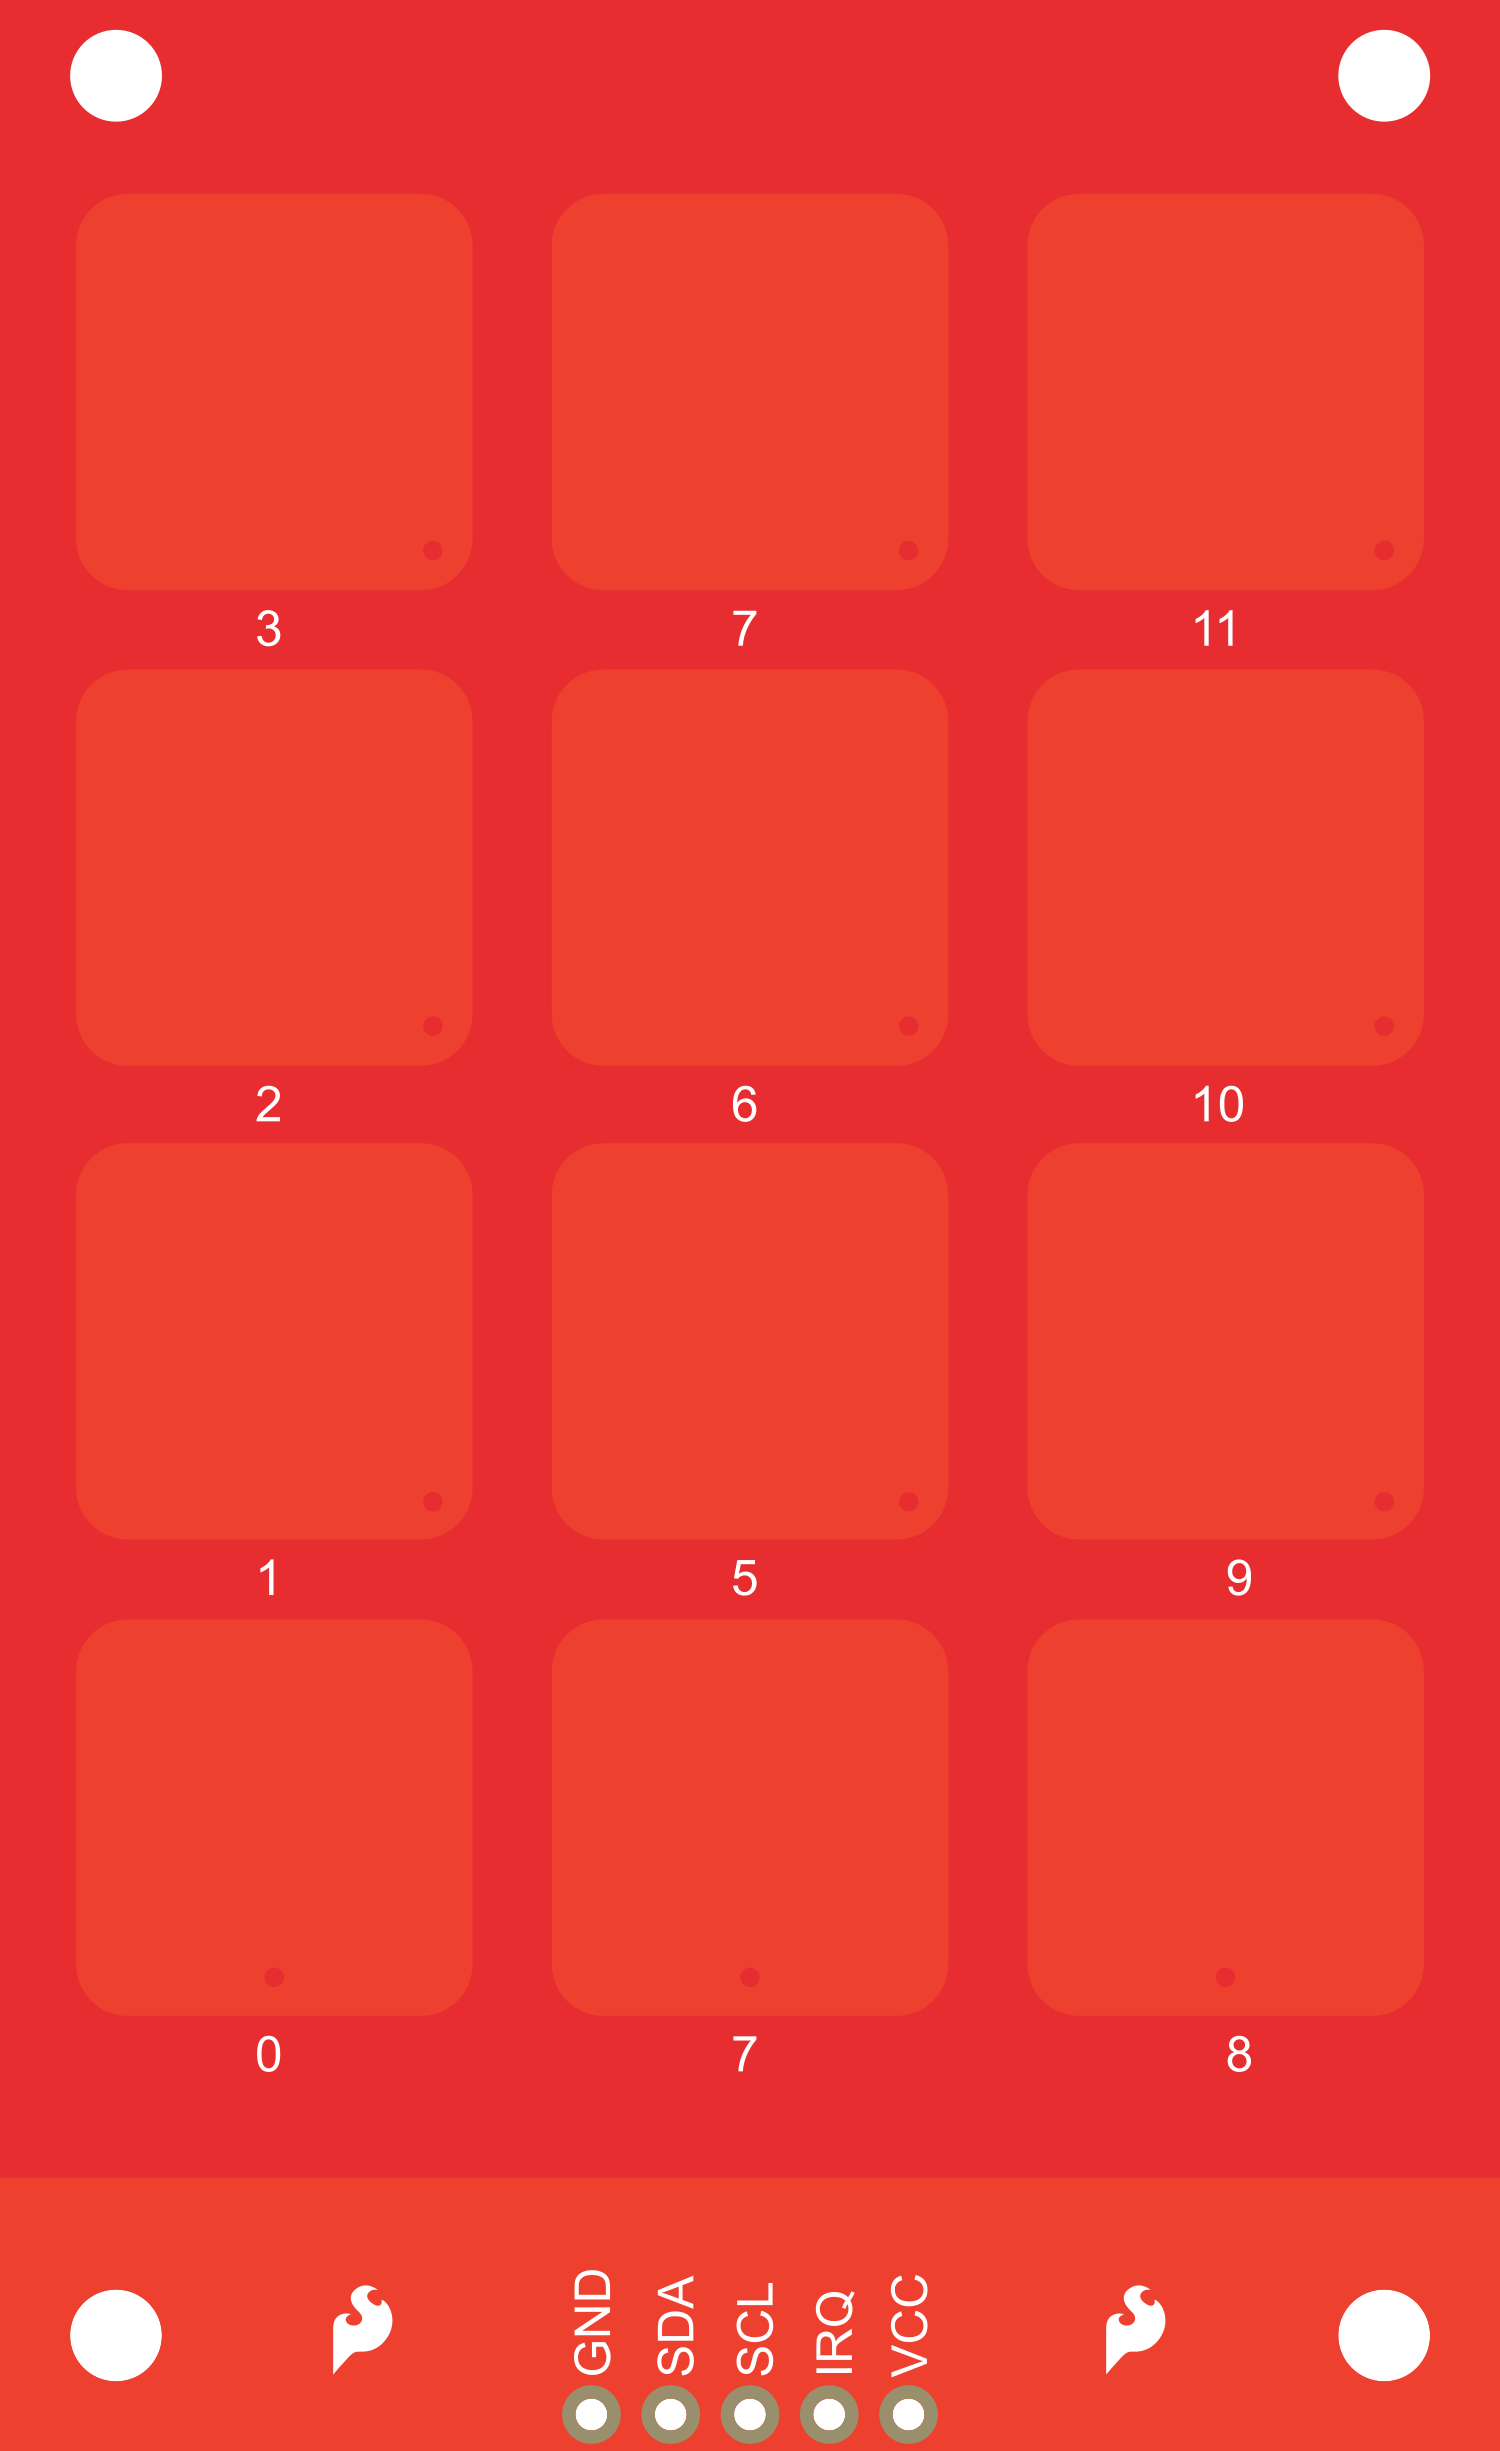
The MPR121 Capacitive Touch Keypad is an innovative touch-sensitive input device that leverages capacitive sensing technology to detect touch or proximity. It is designed to interface with a wide range of electronic projects and consumer products, providing a reliable and user-friendly interface. Common applications include touch-enabled keyboards, keypads, touch screens, and interactive surfaces.

Explore Projects Built with MPR121 Capacitive Touch Keypad

Use Cirkit Designer to design, explore, and prototype these projects online. Some projects support real-time simulation. Click "Open Project" to start designing instantly!
Touch-Sensitive Interface with Adafruit MPR121 and Feather 32u4 Bluefruit
Image of MPR121: A project utilizing MPR121 Capacitive Touch Keypad in a practical application
This circuit integrates an Adafruit MPR121 capacitive touch sensor with an Adafruit Feather 32u4 Bluefruit microcontroller. The MPR121 is powered by the Feather and communicates via I2C (SCL and SDA) to detect touch inputs, which can be processed or transmitted wirelessly by the Feather.
Cirkit Designer LogoOpen Project in Cirkit Designer
Adafruit Feather 32u4 Bluefruit with MPR121 Capacitive Touch Sensor Interface
Image of ALi WTSE: A project utilizing MPR121 Capacitive Touch Keypad in a practical application
This circuit integrates an Adafruit MPR121 capacitive touch sensor with an Adafruit Feather 32u4 Bluefruit microcontroller. The MPR121 is powered by the 3.3V supply from the Feather and communicates with the microcontroller via I2C, with SCL connected to pin 3 and SDA connected to pin 2 of the Feather. This setup allows the Feather to detect touch inputs from the MPR121 for further processing or wireless communication.
Cirkit Designer LogoOpen Project in Cirkit Designer
Arduino UNO R4 WiFi Capacitive Touch MIDI Controller with Visual Feedback and Sound Playback
Image of 自适应乐器: A project utilizing MPR121 Capacitive Touch Keypad in a practical application
This circuit is an interactive touch-based MIDI controller and audio player. It uses an Arduino UNO R4 WiFi to interface with an MPR121 capacitive touch sensor for input, a MAX7219 8-digit 7-segment display for visual feedback, and a DFPlayer MINI for audio output through a loudspeaker. The system detects touch inputs, plays corresponding sounds, and sends MIDI notes.
Cirkit Designer LogoOpen Project in Cirkit Designer
Arduino Mega 2560-Based Smart Home Control System with LCD Display and Flame Sensor
Image of Copy of schoolproject (1): A project utilizing MPR121 Capacitive Touch Keypad in a practical application
This circuit is a multi-functional embedded system featuring an Arduino Mega 2560 microcontroller that interfaces with a 4x4 membrane keypad, a 20x4 I2C LCD, an 8x8 LED matrix, a DS3231 RTC module, a passive buzzer, and a KY-026 flame sensor. The system is powered by a 5V PSU and is designed to provide real-time clock functionality, user input via the keypad, visual output on the LCD and LED matrix, and flame detection with an audible alert.
Cirkit Designer LogoOpen Project in Cirkit Designer

Explore Projects Built with MPR121 Capacitive Touch Keypad

Use Cirkit Designer to design, explore, and prototype these projects online. Some projects support real-time simulation. Click "Open Project" to start designing instantly!
Image of MPR121: A project utilizing MPR121 Capacitive Touch Keypad in a practical application
Touch-Sensitive Interface with Adafruit MPR121 and Feather 32u4 Bluefruit
This circuit integrates an Adafruit MPR121 capacitive touch sensor with an Adafruit Feather 32u4 Bluefruit microcontroller. The MPR121 is powered by the Feather and communicates via I2C (SCL and SDA) to detect touch inputs, which can be processed or transmitted wirelessly by the Feather.
Cirkit Designer LogoOpen Project in Cirkit Designer
Image of ALi WTSE: A project utilizing MPR121 Capacitive Touch Keypad in a practical application
Adafruit Feather 32u4 Bluefruit with MPR121 Capacitive Touch Sensor Interface
This circuit integrates an Adafruit MPR121 capacitive touch sensor with an Adafruit Feather 32u4 Bluefruit microcontroller. The MPR121 is powered by the 3.3V supply from the Feather and communicates with the microcontroller via I2C, with SCL connected to pin 3 and SDA connected to pin 2 of the Feather. This setup allows the Feather to detect touch inputs from the MPR121 for further processing or wireless communication.
Cirkit Designer LogoOpen Project in Cirkit Designer
Image of 自适应乐器: A project utilizing MPR121 Capacitive Touch Keypad in a practical application
Arduino UNO R4 WiFi Capacitive Touch MIDI Controller with Visual Feedback and Sound Playback
This circuit is an interactive touch-based MIDI controller and audio player. It uses an Arduino UNO R4 WiFi to interface with an MPR121 capacitive touch sensor for input, a MAX7219 8-digit 7-segment display for visual feedback, and a DFPlayer MINI for audio output through a loudspeaker. The system detects touch inputs, plays corresponding sounds, and sends MIDI notes.
Cirkit Designer LogoOpen Project in Cirkit Designer
Image of Copy of schoolproject (1): A project utilizing MPR121 Capacitive Touch Keypad in a practical application
Arduino Mega 2560-Based Smart Home Control System with LCD Display and Flame Sensor
This circuit is a multi-functional embedded system featuring an Arduino Mega 2560 microcontroller that interfaces with a 4x4 membrane keypad, a 20x4 I2C LCD, an 8x8 LED matrix, a DS3231 RTC module, a passive buzzer, and a KY-026 flame sensor. The system is powered by a 5V PSU and is designed to provide real-time clock functionality, user input via the keypad, visual output on the LCD and LED matrix, and flame detection with an audible alert.
Cirkit Designer LogoOpen Project in Cirkit Designer

Technical Specifications

Key Technical Details

  • Operating Voltage: 2.5V to 3.6V
  • Supply Current: 29uA (run mode), 3uA (stop mode)
  • Number of Electrodes: 12 touch-sensitive inputs
  • Communication: I2C interface
  • Resolution: 8-bit (256 levels) touch detection
  • Response Time: < 30ms
  • Sensitivity: Adjustable with internal registers

Pin Configuration and Descriptions

Pin Number Pin Name Description
1 SDA Serial Data Line for I2C communication
2 SCL Serial Clock Line for I2C communication
3 IRQ Interrupt Request (active low)
4 ADDR I2C Address select (tie to GND or VCC)
5 VSS Ground
6 VDD Power supply (2.5V to 3.6V)

Usage Instructions

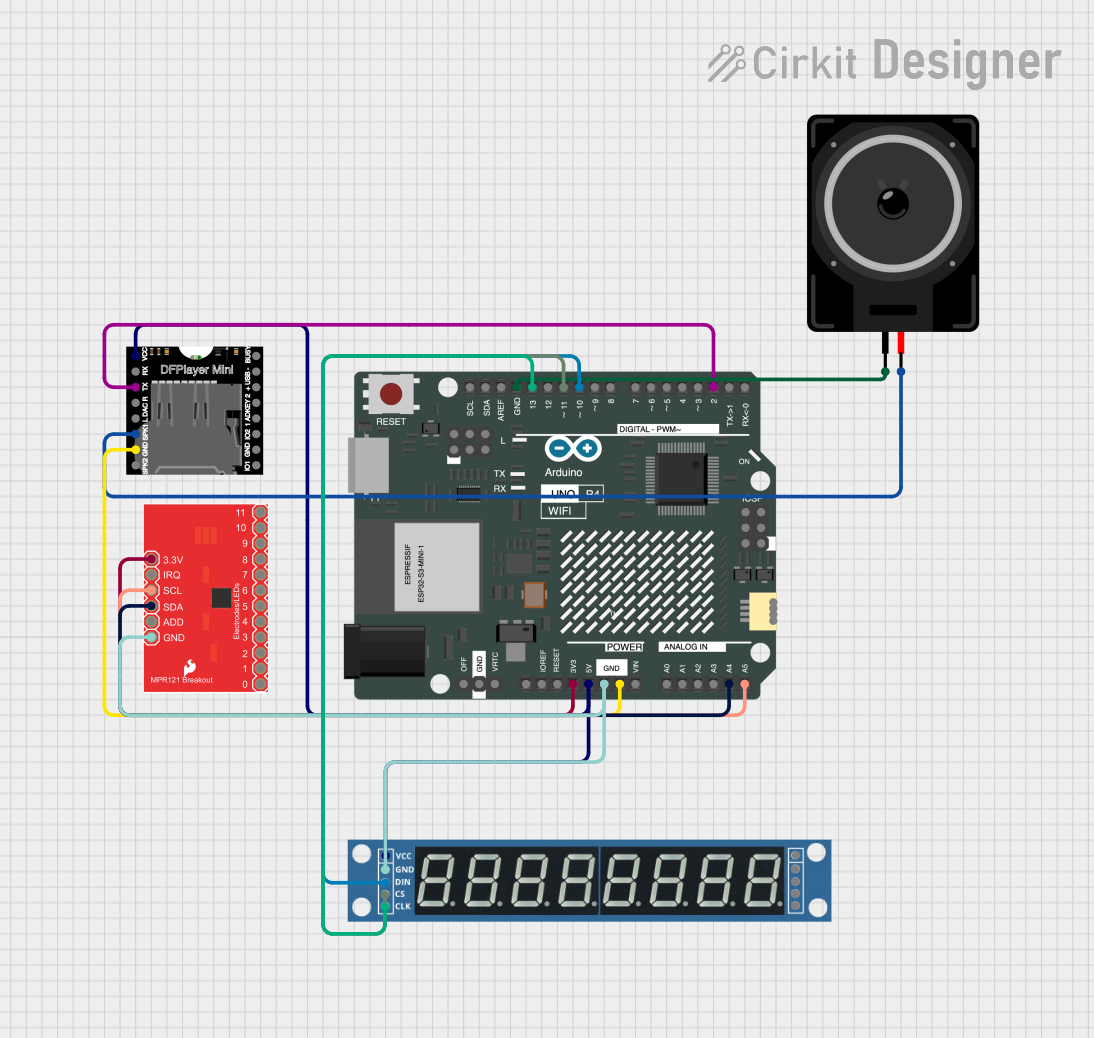
Integration with a Circuit

  1. Power Supply: Connect VDD to a 2.5V to 3.6V power source and VSS to ground.
  2. I2C Communication: Connect SDA and SCL to your microcontroller's I2C data and clock lines.
  3. Address Selection: Set the ADDR pin to either GND or VCC to select between the two possible I2C addresses.
  4. Interrupts: Optionally, connect the IRQ pin to an interrupt-capable pin on your microcontroller to detect touch events.

Best Practices

  • Use pull-up resistors on the SDA and SCL lines as required by the I2C protocol.
  • Avoid running long wires to the touch electrodes to minimize noise and interference.
  • Calibrate the sensitivity settings for your specific application environment.
  • Ensure that the power supply is stable and within the specified voltage range.

Example Code for Arduino UNO

#include <Wire.h>
#include <Adafruit_MPR121.h>

// You can have up to 4 on one i2c bus (by setting the ADD pin
// to different values), but this example will just use one
Adafruit_MPR121 cap = Adafruit_MPR121();

void setup() {
  Serial.begin(9600);
  while (!Serial) { // Necessary to wait for Serial on some platforms
    delay(10);
  }
  
  if (!cap.begin(0x5A)) {
    Serial.println("MPR121 not found, check wiring?");
    while (1);
  }
  Serial.println("MPR121 found!");
}

void loop() {
  // Get the currently touched pads
  uint16_t touched = cap.touched();
  
  for (uint8_t i=0; i<12; i++) {
    // Check if each pin is touched
    if (touched & (1 << i)) {
      Serial.print("C"); Serial.print(i); Serial.println(" is touched");
    }
  }
  
  // Optional: add a delay between reads for stability
  delay(100);
}

Troubleshooting and FAQs

Common Issues

  • No response from the keypad: Ensure that the I2C connections are correct and that the device is powered.
  • Intermittent touch detection: Check for loose connections and ensure that the electrodes are not too far from the touch surface.
  • False touch detections: Adjust the sensitivity settings and ensure there is no electrical noise affecting the device.

Solutions and Tips

  • Double-check wiring against the pin configuration table.
  • Use the provided library's calibration functions to adjust sensitivity.
  • Implement software debouncing to filter out spurious touch events.

FAQs

Q: Can the MPR121 operate at 5V? A: No, the MPR121 is designed to operate between 2.5V and 3.6V. Using a higher voltage can damage the device.

Q: How many touch sensors can I connect to a single microcontroller? A: You can connect up to 4 MPR121 sensors to a single I2C bus by using different ADDR pin configurations.

Q: Is it possible to detect the position of a swipe across multiple electrodes? A: The MPR121 can detect multiple simultaneous touches, but interpreting a swipe pattern requires additional software algorithms to process the touch data.

Remember to always consult the MPR121 datasheet for the most detailed and specific information regarding the operation and limitations of the device.