How to Use Ingcool 7 inch Touchscreen: Examples, Pinouts, and Specs
Introduction
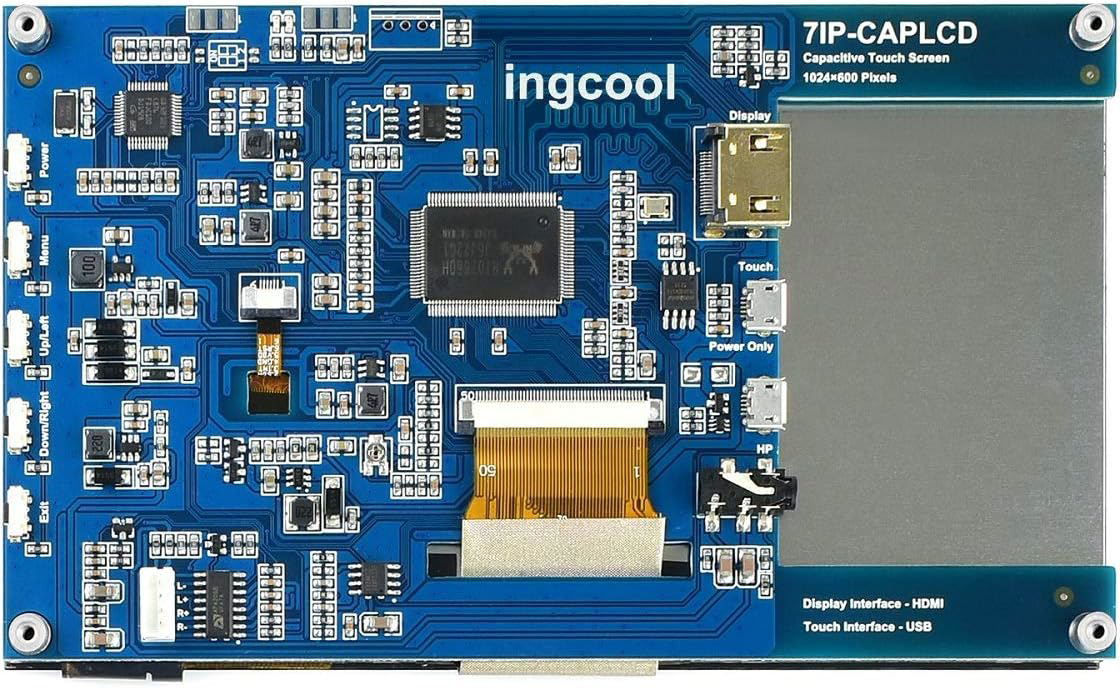
The Ingcool 7 inch Touchscreen (Part ID: 7IP-CAPLCD) is a high-resolution capacitive touchscreen display designed for interactive applications. With its 7-inch diagonal size, it provides a user-friendly interface for input and control in a variety of electronic projects. This display is ideal for use in embedded systems, IoT devices, industrial control panels, and DIY projects requiring a graphical user interface.
Explore Projects Built with Ingcool 7 inch Touchscreen


Explore Projects Built with Ingcool 7 inch Touchscreen
Common Applications
- Embedded systems with graphical user interfaces
- IoT devices with touch-based control
- Industrial automation and control panels
- DIY projects and prototyping
- Educational tools and interactive displays
Technical Specifications
The following table outlines the key technical details of the Ingcool 7 inch Touchscreen:
| Specification | Details |
|---|---|
| Display Type | Capacitive touchscreen |
| Screen Size | 7 inches (diagonal) |
| Resolution | 1024 x 600 pixels |
| Aspect Ratio | 16:9 |
| Touch Technology | 5-point multi-touch |
| Interface | HDMI for display, USB for touch |
| Power Supply | 5V DC (via USB or external source) |
| Operating Temperature | -20°C to 70°C |
| Dimensions | 164.9mm x 100mm x 5.7mm |
Pin Configuration and Descriptions
The Ingcool 7 inch Touchscreen uses HDMI and USB connections for operation. Below is a description of the key connectors:
| Connector | Pin/Port | Description |
|---|---|---|
| HDMI | HDMI Port | Transmits video signal to the display |
| USB | USB Port | Provides power and touch input functionality |
| Power Input | 5V DC | Optional external power input for the display |
Usage Instructions
Connecting the Display
- Power Supply: Connect the USB cable to a 5V power source (e.g., a USB port or power adapter). Alternatively, use the 5V DC input for external power.
- Video Signal: Connect the HDMI cable from your device (e.g., Raspberry Pi, PC, or Arduino with HDMI shield) to the display's HDMI port.
- Touch Input: Connect the USB cable to your device to enable touch functionality.
Using with an Arduino UNO
The Ingcool 7 inch Touchscreen is not directly compatible with the Arduino UNO due to the lack of an HDMI interface. However, you can use an HDMI shield or an intermediary device like a Raspberry Pi to interface the display with Arduino-based projects.
Important Considerations
- Ensure the power supply provides sufficient current (at least 1A) to avoid display flickering or instability.
- Use high-quality HDMI and USB cables to ensure reliable performance.
- Avoid exposing the display to extreme temperatures or moisture.
Example Code for Raspberry Pi
Below is an example of how to configure the touchscreen with a Raspberry Pi:
Example Python script to enable touch functionality on Raspberry Pi
Ensure the HDMI and USB cables are properly connected to the display.
import os
Set the display resolution to match the touchscreen
os.system("xrandr --output HDMI-1 --mode 1024x600")
Enable touch calibration (if needed)
Install xinput-calibrator if not already installed
os.system("sudo apt-get install -y xinput-calibrator")
print("Touchscreen setup complete. You can now use the display.")
Troubleshooting and FAQs
Common Issues
No Display Output
- Ensure the HDMI cable is securely connected to both the display and the source device.
- Verify that the source device is outputting video to the HDMI port.
- Check the power supply to ensure the display is receiving sufficient power.
Touchscreen Not Responding
- Confirm that the USB cable is connected to the source device.
- Check if the source device has the necessary drivers for touch input.
- Restart the device to reinitialize the touchscreen.
Display Flickering
- Verify that the power supply provides at least 1A of current.
- Use a shorter or higher-quality HDMI cable to reduce signal interference.
FAQs
Q: Can I use this display with a Raspberry Pi?
A: Yes, the Ingcool 7 inch Touchscreen is fully compatible with Raspberry Pi. Simply connect the HDMI and USB cables, and configure the resolution as needed.
Q: Does the display support multi-touch?
A: Yes, the touchscreen supports 5-point multi-touch functionality.
Q: Can I power the display using only the USB connection?
A: Yes, the display can be powered via USB, but ensure the power source provides sufficient current (at least 1A).
Q: Is the display compatible with Arduino?
A: The display is not directly compatible with Arduino UNO due to the lack of an HDMI interface. However, you can use an HDMI shield or a Raspberry Pi as an intermediary.
Q: How do I calibrate the touchscreen?
A: On a Raspberry Pi, you can use the xinput-calibrator tool to calibrate the touchscreen. Install it using sudo apt-get install xinput-calibrator.
This concludes the documentation for the Ingcool 7 inch Touchscreen. For further assistance, refer to the manufacturer's user manual or contact support.