How to Use LCD 5110: Examples, Pinouts, and Specs
Introduction
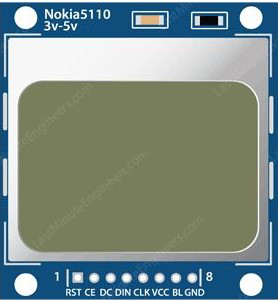
The LCD 5110, manufactured by Nokia, is a compact graphical LCD display module originally designed for Nokia 5110 mobile phones. It is widely used in embedded systems for displaying text, numbers, and simple graphics. The module operates at 3.3V or 5V, making it compatible with a variety of microcontrollers, including Arduino and Raspberry Pi. Its low power consumption and ease of use make it an excellent choice for hobbyists and professionals alike.
Explore Projects Built with LCD 5110


Explore Projects Built with LCD 5110
Common Applications
- Displaying sensor data in IoT projects
- Creating user interfaces for embedded systems
- Visualizing simple graphics or animations
- Educational projects and prototyping
Technical Specifications
Below are the key technical details of the LCD 5110 module:
| Parameter | Value |
|---|---|
| Operating Voltage | 3.3V (preferred) or 5V |
| Backlight Voltage | 3.3V |
| Current Consumption | ~6mA (with backlight) |
| Display Resolution | 84 x 48 pixels |
| Communication Protocol | SPI (Serial Peripheral Interface) |
| Dimensions | 43.6mm x 43.1mm x 5.8mm |
Pin Configuration
The LCD 5110 module has 8 pins. Below is the pinout and description:
| Pin | Name | Description |
|---|---|---|
| 1 | RST | Reset pin. Resets the display when pulled LOW. |
| 2 | CE | Chip Enable. Active LOW signal to enable communication with the display. |
| 3 | DC | Data/Command. HIGH for data, LOW for command. |
| 4 | DIN | Data Input. Serial data input for SPI communication. |
| 5 | CLK | Clock. Serial clock input for SPI communication. |
| 6 | VCC | Power supply. Connect to 3.3V or 5V. |
| 7 | BL | Backlight. Connect to 3.3V for backlight illumination. |
| 8 | GND | Ground. Connect to the ground of the power supply. |
Usage Instructions
Connecting the LCD 5110 to an Arduino UNO
To use the LCD 5110 with an Arduino UNO, follow these steps:
Wiring: Connect the pins of the LCD 5110 to the Arduino as shown below:
LCD Pin Arduino Pin RST Pin 8 CE Pin 9 DC Pin 10 DIN Pin 11 (MOSI) CLK Pin 13 (SCK) VCC 3.3V or 5V BL 3.3V GND GND Install Libraries: Download and install the
Adafruit_PCD8544library from the Arduino Library Manager. This library simplifies communication with the LCD 5110.Upload Code: Use the following example code to display text on the LCD:
#include <Adafruit_GFX.h>       // Core graphics library
#include <Adafruit_PCD8544.h>   // Library for LCD 5110

// Define pins for the LCD
#define RST_PIN 8
#define CE_PIN 9
#define DC_PIN 10
#define DIN_PIN 11
#define CLK_PIN 13

// Initialize the LCD object
Adafruit_PCD8544 display = Adafruit_PCD8544(CLK_PIN, DIN_PIN, DC_PIN, CE_PIN, RST_PIN);

void setup() {
  // Initialize the display
  display.begin();
  display.setContrast(50);  // Adjust contrast (0-100)
  display.clearDisplay();   // Clear the display buffer

  // Display text
  display.setTextSize(1);   // Set text size (1 = small, 2 = large)
  display.setTextColor(BLACK); // Set text color
  display.setCursor(0, 0);  // Set cursor position
  display.println("Hello, World!");
  display.display();        // Update the display with the buffer
}

void loop() {
  // Nothing to do here
}
Important Considerations
- Voltage Levels: While the LCD 5110 can operate at 5V, it is recommended to use 3.3V to avoid long-term damage.
- Backlight Control: The backlight pin (BL) can be connected to a PWM pin on the microcontroller for brightness control.
- Contrast Adjustment: Use the
setContrast()function to adjust the display contrast for optimal visibility.
Troubleshooting and FAQs
Common Issues
Blank Screen:
- Ensure all connections are secure and correct.
- Verify that the
VCCandGNDpins are properly connected. - Check the contrast setting in the code.
Flickering or Unstable Display:
- Ensure the power supply is stable and sufficient.
- Use shorter wires to reduce noise in SPI communication.
No Response from the Display:
- Confirm that the
RSTpin is properly connected and initialized in the code. - Verify that the correct pins are defined in the code for SPI communication.
- Confirm that the
FAQs
Q: Can I use the LCD 5110 with a 5V microcontroller?
A: Yes, the LCD 5110 can operate at 5V, but it is recommended to use a level shifter or resistor divider for the data lines to avoid potential damage.
Q: How do I display graphics on the LCD?
A: The Adafruit_GFX library provides functions like drawPixel(), drawLine(), and drawBitmap() for creating graphics. Refer to the library documentation for examples.
Q: Can I control the backlight brightness?
A: Yes, connect the BL pin to a PWM-capable pin on your microcontroller and use analogWrite() to adjust brightness.
By following this documentation, you can effectively integrate the LCD 5110 into your projects and troubleshoot common issues with ease.