Cirkit Designer Logo
Cirkit Designer
Your all-in-one circuit design IDE
Home / 
Component Documentation

How to Use Connection Node 1pin: Examples, Pinouts, and Specs

Image of Connection Node 1pin
Cirkit Designer LogoDesign with Connection Node 1pin in Cirkit Designer

Introduction

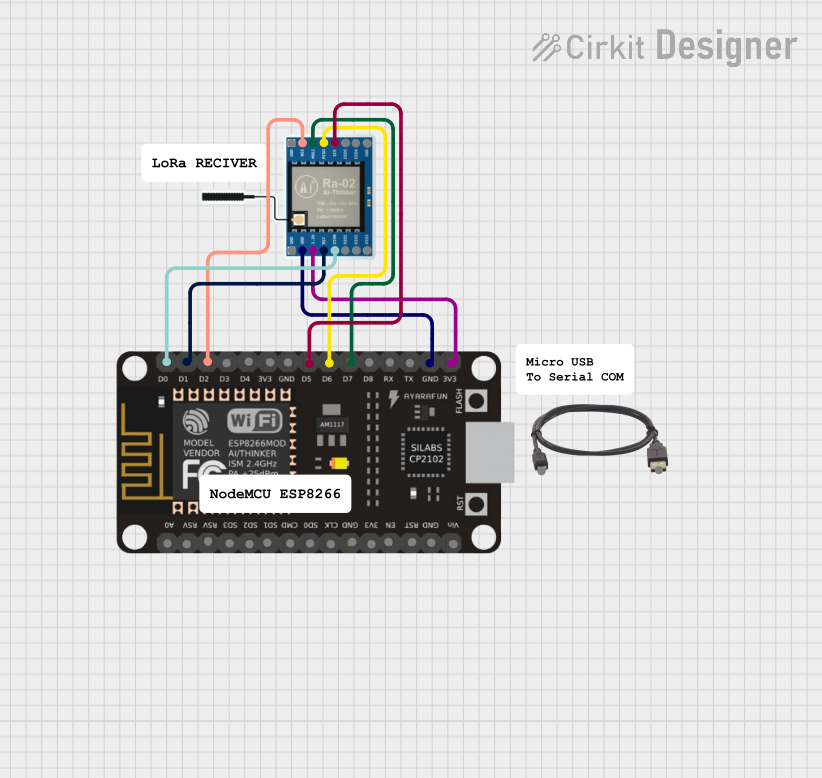
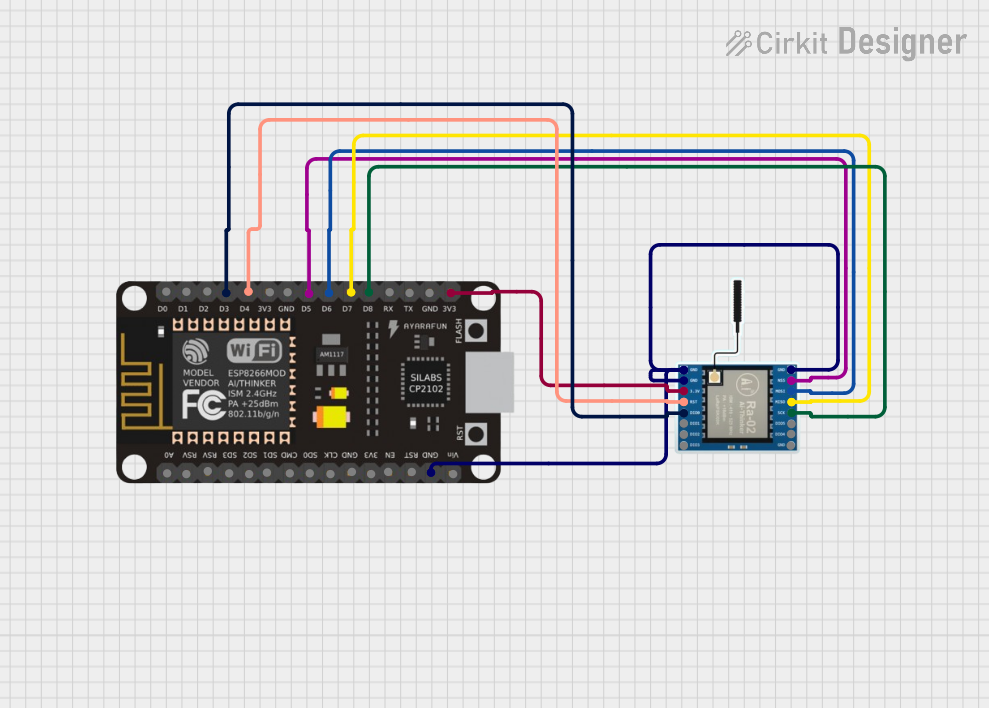
The Connection Node 1pin is a versatile electronic component designed to establish a single-point electrical connection in a circuit. It is commonly used in modular designs, prototyping, and applications where a simple, reliable connection is required. This component is ideal for connecting wires, modules, or other circuit elements in a compact and efficient manner.

Explore Projects Built with Connection Node 1pin

Use Cirkit Designer to design, explore, and prototype these projects online. Some projects support real-time simulation. Click "Open Project" to start designing instantly!
4-Pin Connector Circuit for Edge Detection
Image of 4pin: A project utilizing Connection Node 1pin in a practical application
This circuit appears to be a simple interconnection of pins and points, with a 4-pin component serving as a central hub. The red and black pins of the 4-pin component are connected to various other pins and edge components, forming a basic network of connections without any active components or microcontroller logic.
Cirkit Designer LogoOpen Project in Cirkit Designer
5-Pin Connector Synchronization Circuit
Image of UMB_Cable: A project utilizing Connection Node 1pin in a practical application
This circuit consists of four 5-pin connectors, where two of the connectors are fully interconnected pin-to-pin. The purpose of this setup could be to create a parallel connection between the two 5-pin connectors, possibly for signal distribution or redundancy.
Cirkit Designer LogoOpen Project in Cirkit Designer
ESP8266 NodeMCU with LoRa SX1278 Connectivity
Image of LoRa Reciver: A project utilizing Connection Node 1pin in a practical application
This circuit connects an ESP8266 NodeMCU microcontroller to a LoRa Ra-02 SX1278 module for long-range wireless communication. The ESP8266's GPIO pins are configured to interface with the LoRa module's SPI and control pins, enabling the microcontroller to send and receive data over the LoRa network. The circuit is powered through the ESP8266's 3.3V pin, which also supplies power to the LoRa module, and both devices share a common ground.
Cirkit Designer LogoOpen Project in Cirkit Designer
ESP8266 NodeMCU with LoRa SX1278 Communication Module
Image of node circuit: A project utilizing Connection Node 1pin in a practical application
This circuit connects an ESP8266 NodeMCU microcontroller to a LoRa Ra-02 SX1278 module for wireless communication. The ESP8266's digital pins D3 to D8 are interfaced with the LoRa module's DI00, RST, NSS, MOSI, MISO, and SCK pins respectively, enabling SPI communication between the devices. Power and ground connections are also established, with the 3V3 pin of the ESP8266 supplying power to the 3.3V pin of the LoRa module, and ground pins connected together.
Cirkit Designer LogoOpen Project in Cirkit Designer

Explore Projects Built with Connection Node 1pin

Use Cirkit Designer to design, explore, and prototype these projects online. Some projects support real-time simulation. Click "Open Project" to start designing instantly!
Image of 4pin: A project utilizing Connection Node 1pin in a practical application
4-Pin Connector Circuit for Edge Detection
This circuit appears to be a simple interconnection of pins and points, with a 4-pin component serving as a central hub. The red and black pins of the 4-pin component are connected to various other pins and edge components, forming a basic network of connections without any active components or microcontroller logic.
Cirkit Designer LogoOpen Project in Cirkit Designer
Image of UMB_Cable: A project utilizing Connection Node 1pin in a practical application
5-Pin Connector Synchronization Circuit
This circuit consists of four 5-pin connectors, where two of the connectors are fully interconnected pin-to-pin. The purpose of this setup could be to create a parallel connection between the two 5-pin connectors, possibly for signal distribution or redundancy.
Cirkit Designer LogoOpen Project in Cirkit Designer
Image of LoRa Reciver: A project utilizing Connection Node 1pin in a practical application
ESP8266 NodeMCU with LoRa SX1278 Connectivity
This circuit connects an ESP8266 NodeMCU microcontroller to a LoRa Ra-02 SX1278 module for long-range wireless communication. The ESP8266's GPIO pins are configured to interface with the LoRa module's SPI and control pins, enabling the microcontroller to send and receive data over the LoRa network. The circuit is powered through the ESP8266's 3.3V pin, which also supplies power to the LoRa module, and both devices share a common ground.
Cirkit Designer LogoOpen Project in Cirkit Designer
Image of node circuit: A project utilizing Connection Node 1pin in a practical application
ESP8266 NodeMCU with LoRa SX1278 Communication Module
This circuit connects an ESP8266 NodeMCU microcontroller to a LoRa Ra-02 SX1278 module for wireless communication. The ESP8266's digital pins D3 to D8 are interfaced with the LoRa module's DI00, RST, NSS, MOSI, MISO, and SCK pins respectively, enabling SPI communication between the devices. Power and ground connections are also established, with the 3V3 pin of the ESP8266 supplying power to the 3.3V pin of the LoRa module, and ground pins connected together.
Cirkit Designer LogoOpen Project in Cirkit Designer

Common Applications and Use Cases

  • Prototyping and breadboarding circuits
  • Modular electronic designs
  • Connecting sensors, actuators, or other components
  • Extending or branching electrical connections
  • Educational and DIY electronics projects

Technical Specifications

The Connection Node 1pin is a simple yet essential component. Below are its key technical details:

Parameter Value
Number of Pins 1
Voltage Rating Up to 50V DC
Current Rating Up to 3A
Material Copper alloy (plated)
Insulation None (bare connection point)
Mounting Type Through-hole or solderable
Dimensions 2mm diameter (typical)

Pin Configuration and Description

The Connection Node 1pin has a single pin for electrical connection. Below is the pin description:

Pin Number Description
1 Electrical connection point (input/output)

Usage Instructions

How to Use the Connection Node 1pin in a Circuit

  1. Mounting the Component:

    • If using a breadboard, insert the pin into the desired hole.
    • For permanent circuits, solder the pin to a PCB or wire.
  2. Connecting Wires or Components:

    • Attach a wire or component lead to the pin.
    • Ensure a secure connection by soldering or using a connector if necessary.
  3. Testing the Connection:

    • Use a multimeter to verify continuity between the connected elements.

Important Considerations and Best Practices

  • Avoid Overloading: Ensure the voltage and current do not exceed the specified ratings (50V DC, 3A).
  • Prevent Short Circuits: Since the pin is uninsulated, avoid accidental contact with other conductive elements.
  • Secure Connections: For reliable performance, solder the pin or use a connector to prevent loose connections.
  • Use Heat Shrink Tubing: If insulation is required, cover the connection with heat shrink tubing or electrical tape.

Example: Connecting to an Arduino UNO

The Connection Node 1pin can be used to connect a sensor or module to an Arduino UNO. Below is an example of connecting a single-pin sensor to an Arduino's analog input:

// Example: Reading a sensor value connected via Connection Node 1pin
// Connect the sensor's output to Arduino A0 using the Connection Node 1pin

const int sensorPin = A0;  // Define the analog pin connected to the sensor
int sensorValue = 0;       // Variable to store the sensor reading

void setup() {
  Serial.begin(9600);  // Initialize serial communication for debugging
}

void loop() {
  sensorValue = analogRead(sensorPin);  // Read the sensor value
  Serial.print("Sensor Value: ");       // Print the sensor value to the serial monitor
  Serial.println(sensorValue);
  delay(500);  // Wait for 500ms before the next reading
}

Troubleshooting and FAQs

Common Issues Users Might Face

  1. Loose Connections:

    • Problem: The wire or component lead is not securely attached to the pin.
    • Solution: Solder the connection or use a connector to ensure a firm attachment.
  2. Short Circuits:

    • Problem: The uninsulated pin comes into contact with other conductive elements.
    • Solution: Use heat shrink tubing or electrical tape to insulate the connection.
  3. Overheating During Soldering:

    • Problem: Excessive heat damages the pin or surrounding components.
    • Solution: Use a temperature-controlled soldering iron and limit soldering time.
  4. Intermittent Connections:

    • Problem: The connection is unreliable due to poor contact.
    • Solution: Clean the pin and wire ends, and ensure a tight connection.

FAQs

Q1: Can the Connection Node 1pin handle AC voltage?
A1: While it is primarily designed for DC applications, it can handle low-frequency AC voltages within the specified voltage and current ratings.

Q2: Is the pin corrosion-resistant?
A2: The pin is typically plated to resist corrosion, but prolonged exposure to moisture or harsh environments may degrade its performance.

Q3: Can I use this component for high-frequency signals?
A3: Yes, but ensure the connection is secure and free from interference to maintain signal integrity.

Q4: How do I remove the pin from a breadboard?
A4: Gently pull the pin straight out to avoid damaging the breadboard or bending the pin.

This concludes the documentation for the Connection Node 1pin.